The key to preventing bike problems on your first spring rides is completing a thorough pre-season inspection at least one week before you plan to ride, focusing on the five components most affected by winter storage: tires, brake pads, chain lubrication, cable tension, and wheel true. A bike that sat in a cold garage from November to March has likely developed flat spots on tires, dried-out lubricant, and stretched cables that will cause shifting problems, brake squealing, or worse””a mechanical failure ten miles from home. For example, a rider who stored their bike with the tires at 60 PSI may find them at 25 PSI by spring, and those tires have likely developed minor dry rot along the sidewalls that isn’t immediately visible but will cause punctures under load. Beyond the basic inspection, preventing spring ride problems requires understanding that your body and your bike are both coming out of hibernation.
Your cardiovascular fitness has declined, your bike-specific muscles have weakened, and your sense of balance and handling may feel slightly off. This article covers the complete pre-ride inspection process, explains which components deteriorate fastest during storage, walks through brake and drivetrain maintenance, addresses tire and tube concerns specific to spring riding, and provides expert guidance on avoiding the mechanical and physical pitfalls that ruin early-season rides. The stakes are higher than simple inconvenience. Spring roads are covered in debris””sand, gravel, broken glass, and potholes that formed over winter””and a bike with compromised brakes or worn tires faces greater danger than it would in summer. Taking two hours to properly service your bike before the season starts will prevent dozens of hours of trailside repairs and potential medical bills.
Table of Contents
- Why Do Bikes Develop Problems After Winter Storage?
- Essential Spring Bike Inspection: What to Check Before Your First Ride
- Spring Cycling Brake Maintenance: Stopping Power When You Need It Most
- Tire and Tube Preparation for Early Season Road Conditions
- Bolt Checks and Torque Settings: Preventing Dangerous Failures
- Breaking In Your Body: Physical Preparation for Spring Cycling
- How to Prepare
- How to Apply This
- Expert Tips
- Conclusion
- Frequently Asked Questions
Why Do Bikes Develop Problems After Winter Storage?
Bicycles are precision machines with dozens of moving parts, lubricants, and rubber components that degrade even when the bike isn’t being used. During winter storage, temperature fluctuations cause metal components to expand and contract repeatedly, which loosens bolts and stretches cables. A derailleur cable that was perfectly tensioned in October may have stretched enough by April to skip gears under load, particularly when shifting to smaller cogs where cable tension matters most. Lubricants break down through oxidation and evaporation, even in sealed environments. Chain lube that protected your drivetrain during fall rides has now dried into a gummy residue that attracts dirt and accelerates wear.
Grease in wheel hubs, headset bearings, and bottom brackets can harden or separate, creating dry spots that cause premature bearing failure. One cycling mechanic reported that 40 percent of spring tune-ups involve repacking bearings that were perfectly fine six months earlier, simply because the grease migrated away from contact surfaces during storage. Rubber deteriorates fastest of all. Tires, brake pads, handlebar grips, and cable housing all contain plasticizers that slowly evaporate, causing the rubber to harden and crack. This process accelerates in cold, dry environments””exactly the conditions found in most garages during winter. A tire that appears fine visually may have lost significant grip because the rubber compound has hardened, reducing traction on wet spring roads when you need it most.

Essential Spring Bike Inspection: What to Check Before Your First Ride
Begin your inspection with the frame and fork, looking for cracks around weld joints, the head tube, and anywhere the frame experienced stress during the previous season. Aluminum frames can develop fatigue cracks that are invisible to casual observation but will cause catastrophic failure under load. Use a bright flashlight and run your fingers along every weld, feeling for irregularities. Carbon fiber frames require even more scrutiny””tap suspect areas with a coin and listen for changes in tone that indicate delamination. Move to the wheels and tires next. Spin each wheel slowly while watching the gap between the rim and brake pads; any wobble greater than 2mm indicates the wheel needs truing.
Check tire sidewalls for cracking, especially near the bead where the tire meets the rim. Inflate tires to maximum recommended pressure and let them sit overnight””if they lose more than 10 PSI, you likely have a slow leak or porous tube that will strand you mid-ride. However, if your bike has been stored in a climate-controlled environment at stable temperatures, you may find fewer issues than expected. Bikes stored in heated basements or indoor spaces experience less thermal cycling and humidity variation, which means cables stretch less, lubricants last longer, and rubber degrades more slowly. This doesn’t eliminate the need for inspection, but it does mean you’re less likely to find surprises. Conversely, bikes stored outdoors under tarps or in unheated sheds will have dramatically more degradation and may require professional service before they’re safe to ride.
Spring Cycling Brake Maintenance: Stopping Power When You Need It Most
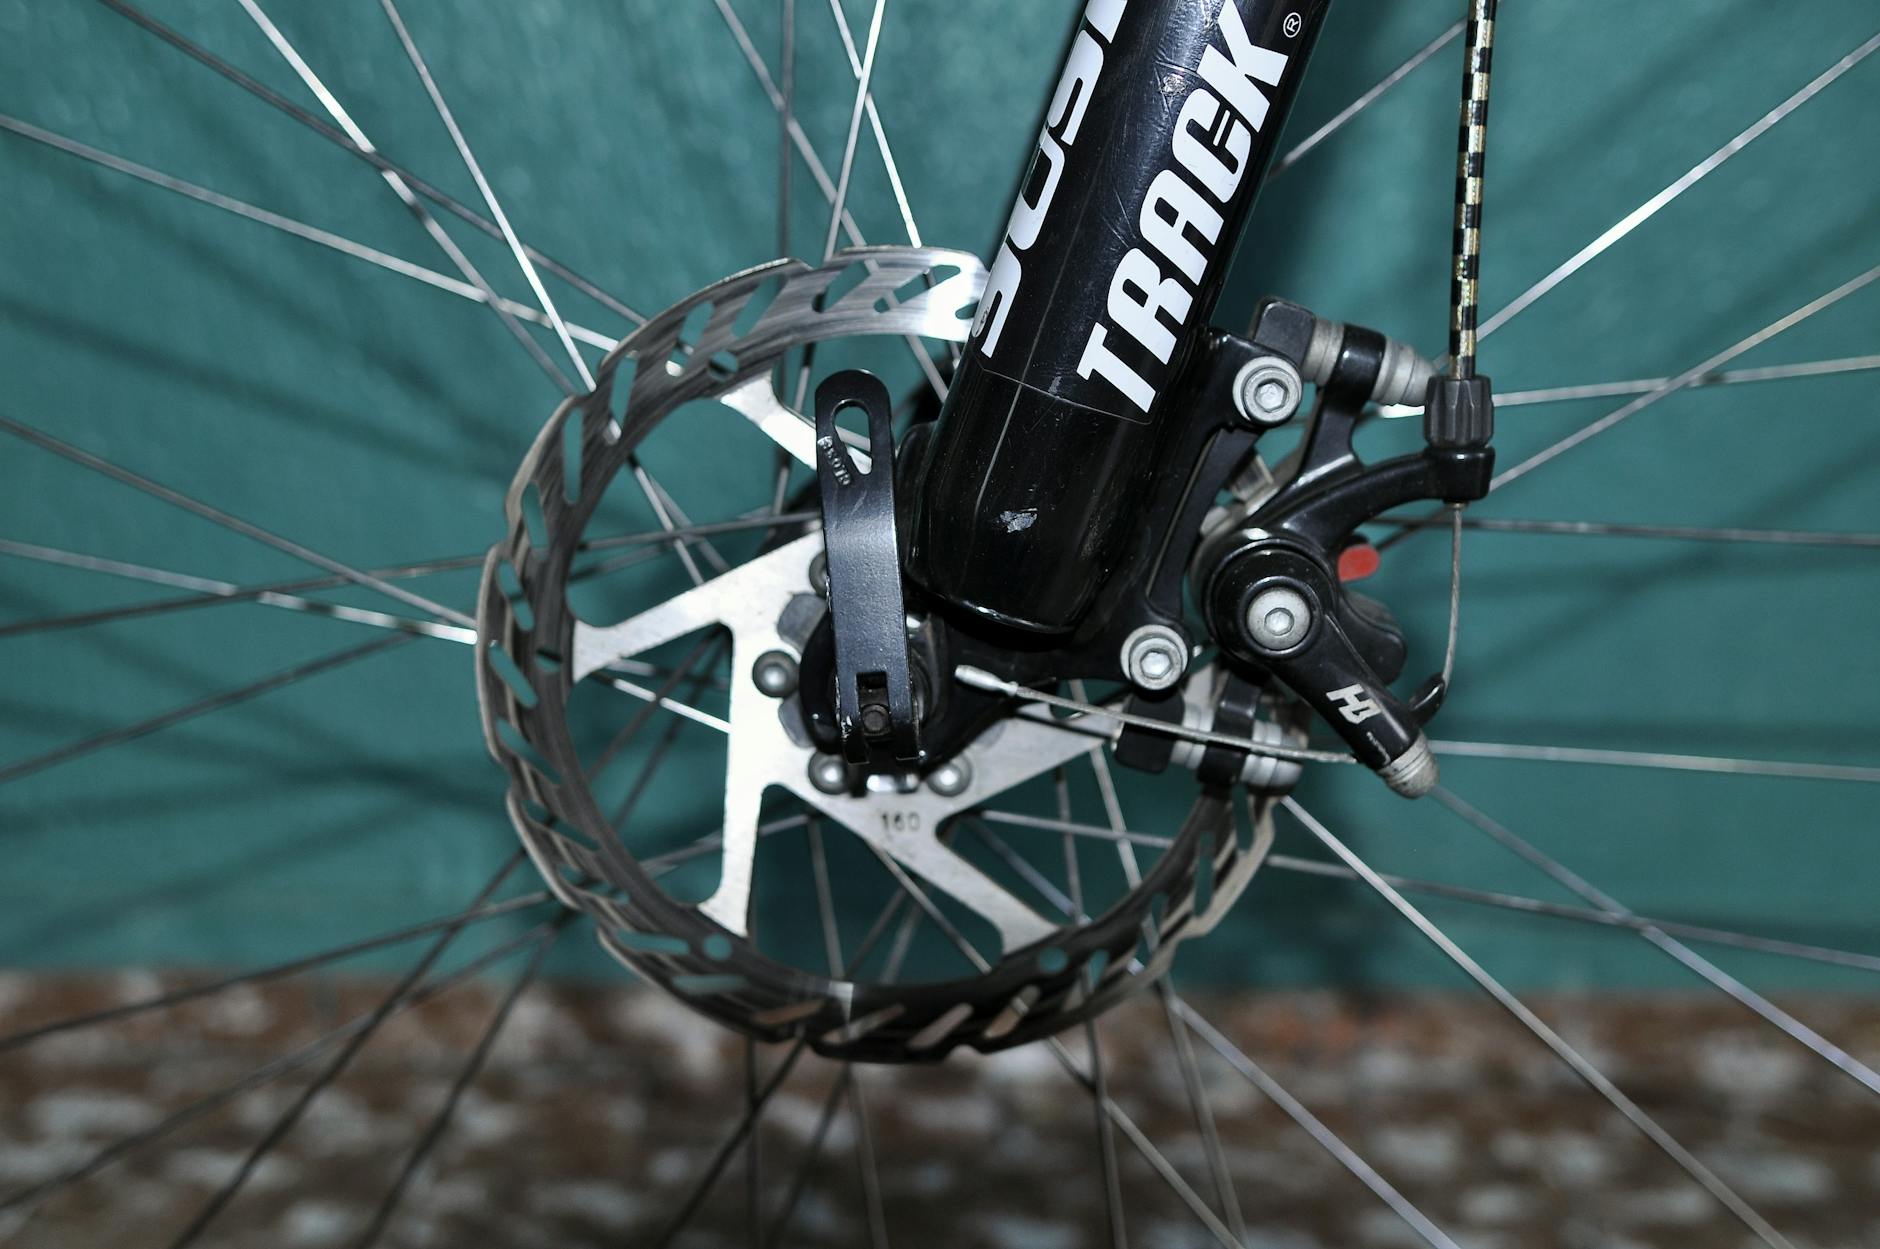
Brakes deserve special attention because spring riding conditions demand more from them than any other season. Cold mornings mean condensation on brake surfaces, reducing friction until the pads warm up. Sand and grit on roads act as abrasive compounds that accelerate pad wear and can score rotors or rims. Potholes appear without warning, requiring sudden stops that test brake performance at the worst possible moment. For rim brakes, remove the pads and inspect them for embedded debris, glazing, and remaining material. Metal flecks from aluminum rims become embedded in brake pads over time and will score your rims if not removed””use a pick or sharp knife to dig them out. Glazed pads have a shiny, hardened surface that reduces braking power; sand them lightly with 100-grit sandpaper to restore texture. Replace any pad worn past the indicator line or showing cracks. Disc brake inspection requires checking both pad thickness and rotor condition. Brake pads should have at least 1.5mm of material remaining; anything less warrants replacement before a long ride. Rotors should be flat and free of deep scoring””minor surface scratches are normal, but grooves you can feel with a fingernail indicate the rotor needs replacement.
One common spring mistake is contaminating disc rotors with spray lubricants intended for the chain; even a small amount of oil on a rotor will cause squealing and dramatically reduced stopping power that requires sanding the rotor and replacing the pads to fix. ## How to Maintain Your Drivetrain for Smooth Spring Shifting The drivetrain””your chain, cassette, chainrings, and derailleurs””accumulates the most grime and suffers the most from dried lubricant. Start by degreasing the entire system with a citrus-based cleaner and stiff brush, paying particular attention to the derailleur pulleys and the spaces between cassette cogs. Rinse thoroughly and let everything dry completely before applying fresh lubricant. Chain wear is measured with a chain checker tool that indicates stretch percentage. A chain at 0.5 percent wear should be replaced immediately on 11 or 12-speed drivetrains, which use narrower chains with tighter tolerances. Chains at 0.75 percent wear will have already damaged your cassette, meaning you’ll need to replace both simultaneously or face poor shifting and premature wear on the new chain. For example, a rider who replaces only the chain on a worn cassette typically gets less than 500 miles before the new chain “skips” under power because it no longer meshes properly with the damaged cog teeth. Cable tension affects shifting precision more than any other factor, and cables stretch significantly during storage due to thermal cycling. After lubricating the chain, shift through all gears while pedaling on a stand or with the rear wheel lifted. Hesitation when shifting to larger cogs indicates insufficient cable tension; hesitation shifting to smaller cogs indicates excessive tension. Most modern derailleurs have barrel adjusters that allow fine-tuning without tools””turn counterclockwise to increase tension, clockwise to decrease it, making quarter-turn adjustments until shifts are crisp across the entire range.
Tire and Tube Preparation for Early Season Road Conditions
Spring roads present unique hazards that punish neglected tires. Winter potholes leave sharp edges that slice sidewalls. Sand spread for ice traction embeds in tire treads and slowly works through the casing. Broken glass from winter accidents accumulates at road edges where cyclists typically ride. These conditions demand tires with adequate tread depth, supple casings that haven’t hardened, and proper inflation pressure. Check tread wear by looking for the wear indicators molded into most quality tires””small raised bars in the tread grooves that become flush with the surface when the tire needs replacement.
Tires without wear indicators should be replaced when the center tread becomes noticeably flatter than the shoulders, or when you can see the underlying casing threads through the rubber. For tubeless setups, inspect the sealant by removing the valve core and inserting a thin stick””if the sealant has dried into chunks or clumps, remove the tire, clean out the old sealant, and add fresh fluid. Inflation pressure requires recalibration for spring conditions. Colder air is denser, meaning a tire inflated to 80 PSI in a 50-degree garage will measure closer to 85 PSI when the road surface heats to 70 degrees midday. This might not matter on smooth pavement, but overinflated tires on rough spring roads transmit more vibration, reduce traction, and are more susceptible to pinch flats from pothole impacts. Consider running 5-10 PSI below your summer pressure until roads are swept and repaired, accepting slightly higher rolling resistance in exchange for better compliance and puncture resistance.
Bolt Checks and Torque Settings: Preventing Dangerous Failures
Every bolted connection on a bicycle can loosen over time, and winter storage accelerates this process through thermal expansion and contraction. The most dangerous loosening occurs at stem bolts, handlebar clamp bolts, and seat post clamps””failures here cause immediate loss of control. Before your first ride, systematically check every bolt on the bike using the appropriate torque wrench setting. Modern lightweight components, particularly carbon fiber handlebars and seat posts, require precise torque values. A carbon handlebar clamped to 6 Nm when the specification calls for 5 Nm may develop stress fractures that cause sudden failure weeks or months later. Conversely, under-torqued bolts allow components to slip or rotate, which is merely inconvenient on a seat post but potentially fatal on a stem or brake caliper.
Invest in a quality torque wrench with a range of 2-10 Nm and use it religiously. Pay particular attention to quick-release skewers or thru-axles on wheels. These components must be tight enough to prevent wheel movement in the dropouts but not so tight that they damage the frame. For quick releases, the lever should begin to feel resistance when it’s parallel to the ground and require firm palm pressure to close fully. Thru-axles should be tightened to the manufacturer’s specification, typically 12-15 Nm for rear axles and 6-10 Nm for front. A wheel that shifts in the dropout during braking or hard pedaling can cause loss of control, brake rub, or in worst cases, complete wheel ejection.

Breaking In Your Body: Physical Preparation for Spring Cycling
Your fitness has declined over winter even if you maintained an indoor training routine, because outdoor cycling demands different muscle groups and balance skills than stationary trainers provide. The first spring rides should be significantly shorter and easier than your typical summer outings, building duration and intensity gradually over four to six weeks. A reasonable progression starts at 60 percent of your typical summer ride distance at a conversational pace. Increase by no more than 10 percent weekly, and include at least two rest days between rides during the first two weeks. For example, a cyclist who regularly rode 50 miles in summer should limit the first spring ride to 25-30 miles, keeping heart rate in zone 2, and should expect significant muscle soreness the following day regardless.
Pushing harder than this invites overuse injuries, particularly to knees and IT bands that haven’t adapted to the cycling motion. Saddle soreness affects nearly every cyclist returning after a break. Skin that was calloused and adapted to saddle pressure in autumn has softened over winter. Initial rides will cause discomfort that ranges from annoying to debilitating, depending on saddle fit, chamois quality, and ride duration. Limit the first few rides to 45-60 minutes regardless of fitness level, allowing skin adaptation before attempting longer distances.
How to Prepare
- **Clean the entire bike thoroughly.** Remove wheels and degrease the drivetrain, then wash the frame, fork, and wheels with mild soap and water. This cleaning reveals problems hidden by grime and prevents contaminating fresh lubricant with old dirt. Dry everything completely before proceeding.
- **Inspect the frame and fork for damage.** Check every weld, joint, and high-stress area for cracks, corrosion, or paint bubbling that might indicate underlying problems. Flex the fork by pushing down on the handlebars and listen for creaking or clicking that indicates bearing issues.
- **Service the wheels and tires.** True wheels that have any visible wobble, replace worn or cracked tires, and inflate to proper pressure. Check spoke tension by squeezing pairs of spokes””significantly loose spokes need tensioning before the wheel fails.
- **Rebuild the braking system.** Replace worn pads, clean rotors or rims with isopropyl alcohol, and adjust alignment so pads contact surfaces evenly. Test brake lever feel””sponginess in hydraulic brakes indicates air in the lines requiring a bleed.
- **Lubricate and adjust the drivetrain.** Apply fresh chain lube to a clean chain, wipe off excess, and adjust derailleur tension for crisp shifting. Warning: Over-lubricating is as harmful as under-lubricating””excess oil attracts dirt that accelerates wear and makes a mess of your components and clothing.
How to Apply This
- **Complete a parking lot test ride before hitting the road.** Spend 10-15 minutes in an empty lot checking all gears, testing brakes at various speeds, and listening for unusual sounds. Fix any issues before venturing miles from home.
- **Plan routes with bail-out options for the first two weeks.** Choose courses that loop back toward home or have multiple shortcuts, allowing you to cut the ride short if mechanical problems arise or fatigue hits harder than expected.
- **Carry comprehensive repair supplies even on short rides.** Include a spare tube, patch kit, tire levers, multi-tool, mini-pump, and a quick link for your chain. Spring roads cause more flats and mechanicals than any other season.
- **Ride with a partner or share your route for safety.** Early season rides are higher risk due to rusty bike handling skills, unexpected mechanicals, and physical deconditioning. Having someone aware of your route provides a safety net if problems occur.
Expert Tips
- Schedule your bike inspection at least one week before your planned first ride, leaving time to order parts or schedule professional service if you discover problems beyond your skill level to fix.
- Do not ride in temperatures below 45 degrees Fahrenheit on your first spring outings; cold muscles and stiff lubricants increase both injury risk and mechanical failure probability.
- Keep a maintenance log with dates and mileage for tire replacement, chain replacement, and cable changes, making spring inspection a matter of checking against known wear intervals rather than guessing.
- Clean and lube your chain after every wet ride during spring, not just when it looks dirty; spring road spray contains salt residue, sand, and contaminants that accelerate corrosion between links.
- Store a spare derailleur hanger in your saddlebag during spring months, as this easily-bent component fails most often when hitting debris or potholes, and riding home is impossible without it.
Conclusion
Preventing bike problems during your first spring rides comes down to respecting the reality that your bike and body have both changed during winter storage. A systematic inspection covering frame integrity, wheel true, brake function, drivetrain condition, and torque settings will catch the vast majority of mechanical issues before they strand you roadside. Combined with proper physical preparation””gradual mileage increases, attention to saddle adaptation, and realistic expectations about early-season fitness””these steps transform potentially disastrous first rides into enjoyable returns to cycling.
The investment of a few hours in pre-season maintenance pays dividends throughout the year. A properly serviced bike shifts crisply, stops reliably, and rolls efficiently, making every ride more enjoyable. More importantly, catching worn components early prevents the cascade failures that occur when neglected chains damage cassettes or worn brake pads score rotors. Start your season right, and the rest of the year takes care of itself.
Frequently Asked Questions
How long does it typically take to see results?
Results vary depending on individual circumstances, but most people begin to see meaningful progress within 4-8 weeks of consistent effort. Patience and persistence are key factors in achieving lasting outcomes.
Is this approach suitable for beginners?
Yes, this approach works well for beginners when implemented gradually. Starting with the fundamentals and building up over time leads to better long-term results than trying to do everything at once.
What are the most common mistakes to avoid?
The most common mistakes include rushing the process, skipping foundational steps, and failing to track progress. Taking a methodical approach and learning from both successes and setbacks leads to better outcomes.
How can I measure my progress effectively?
Set specific, measurable goals at the outset and track relevant metrics regularly. Keep a journal or log to document your journey, and periodically review your progress against your initial objectives.
When should I seek professional help?
Consider consulting a professional if you encounter persistent challenges, need specialized expertise, or want to accelerate your progress. Professional guidance can provide valuable insights and help you avoid costly mistakes.
What resources do you recommend for further learning?
Look for reputable sources in the field, including industry publications, expert blogs, and educational courses. Joining communities of practitioners can also provide valuable peer support and knowledge sharing.


