The foundation of a trouble-free cycling season starts with a systematic spring inspection covering five critical areas: drivetrain cleaning and lubrication, brake system evaluation, tire condition assessment, bearing checks, and cable inspection. After months of winter storage or riding through harsh conditions, your bicycle accumulates wear that, if left unaddressed, transforms minor issues into ride-ending failures or expensive repairs. A cyclist who skips spring maintenance might discover mid-ride that their chain has stretched beyond safe limits, causing the cassette to skip under load during a climb””a problem that could have been prevented with a fifteen-minute inspection and a twenty-dollar chain replacement. This comprehensive approach matters because bicycle components deteriorate in interconnected ways.
A neglected chain doesn’t just wear itself out; it accelerates cassette and chainring wear, potentially tripling your eventual repair costs. Similarly, brake pads that appear functional may have hardened over winter, reducing stopping power precisely when spring’s wet roads demand the most from your braking system. The maintenance tasks outlined here require basic tools most cyclists already own, though knowing when a problem exceeds home-mechanic capabilities saves both money and frustration. This article walks through each maintenance area in detail, explaining not just what to check but why each inspection matters and what warning signs indicate professional attention is needed. Whether you’re preparing a road bike that spent winter on a trainer, a commuter that saw daily use through snow and salt, or a mountain bike emerging from garage hibernation, these procedures apply universally with only minor variations.
Table of Contents
- What Spring Maintenance Tasks Prevent Cycling Season Problems?
- Deep Cleaning Your Drivetrain After Winter Storage or Riding
- Brake System Inspection and Pad Replacement Timing
- Tire Inspection and When to Replace for Spring Riding
- Cable and Housing Problems That Cause Spring Shifting Issues
- Bearing Assessment for Headset, Hubs, and Bottom Bracket
- How to Prepare
- How to Apply This
- Expert Tips
- Conclusion
- Frequently Asked Questions
What Spring Maintenance Tasks Prevent Cycling Season Problems?
The maintenance tasks that prevent mid-season breakdowns fall into two categories: wear items that need replacement on a schedule and systems that require periodic adjustment. Wear items include chains, brake pads, tires, and cables””components designed to sacrifice themselves protecting more expensive parts. A chain, for example, stretches as its internal pins and rollers wear against each other. Once stretch exceeds 0.5 percent on a chain checker tool, the chain begins damaging cassette teeth. Replace it at 0.5 percent stretch and your cassette lasts through three or four chains; wait until 0.75 percent and you’ll likely need a new cassette with every chain. Adjustment-based maintenance addresses the reality that cables stretch, bearings develop play, and fasteners loosen through vibration. Headset bearings commonly develop a subtle looseness over winter that manifests as a clunk when braking””easily fixed with a five-minute adjustment but potentially dangerous if ignored.
Wheel hub bearings similarly require periodic attention; cup-and-cone hubs need annual adjustment and fresh grease, while sealed cartridge bearings typically last two to three seasons before requiring replacement. The distinction matters because over-tightening cup-and-cone bearings causes rapid wear, while cartridge bearings either work properly or need replacement with no adjustment possible. Comparing these maintenance approaches reveals an important principle: scheduled replacement of wear items costs less than reactive repair. A chain costs fifteen to forty dollars depending on quality level. A cassette costs forty to two hundred dollars. Chainrings cost thirty to eighty dollars each. The cyclist who replaces chains proactively spends roughly sixty dollars annually on chains. The cyclist who waits until shifting deteriorates often spends two hundred dollars or more replacing the entire drivetrain simultaneously.
Deep Cleaning Your Drivetrain After Winter Storage or Riding
Drivetrain cleaning deserves its own section because winter conditions””whether riding through them or storing a bike after fall rides””create unique contamination challenges. Road salt accelerates corrosion on steel components like chains and cable housing. Trainer use concentrates sweat on the drivetrain, and sweat’s salt content rivals ocean water for corrosiveness. Even clean indoor storage allows old lubricant to congeal, attracting dust that creates a grinding paste when riding resumes. Effective drivetrain cleaning requires degreaser, brushes, and patience rather than expensive specialized tools. Remove the rear wheel and run the chain through a rag while backpedaling to remove surface contamination.
Apply degreaser to the chain, chainrings, and derailleur pulleys, then scrub with a stiff brush to reach between chain plates and into cassette cogs. Rinse thoroughly””degreaser residue prevents new lubricant from adhering properly. However, if your frame has internal cable routing that passes near the bottom bracket, avoid pressure washing or excessive water application in that area, as trapped moisture accelerates cable corrosion inside the frame. The limitation worth noting: cleaning cannot restore a worn chain. Contamination accelerates wear, but the wear itself is permanent metal loss. A chain that measured 0.4 percent stretch in fall will measure the same or worse after spring cleaning. Cleaning removes the grinding paste preventing accurate measurement, but if post-cleaning measurement shows excessive stretch, replacement remains necessary regardless of how clean and shiny the chain looks.
Brake System Inspection and Pad Replacement Timing
Brake system reliability directly affects rider safety, making spring inspection non-negotiable. Rim brake pads require checking for wear indicators””most quality pads include grooves that disappear as material wears away. However, wear depth tells only part of the story. Pads that sat unused through winter often harden, reducing friction coefficient even when adequate material remains. The test is simple: squeeze the brake lever hard and note whether the pad feels grabby and confident or smooth and weak. Hardened pads benefit from light sanding with medium-grit sandpaper to expose fresh material, though severely hardened pads warrant replacement. Disc brake inspection follows different criteria. Pad material should measure at least 1.5 millimeters thick; most new pads start around 3 millimeters.
More importantly, check rotor condition. Rotors have minimum thickness stamped on them, typically 1.5 to 1.8 millimeters depending on manufacturer. A rotor worn below minimum thickness risks sudden failure””the braking surface becomes too thin to dissipate heat, warps dramatically, and can crack. Digital calipers provide accurate measurement; if you lack calipers, a rotor showing visible wear lips at the edges or noticeable dishing needs professional measurement or precautionary replacement. Hydraulic brake systems require checking fluid level and condition. Mineral oil systems (Shimano, Magura, and others) should show fluid visible in the reservoir when the lever is level. DOT fluid systems (SRAM, Hayes, and others) similarly need adequate fluid level, but DOT fluid additionally degrades from moisture absorption over time. If your DOT-based brakes feel spongy despite adequate fluid level and no visible leaks, the fluid has likely absorbed enough atmospheric moisture to require bleeding and replacement””a more involved procedure than simply topping off.
Tire Inspection and When to Replace for Spring Riding
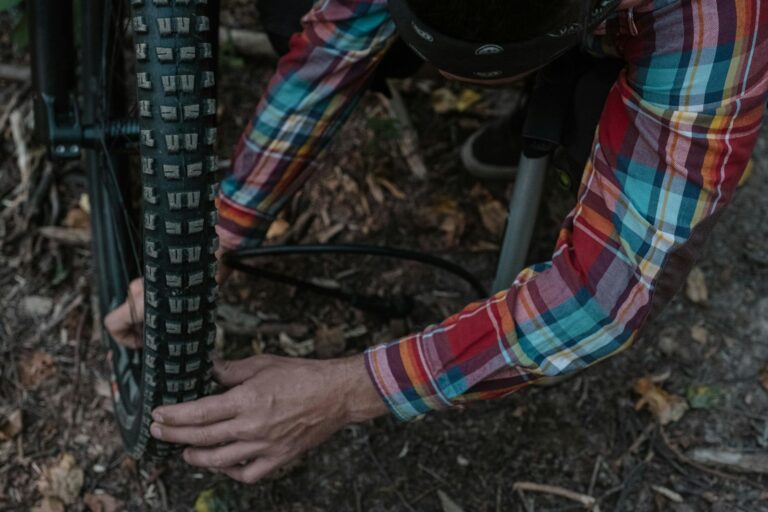
Tire condition assessment requires examining three distinct areas: tread depth, sidewall integrity, and rubber compound condition. Tread depth matters most for wet-weather grip; many road tires include wear indicators””small divots in the tread that disappear when replacement is needed. Mountain bike tires rely on knob height, with significantly worn center knobs indicating replacement time even if side knobs appear adequate. Sidewall inspection reveals damage invisible from a quick glance at tread. Run your fingers along each sidewall feeling for cuts, bulges, or cord exposure.
Small cuts that don’t penetrate to the casing present minimal risk, but any bulge indicates casing damage requiring immediate replacement””the bulge will eventually fail, causing sudden deflation. Winter storage in cold garages accelerates rubber degradation; tires showing fine surface cracking throughout the sidewall have aged beyond safe use regardless of remaining tread depth. The tradeoff between tire types affects spring selection decisions. Fresh supple-casing tires offer superior grip and comfort but puncture more easily and wear faster. Reinforced training or commuting tires sacrifice some ride quality for dramatically improved flat resistance and longevity. For riders planning high spring mileage through debris-strewn roads still being swept from winter, starting the season on puncture-resistant tires and switching to performance rubber once streets clean up represents a practical compromise””assuming you have the budget and storage for multiple tire sets.
Cable and Housing Problems That Cause Spring Shifting Issues
Cables and housing represent the most frequently overlooked maintenance area, yet cause the most common spring complaints: shifting that won’t index properly regardless of derailleur adjustment. The symptom appears as skipping under load, failure to reach the largest or smallest cogs, or sluggish shifts in one direction. Mechanics frequently receive bikes with “broken derailleurs” that actually have perfectly functional derailleurs defeated by seized or frayed cables. The warning signs of cable problems include visible rust at cable ends, kinks in housing, fraying at the shifter exit point, and””most subtly””sluggish return movement when shifting to smaller cogs or chainrings. That return movement relies on spring tension, and corroded or poorly lubricated cables create enough friction to overpower weak springs. The diagnostic test involves disconnecting the cable at the derailleur and checking whether the shifter moves freely through its range.
If the shifter feels sticky with the cable disconnected, the cable or housing (or both) requires replacement. A limitation applies to internally routed frames: cables running through frame tubes frequently corrode from condensation that enters through access ports. This internal corrosion remains invisible during external inspection. If your internally routed bike exhibits shifting problems despite functional derailleurs and proper adjustment, suspect internal cable corrosion even when visible cable sections appear pristine. Some frames allow cable replacement without full housing replacement; others require complete cable-and-housing runs. Check your frame manufacturer’s documentation before ordering parts.

Bearing Assessment for Headset, Hubs, and Bottom Bracket
Bearing condition affects ride quality in ways that develop gradually enough to escape notice until problems become severe. A headset with pitted bearings creates vague steering feel; worn hub bearings produce wheel wobble that mimics spoke tension problems; a rough bottom bracket adds resistance you might attribute to fitness decline rather than mechanical drag. Assessment techniques vary by bearing location. For headsets, lift the front wheel off the ground and turn the handlebar slowly, feeling for notchiness or rough spots in the rotation. Then apply the front brake and rock the bike forward and backward, checking for clunking that indicates loose headset adjustment.
Hub bearings require grabbing the tire at the top and wiggling laterally while watching the hub””any visible movement between axle and hub shell indicates play requiring adjustment or bearing replacement. Bottom brackets are hardest to assess while installed; remove the chain and spin the cranks by hand, feeling for roughness or lateral play in the spindle. For example, a cyclist noticing their steering feels less precise than they remember might discover headset bearings with visible wear tracks””indexing from always parking with the wheel pointed straight ahead. This indexing creates flat spots that cause the steering to “fall into” the straight-ahead position, requiring conscious effort to hold slight turns. The fix requires either new bearings (for serviceable headsets) or complete headset replacement (for integrated bearing races).
How to Prepare
- **Assemble cleaning supplies**: Degreaser (either bicycle-specific or simple green diluted 4:1), multiple clean rags, chain-cleaning brushes or an old toothbrush, and bucket or spray bottles for degreaser application. Avoid using household cleaners containing ammonia or bleach, which can damage aluminum components and rubber seals.
- **Gather measurement tools**: Chain checker, tire pressure gauge, ruler or calipers for brake pad and rotor measurement, and torque wrench if your bike uses carbon components or manufacturer-specified torque values.
- **Collect lubricants**: Chain lubricant appropriate for your conditions (wet lube for rainy climates, dry lube for arid regions), light oil for cable lubrication, and grease for any bearing service.
- **Prepare common replacement parts**: If your chain measured borderline last season, buy a replacement before it’s needed. Stock brake pads, cables, and housing for your brake type. Having parts on hand converts a discovered problem into a same-day fix rather than a delayed repair awaiting parts delivery.
- **Establish a clean, well-lit workspace**: A repair stand simplifies every task but isn’t essential””flipping the bike onto its handlebars and saddle works for most maintenance, though it complicates wheel truing and headset work.
How to Apply This
- **Begin with cleaning**: Degrease and clean the entire drivetrain before attempting any adjustments or measurements. Contamination prevents accurate chain stretch measurement, hides brake pad wear indicators, and makes cable inspection unreliable. Allow components to dry completely before applying lubricant.
- **Perform measurements and inspections**: With clean components, measure chain stretch, check brake pad thickness, assess tire condition, and test all bearings for play or roughness. Document findings””write down chain stretch percentage, approximate brake pad remaining, and notes about any concerning bearing feel. This documentation helps track wear rates over time.
- **Address discovered issues**: Replace wear items exceeding service limits. Adjust bearings exhibiting play. Replace cables showing corrosion or fraying. Complete all replacements and repairs before final adjustments, as new parts often require different adjustment than worn components.
- **Perform final adjustments and lubrication**: With all replacements completed, adjust front and rear derailleur limit screws and indexing, set brake pad position (rim brakes) or bed in new pads (disc brakes), and apply appropriate lubricant to the chain and cables. Verify all bolts are properly torqued, giving particular attention to stem and handlebar bolts where failure creates crash risk.
Expert Tips
- Replace housing along with cables when corrosion is present””new cables through corroded housing quickly develop the same friction problems, wasting both the cable cost and your labor time.
- Do not apply lubricant to disc brake rotors or pads under any circumstances; even fingerprint oils can contaminate brake surfaces, requiring pad replacement and rotor cleaning with isopropyl alcohol.
- Check quick-release or thru-axle tightness after each reassembly””these critical fasteners loosen more easily than expected, and a loose wheel creates unpredictable handling that can cause crashes.
- Test ride in a safe area before committing to traffic or trails; spring maintenance often reveals secondary issues only apparent under riding conditions, and discovering them in a parking lot beats discovering them on a descent.
- Photograph your derailleur positioning and cable routing before beginning any work; these references prove invaluable when reassembly doesn’t go as expected, especially on complex modern drivetrains with internal cable routing.
Conclusion
Spring maintenance success comes from systematic inspection rather than reactive repair. The cyclist who cleans and measures, replacing wear items before failure and adjusting systems showing early warning signs, enjoys a season of reliable riding. The investment in time””typically two to four hours for comprehensive spring service””prevents the frustration of mid-ride failures and the expense of cascade damage where worn components destroy related parts.
These procedures build mechanical competency that extends beyond spring maintenance. Understanding how your bicycle’s systems work and how wear manifests makes you a better rider, able to identify developing problems during rides and address them before they strand you. Some tasks””wheel truing, suspension service, hydraulic brake bleeding””may exceed comfortable home-mechanic territory, and recognizing those limits matters as much as developing the skills themselves. A professional mechanic consultation for complex problems combined with home maintenance of routine items represents the practical balance most cyclists reach.
Frequently Asked Questions
How long does it typically take to see results?
Results vary depending on individual circumstances, but most people begin to see meaningful progress within 4-8 weeks of consistent effort. Patience and persistence are key factors in achieving lasting outcomes.
Is this approach suitable for beginners?
Yes, this approach works well for beginners when implemented gradually. Starting with the fundamentals and building up over time leads to better long-term results than trying to do everything at once.
What are the most common mistakes to avoid?
The most common mistakes include rushing the process, skipping foundational steps, and failing to track progress. Taking a methodical approach and learning from both successes and setbacks leads to better outcomes.
How can I measure my progress effectively?
Set specific, measurable goals at the outset and track relevant metrics regularly. Keep a journal or log to document your journey, and periodically review your progress against your initial objectives.
When should I seek professional help?
Consider consulting a professional if you encounter persistent challenges, need specialized expertise, or want to accelerate your progress. Professional guidance can provide valuable insights and help you avoid costly mistakes.
What resources do you recommend for further learning?
Look for reputable sources in the field, including industry publications, expert blogs, and educational courses. Joining communities of practitioners can also provide valuable peer support and knowledge sharing.