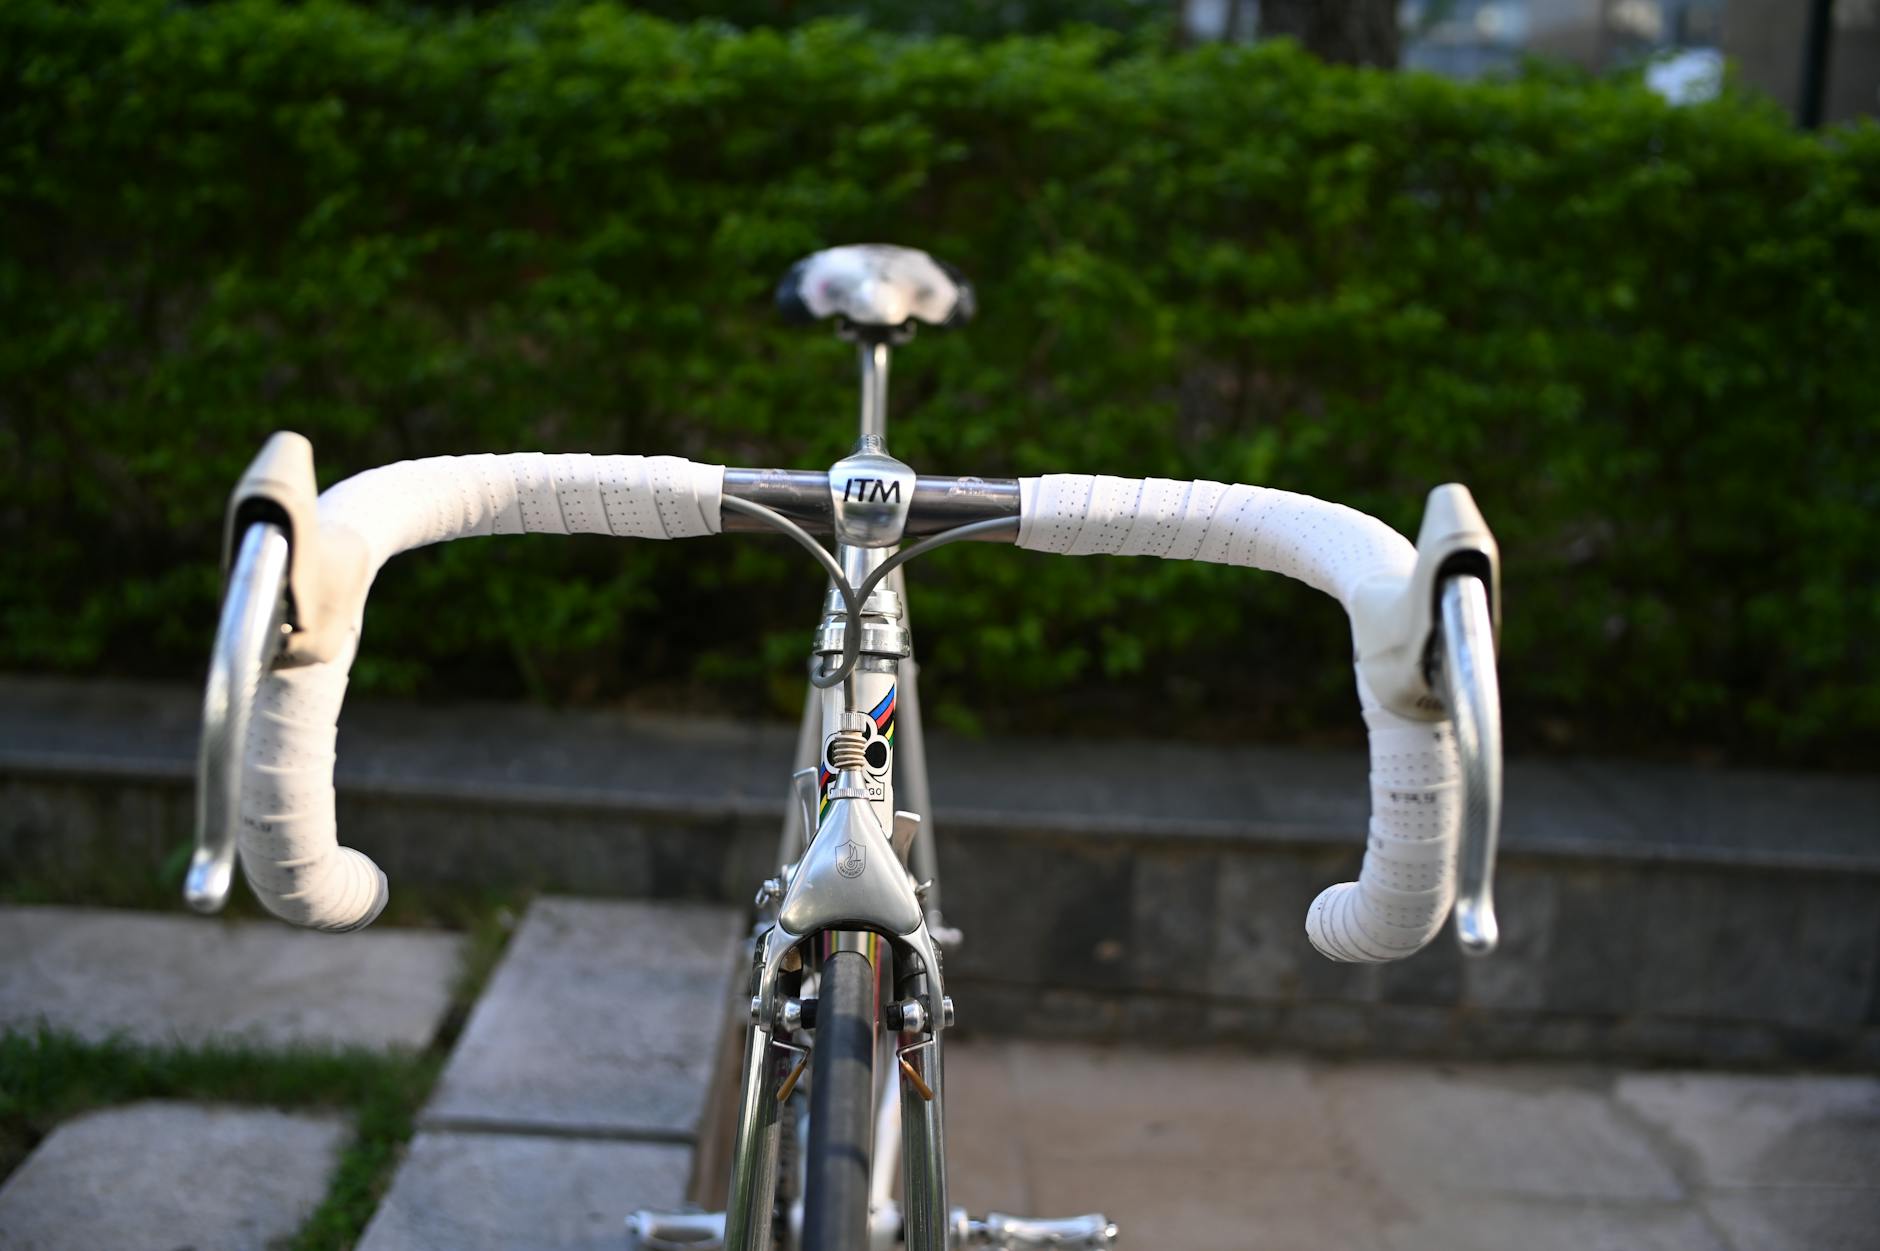
Wrapping handlebar tape like a professional comes down to maintaining consistent tension, overlapping each pass by about one-third of the tape’s width, and pulling the tape at a slight diagonal as you spiral from the bar end toward the stem. That sounds simple enough, but the difference between a clean wrap and one that bunches, slips, or unravels within a few rides is almost entirely in the details — how you anchor the starting end, how you navigate the brake lever clamps, and how you finish at the top. A mechanic at a busy shop might wrap forty bars a week and make it look effortless, but even experienced home wrenders can end up with lumpy spots around the lever hoods if they rush or skip a figure-eight pass.
This article walks through every stage of the process, from choosing the right tape for your riding style to troubleshooting common problems like gaps near the stem or tape that creeps loose on hot days. We will cover the specific technique for wrapping around brake lever brackets, the debate over wrapping direction, and why the finishing details matter more than most people think. Whether you are rewrapping worn tape on a daily commuter or setting up a brand-new road bike, these steps will get you a result that looks and feels like shop-quality work.
Table of Contents
- What Tools and Materials Do You Need to Wrap Bike Handlebar Tape Properly?
- How Should You Prepare Your Handlebars Before Wrapping?
- What Is the Correct Starting Technique at the Bar End?
- How Do You Wrap Around Brake Lever Hoods Without Creating Gaps?
- Why Does Handlebar Tape Come Loose and How Do You Prevent It?
- Does Handlebar Tape Thickness Affect Comfort and Performance?
- When Should You Consider Alternatives to Traditional Handlebar Tape?
- Conclusion
- Frequently Asked Questions
What Tools and Materials Do You Need to Wrap Bike Handlebar Tape Properly?
Before you start peeling backing off new tape, gather everything you need so you do not have to stop mid-wrap. You will need the tape itself, the included finishing strips or electrical tape, the bar-end plugs that come with most tape sets, scissors, and optionally a small roll of electrical tape for anchoring. Some mechanics also keep a clean rag and rubbing alcohol nearby to wipe down the bars, especially if old adhesive residue is present. Compared to something like truing a wheel, this job requires almost no specialized tools, which is partly why it is a great entry point for home maintenance. The tape you choose matters more than people expect.
Cork-backed tape offers good cushioning and grip when wet, but it tears more easily if you have to reposition it. Synthetic polymer tapes like Lizard Skins DSP or Supacaz Super Sticky Kush are more forgiving during installation and hold up longer, though they cost roughly twice as much as basic cork. Gel-padded tapes add vibration damping but can feel bulky on bars with already-thick diameters. If you ride long distances on rough pavement, the extra padding is worth the trade-off. For criterium racing or riders who prefer a thin, direct feel, a simple 2mm synthetic tape without gel is usually the better pick.
How Should You Prepare Your Handlebars Before Wrapping?
Strip off the old tape entirely, pulling carefully around the brake lever clamp areas where adhesive tends to bond tightly to the bar surface. Use rubbing alcohol or a citrus-based adhesive remover to clean off any sticky residue. If you leave old adhesive on the bars, the new tape may not sit flat, and you will feel ridges through the wrap. This is also a good time to inspect the bars for cracks, particularly around the stem clamp area and near the lever mounts. Aluminum bars with visible cracks should be replaced, not re-taped.
Check that your brake levers are positioned where you want them before wrapping. Once the tape is on, adjusting lever height or angle means unwrapping at least partially and often ruining the tape. Most riders set their lever hoods so the top of the hood is roughly level with the top of the bar, but comfort varies — some prefer them a few millimeters higher or lower. However, if you are switching from a shallow-drop bar to a deep-drop bar, your old lever position may not translate directly, so take a short test ride with the levers loosely positioned before committing to the wrap. The short adhesive strips that come with most tape sets should be placed over the back side of the lever clamp band now, covering the metal so it does not create a hard spot you can feel through the tape.
What Is the Correct Starting Technique at the Bar End?
Start at the bar end, not the stem. Pull out about three centimeters of tape past the end of the bar so the bar-end plug can tuck it in and hold it secure. If you are using tape with an adhesive backing, peel just the first fifteen centimeters or so rather than stripping the entire backing at once — this prevents the tape from sticking to itself if you fumble. Angle the first wrap so the tape overlaps the bar end at roughly a forty-five-degree angle, then begin spiraling upward. The direction of the wrap matters and is not arbitrary. On the right side of the bar, wrap counterclockwise when viewed from the bar end. On the left side, wrap clockwise.
The reason is biomechanical: when you grip the drops and apply force, your hands naturally twist the tape in one direction. Wrapping the correct way means your grip tightens the tape rather than peeling it loose. A mechanic at a Trek dealer once told me he sees more tape failures from reversed wrap direction than from any other cause, because the tape slowly walks out of position over hundreds of kilometers. If you wrap both sides the same direction, one side will always be fighting your grip. The first three or four passes set the tone for the entire wrap. Maintain firm, consistent tension — not so tight that the tape stretches thin and tears, but tight enough that there is no slack. Each pass should overlap the previous one by roughly a third of the tape width. This overlap is what creates a smooth, even surface without gaps or bulges.

How Do You Wrap Around Brake Lever Hoods Without Creating Gaps?
The lever clamp area is where most wraps go wrong. As you approach the brake lever from below, the tape has to navigate around an irregular shape, and if you just spiral straight through, you will get a gap on the inside of the curve behind the lever body. The professional technique is a figure-eight pass: bring the tape up from below, cross over the top of the lever clamp on the inside, loop behind the lever body, come back underneath, and then resume your normal spiral upward. This fills the gap area with a double layer of tape and creates a smooth transition. There is a trade-off here between neatness and padding.
The figure-eight method adds bulk around the lever, which some riders find uncomfortable if they spend a lot of time with their hands on the hoods. If you prefer a thinner feel, you can instead use the small adhesive-backed patches that come with many tape sets to cover the gap area, then wrap the tape in a slightly wider spiral past the lever without doing a full figure-eight. The result is less padding but also less buildup. Professional race mechanics almost always use the figure-eight because it creates a more secure wrap that will not shift during aggressive riding, but for casual riding, the patch method works fine and looks cleaner if you do not have the figure-eight technique dialed in yet. After you pass the lever, resume wrapping with the same tension and overlap you used on the lower section. A common mistake is to change the overlap ratio after the lever, resulting in a visibly different tape spacing between the drops and the tops of the bars.
Why Does Handlebar Tape Come Loose and How Do You Prevent It?
Tape that unravels or shifts usually fails for one of three reasons: insufficient tension during wrapping, poor finishing at the stem end, or using tape that has lost its adhesive backing due to age or heat. If you live in a hot climate and store your bike in a garage that reaches forty degrees Celsius in summer, adhesive-backed tape can lose its grip surprisingly fast. Cork tape is particularly vulnerable to heat degradation. In those conditions, adding a small piece of electrical tape every few wraps as a hidden anchor can prevent a cascading unravel. Finishing at the stem end is critical. Cut the tape at an angle so the final edge sits flush rather than leaving a blunt, visible end. Most tape sets include a finishing strip — a short piece of adhesive-backed tape or a rubberized band — that wraps around the final edge.
Apply this tightly. Some riders use black electrical tape instead, which works but can leave adhesive residue on the bar tape over time. A better option for a clean look is Fizik finishing tape or a similar branded finishing strip, which uses a thin, flexible material that conforms to the bar shape without the gummy residue. Whatever you use, make sure the finishing strip overlaps itself by at least a full centimeter so it does not peel up. One limitation worth noting: no amount of perfect wrapping technique will save tape that is simply worn out. If the surface has become slick, compressed, or torn, new tape is the only fix. Most riders should plan on replacing handlebar tape every three to six thousand kilometers, or sooner if it gets soaked repeatedly and starts to smell.
Does Handlebar Tape Thickness Affect Comfort and Performance?
Tape thickness ranges from about 1.8mm for the thinnest options to 3.5mm or more for heavily padded versions. Thicker tape absorbs more road vibration, but it also increases the effective diameter of the bar, which can change how the bike feels in your hands. Riders with smaller hands sometimes find that adding 3mm of tape to an already standard-diameter bar makes the grip uncomfortably large, reducing control in technical situations.
A useful comparison: switching from 2mm tape to 3.5mm tape on a 31.8mm bar adds roughly 3mm to the gripping diameter on each side, which is enough that some riders need to adjust their brake lever reach. For gravel and endurance riding, many professionals double-wrap the bars — putting a base layer of thin tape underneath the outer layer. This adds significant vibration damping without the mushy feel of very thick gel tape. The downside is added weight (roughly 40 to 60 grams) and a noticeably larger bar diameter, so it is not ideal for riders who prioritize a lean, responsive feel.
When Should You Consider Alternatives to Traditional Handlebar Tape?
Silicone grip covers and molded rubber grips designed for drop bars have appeared in the last few years, offering a no-wrap alternative that slides onto the bar and stays put through friction. Products like Redshift Cruise Control grips or Wolf Tooth Fat Paw drop-bar grips eliminate the wrapping process entirely and can last far longer than tape. They work well for commuters and gravel riders who want a thick, cushioned grip, but they lack the customizable feel and aesthetic range of traditional tape.
You also cannot easily adjust them once installed — they are either on or off. For most road cyclists, traditional tape remains the standard because it is light, replaceable, available in dozens of colors and textures, and allows precise control over thickness and feel across different parts of the bar. But if you dread the wrapping process and ride primarily for utility rather than performance, molded grips are a legitimate option that the industry is slowly taking more seriously.
Conclusion
Wrapping handlebar tape well is a skill that rewards patience and attention to detail more than any special talent. The keys are consistent tension, correct wrap direction for each side of the bar, a clean figure-eight pass around the brake levers, and a secure finish at the stem. Preparing the bars properly — cleaning off old adhesive, positioning levers, and applying the clamp cover strips — takes only a few extra minutes but makes a significant difference in the final result.
If your first attempt is not perfect, that is normal. Tape is relatively inexpensive, and rewrapping gives you a chance to practice the technique. After two or three attempts, most riders develop a rhythm that produces professional-looking results in under fifteen minutes per side. Keep a spare roll on hand so that when your current tape wears out or gets damaged, you can rewrap without waiting on a shipment or shop visit.
Frequently Asked Questions
Which direction should I wrap my handlebar tape?
Wrap counterclockwise on the right side and clockwise on the left side, as viewed from the bar end. This ensures your natural grip force tightens the tape rather than loosening it during rides.
How often should I replace handlebar tape?
Most riders should replace tape every 3,000 to 6,000 kilometers, or whenever it becomes slick, torn, or compressed. Riders who frequently ride in rain or sweat heavily may need to replace it more often.
Can I reuse handlebar tape after removing it?
Tape without an adhesive backing can sometimes be carefully reused once, but adhesive-backed tape almost never re-sticks well enough to be reliable. In practice, tape is cheap enough that reusing it is rarely worth the frustration.
Do I need to use the finishing tape that comes in the box?
You need some kind of finishing strip to hold the tape at the stem end. The included strips work fine. Electrical tape is a common substitute but can leave residue. Branded finishing tapes from Fizik or other makers offer the cleanest look.
Is it better to wrap with or without the adhesive backing?
Adhesive backing makes the tape more forgiving for beginners and adds security, but it makes repositioning harder if you make a mistake. Non-adhesive tape requires better tension technique but is easier to adjust mid-wrap.


