To test your bike brakes after winter, start with a visual inspection of the brake pads, rotors or rims, and cables, then perform a static squeeze test before any riding. With the bike stationary, pull each brake lever firmly””it should engage smoothly about halfway to the handlebar and hold firm without spongy resistance or grinding sensations. If the lever pulls all the way to the bar or feels inconsistent, you have a problem that needs addressing before you ride. A quick parking lot test at walking speed will confirm whether your brakes can actually stop the bike under controlled conditions. Consider what happens when you skip this inspection: a cyclist in Minnesota discovered during his first spring ride that road salt and moisture had corroded his cable housing over the winter, causing the rear brake to fail completely on a downhill approach to an intersection.
The cable had seized inside the housing, giving the appearance of working during a casual lever squeeze but providing zero actual stopping power when force was applied. This scenario plays out every spring, often with consequences ranging from minor scares to serious crashes. This article covers the complete brake testing process, from initial visual checks through on-road verification. You will learn how to identify the specific signs of winter damage on both rim and disc brake systems, understand when home adjustments are sufficient versus when professional service is required, and discover the maintenance steps that prevent these problems from recurring. The goal is to get you riding safely without unnecessary shop visits or overlooked hazards.
Table of Contents
- Why Do Bike Brakes Need Testing After Winter Storage?
- Visual Inspection Checklist for Winter-Stored Brake Systems
- Static Testing Methods Before Your First Ride
- Performing Low-Speed Brake Tests Safely
- When to Perform Full-Speed Brake Tests
- Signs That Indicate Professional Service Is Needed
- How to Prepare
- How to Apply This
- Expert Tips
- Conclusion
- Frequently Asked Questions
Why Do Bike Brakes Need Testing After Winter Storage?
Winter creates a hostile environment for brake systems even when bikes are stored indoors. Temperature fluctuations cause condensation to form on metal components, leading to surface rust on steel cables and disc brake rotors. Brake fluid in hydraulic systems can absorb moisture through microscopic pores in the hose material, lowering the boiling point and potentially causing brake fade during hard stops. Brake pads themselves can harden, glaze over, or develop flat spots from sitting in one position against a rotor for months. The problems compound based on storage conditions. A bike kept in an unheated garage experiences more dramatic temperature swings than one stored in a climate-controlled space.
Bikes stored near salt, road chemicals, or in coastal areas face accelerated corrosion. Even high-end stainless steel cables develop internal corrosion where they contact the housing, and this damage is invisible until the brake fails to release properly or requires excessive lever force. Comparing summer storage to winter storage illustrates the difference clearly. A bike left for three months during summer in a dry environment typically needs only a quick check and perhaps some lubrication. The same bike stored through a Midwest winter may need new cables, brake bleeding, pad replacement, and rotor cleaning before it’s roadworthy. Skipping the inspection does not just risk brake failure””it can also cause accelerated wear as contaminated or glazed pads chew through rotors or rims far faster than normal operation would allow.
Visual Inspection Checklist for Winter-Stored Brake Systems
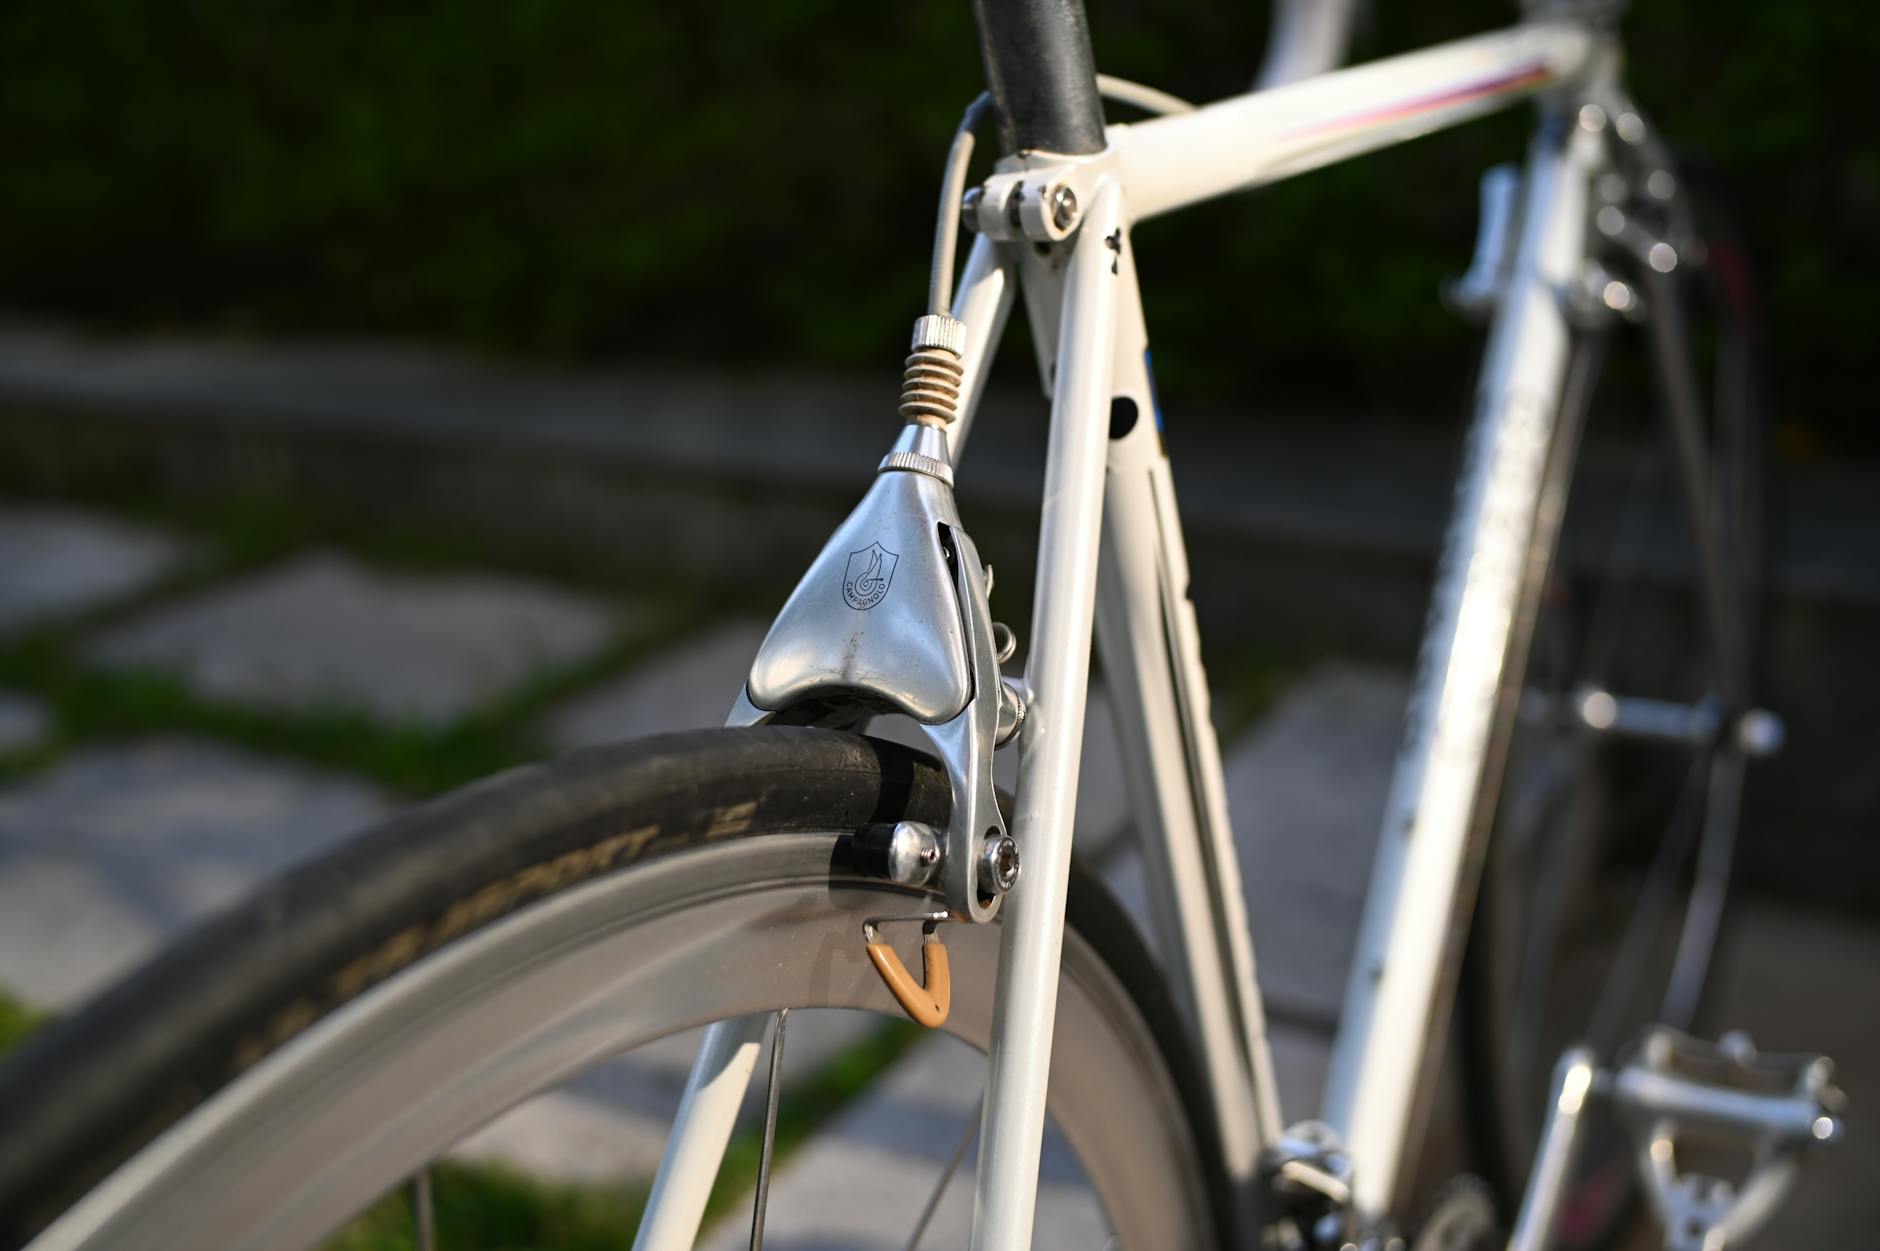
Begin your inspection with the brake pads themselves. For rim brakes, look for the wear indicator grooves molded into the pad surface””if these grooves are no longer visible, the pad needs replacement regardless of winter storage. Check for hardening by pressing a fingernail into the pad surface; fresh rubber should give slightly, while hardened pads feel like plastic. Disc brake pads require removal for proper inspection; look for a minimum of 1.5mm of pad material remaining, and check for contamination that appears as dark, oily spots or a glazed, shiny surface. Cables and housing demand particular attention after winter. Run your fingers along the full length of each cable housing, feeling for kinks, cracks, or bulges. At cable entry and exit points, look for rust-colored residue that indicates internal corrosion.
For hydraulic systems, examine the hose connections at both the lever and caliper for any signs of fluid weeping or crystalline residue. However, if your hydraulic brakes use DOT fluid rather than mineral oil, be aware that DOT fluid is hygroscopic and may have absorbed significant moisture even without visible leaks””this invisible contamination is one reason many mechanics recommend bleeding hydraulic brakes annually regardless of apparent condition. The stopping surface””whether rim or rotor””completes the visual inspection. Disc rotors should be checked for lateral runout by spinning the wheel and watching for wobble; more than 0.5mm of visible movement indicates a warped rotor. Surface contamination shows as discolored patches or a sticky residue that catches when you run a clean paper towel across the rotor. For rim brakes, inspect the braking surface for concavity, which indicates the rim is worn and approaching failure. Some rims have wear indicators; if yours does not, a rim that feels significantly cupped when you run a finger across it is a safety concern that no amount of pad adjustment can address.
Static Testing Methods Before Your First Ride
The lever test reveals more than most cyclists realize. Pull each brake lever slowly and deliberately, paying attention to the point of engagement. Properly adjusted rim brakes should begin engaging when the lever has traveled about one-third of the distance to the handlebar, with full braking achieved by the halfway point. Disc brakes, whether mechanical or hydraulic, should engage within the first centimeter of lever travel and build progressively. Any “dead zone” where the lever moves without resistance indicates air in a hydraulic system, stretched cables, or worn pads that have exceeded their adjustment range. The lift-and-spin test exposes problems that static lever checks miss.
Lift the front wheel off the ground and spin it while the brake is released””listen for any rubbing, which indicates rotor misalignment or a seized caliper piston. Apply the brake and note how quickly the wheel stops; a properly functioning brake should halt a free-spinning wheel within one-quarter turn. For the rear wheel, repeat this process and also check that the brake releases completely, as cable-actuated rear brakes often develop spring tension issues that cause dragging. A limitation of static testing is that it cannot replicate actual stopping forces. A brake that feels fine when you squeeze the lever while straddling the bike may behave differently when body weight transfers forward during actual deceleration. This is why static tests are a prerequisite for, not a replacement of, on-road testing. The static check eliminates obviously unsafe conditions before you put the bike in motion, but the final verification must happen while riding.

Performing Low-Speed Brake Tests Safely
Choose your testing location deliberately. An empty parking lot with clean, dry pavement provides the controlled environment you need. Avoid testing on slopes, loose gravel, or wet surfaces that introduce variables unrelated to brake function. Begin at walking speed””literally walking beside the bike while applying brakes. This confirms basic function without any crash risk. Progress to coasting speeds of five to ten miles per hour, testing each brake independently before combining them. The front brake deserves specific attention because it provides approximately seventy percent of your stopping power on flat ground. At low speed, apply the front brake firmly and observe whether the bike stops smoothly or exhibits any pulsing sensation.
Pulsing indicates a warped rotor or out-of-round rim. Note the distance required to stop and compare it to your memory of pre-winter performance. A significant increase in stopping distance, even at low speed, indicates pads that need replacement or contamination that requires cleaning. Rear brake testing should include a skid test on a surface where skidding is safe. From about ten miles per hour, apply only the rear brake hard enough to lock the wheel momentarily. This test serves two purposes: it confirms the rear brake has sufficient power, and it helps scrub off any pad glazing that developed during storage. If the rear wheel refuses to lock under hard application, the brake needs work. If it locks too easily and feels grabby, the pads may be contaminated or the braking surface needs cleaning. The tradeoff here is between thorough testing and pad wear””this skid test does consume a small amount of pad material, but the information gained justifies the minimal wear.
When to Perform Full-Speed Brake Tests
Full-speed testing should only follow successful low-speed tests. Once you have confirmed basic function, find a road with minimal traffic and good sight lines. Accelerate to your normal riding speed and perform controlled stops, first using both brakes together, then each independently. Pay attention to any brake fade””a progressive loss of stopping power during sustained application””which indicates overheated pads, contaminated surfaces, or moisture-contaminated hydraulic fluid. The comparison between cold and warmed-up brake performance matters more than many riders realize. Perform your full-speed tests after the brakes have warmed up through normal use, typically after ten to fifteen minutes of riding with occasional moderate braking.
Some brake pad compounds, particularly organic compounds on disc brakes, perform noticeably worse when cold. If your brakes feel adequate when warm but weak when cold, consider whether your typical riding includes situations requiring hard braking immediately after starting””such as a steep hill at the beginning of your commute””and plan accordingly. A warning about high-speed brake testing: do not test emergency stopping power near the limits of adhesion without proper protective gear and in conditions you can control. A blown tire, unexpected pothole, or debris on the road during a maximum-effort stop can cause a crash that exceeds the severity of any brake malfunction you were testing for. The goal of full-speed testing is to confirm normal function, not to find the absolute limits of your brake system. Save limit testing for closed courses or leave it to professionals.

Signs That Indicate Professional Service Is Needed
Certain symptoms exceed what home maintenance can address. Hydraulic brakes that feel spongy after bleeding may have a damaged seal allowing air ingress, requiring caliper rebuild or replacement. Mechanical disc brakes with persistent rubbing despite proper alignment may have bent caliper mounts that need facing by a shop with proper tooling. Rim brakes that vibrate violently during application””a condition called brake shudder””often indicate a rim that has developed an irregularity requiring wheel building expertise to diagnose. The cost-benefit calculation for professional service shifts based on the brake system’s complexity. A cable-actuated rim brake can be fully overhauled by a competent home mechanic for under twenty dollars in parts.
An entry-level mechanical disc brake costs slightly more but remains approachable. However, hydraulic disc brakes, particularly high-end systems with intricate internals, often justify shop service because the specialized bleed kits, replacement seals, and diagnostic expertise cost more than professional labor for occasional maintenance. Know your limits honestly. If your inspection reveals a problem you cannot confidently diagnose, stop and seek help. For example, a brake that engages differently after sitting””the phenomenon of pad knock-back in hydraulic systems””can indicate anything from a simple adjustment issue to a failing master cylinder. Attempting repairs without understanding the underlying cause wastes time and money, and may leave you with a brake that seems fixed but fails when you need it. Shops exist for a reason, and using them appropriately is not a failure of self-sufficiency but a recognition of the stakes involved in brake function.
How to Prepare
- Clean all brake components before inspection. Use isopropyl alcohol for disc brake rotors and pads, and a degreaser safe for rubber on rim brake pads and rim surfaces. Cleaning removes contamination that might mask other problems and ensures any testing reflects actual component condition rather than surface grime.
- Check pad condition and replace if necessary before testing. Installing fresh pads eliminates pad wear as a variable, letting you focus on other brake system components during testing. This is particularly important if you are uncertain how much life your pads had remaining before winter storage.
- Inspect all cables and housing, replacing any sections showing corrosion, kinking, or damage. New cables are inexpensive insurance against winter storage damage. When routing new cables, apply a light lubricant to reduce friction and prevent future corrosion.
- For hydraulic systems, check fluid level and perform a test squeeze to assess firmness. If the lever feel is suspect, bleed the system before road testing. Bleeding hydraulic brakes with contaminated fluid while testing can damage seals and create bigger problems than you started with.
- Verify pad-to-rotor or pad-to-rim alignment. Adjust as necessary so that brake contact is even and occurs where intended. This step catches problems like pads that have shifted position during storage or wheels that have come slightly out of true.
How to Apply This
- Document all identified issues before beginning repairs. This prevents the common mistake of fixing an obvious problem, declaring the bike ready, and forgetting about a secondary issue discovered earlier. A simple written list ensures nothing slips through the cracks.
- Address safety-critical items first. Any issue that could cause sudden brake failure””severely worn pads, contaminated hydraulic fluid, damaged cables, or cracked housing””takes priority over performance issues like minor rubbing or suboptimal lever feel.
- Perform repairs in logical order. Replace consumables like pads and cables before making adjustments, since new components may require different settings. Complete all repairs before final testing so you are evaluating the system as it will actually be ridden.
- Conduct a final test ride after all repairs are complete. This ride should replicate your actual riding conditions as closely as possible””if you commute in traffic, test in conditions requiring traffic-type vigilance; if you ride trails, find terrain that demands the brake performance you need. Only declare the bike ready after this realistic test confirms all systems function as required.
Expert Tips
- Bed in new brake pads properly before relying on them for hard stops. Perform ten to twenty moderate stops from medium speed to transfer pad material to the rotor or rim, creating the interface that provides full braking power. New pads that have not been bedded in can feel weak and may take significantly longer to stop the bike.
- Do not skip the cable inspection simply because the levers feel fine. Internal cable corrosion often manifests only under load or over time, and a cable that seems functional during inspection may fray or snap during actual use. The cost of preventive cable replacement is far less than the cost of a brake failure.
- Store bikes with hydraulic disc brakes upright or hanging from the front wheel. Storing a bike upside down or on its side can allow air bubbles to migrate in the hydraulic system, causing sponginess that requires bleeding to correct. If your bike was stored in a problematic position, expect to bleed the brakes.
- Consider the age of your brake fluid even if the brakes feel fine. Mineral oil systems are less sensitive to moisture absorption than DOT fluid systems, but both degrade over time. Most manufacturers recommend complete fluid changes every one to two years regardless of feel.
- Do not test brakes aggressively on a bike that has been recently washed or exposed to moisture. Water on braking surfaces dramatically reduces friction, and testing in wet conditions can lead to overconfidence about dry weather performance or, conversely, unnecessary concern about properly functioning brakes. Allow brakes to dry completely before testing, and remember that your first few stops after riding through water will always be weaker.
Conclusion
Testing your bike brakes after winter storage is a non-negotiable part of returning to safe cycling. The combination of visual inspection, static testing, and progressive on-road verification catches problems before they manifest as crashes or close calls. Winter storage affects every brake system to some degree, whether through corrosion on cables, moisture in hydraulic fluid, or simple degradation of pad compounds. The time invested in proper testing pays dividends in safety and, often, in reduced repair costs when problems are caught before they cause secondary damage. Make brake testing the first item on your spring cycling checklist, before route planning or fitness assessment.
A bike with compromised brakes is not just slow or uncomfortable””it is dangerous. The steps outlined here take less than an hour for most cyclists and require minimal tools. When problems exceed your comfort level for home repair, a professional inspection provides peace of mind and often catches issues you might have missed. Your braking system is the most critical safety equipment on your bicycle. Treat it accordingly.
Frequently Asked Questions
How long does it typically take to see results?
Results vary depending on individual circumstances, but most people begin to see meaningful progress within 4-8 weeks of consistent effort. Patience and persistence are key factors in achieving lasting outcomes.
Is this approach suitable for beginners?
Yes, this approach works well for beginners when implemented gradually. Starting with the fundamentals and building up over time leads to better long-term results than trying to do everything at once.
What are the most common mistakes to avoid?
The most common mistakes include rushing the process, skipping foundational steps, and failing to track progress. Taking a methodical approach and learning from both successes and setbacks leads to better outcomes.
How can I measure my progress effectively?
Set specific, measurable goals at the outset and track relevant metrics regularly. Keep a journal or log to document your journey, and periodically review your progress against your initial objectives.
When should I seek professional help?
Consider consulting a professional if you encounter persistent challenges, need specialized expertise, or want to accelerate your progress. Professional guidance can provide valuable insights and help you avoid costly mistakes.
What resources do you recommend for further learning?
Look for reputable sources in the field, including industry publications, expert blogs, and educational courses. Joining communities of practitioners can also provide valuable peer support and knowledge sharing.


