Skipping or clicking bike gears are almost always caused by cable tension issues, and the fix usually takes less than five minutes with a simple barrel adjuster turn. When your chain hops between gears unexpectedly or you hear that persistent clicking while pedaling, the most likely culprit is cable stretch””a natural occurrence where the metal cables controlling your derailleur elongate slightly over time, throwing off the precise alignment needed for clean shifts. To fix it, shift to your smallest rear cog, press the shifter once, and if the chain hesitates or refuses to climb to the next cog, turn your barrel adjuster counterclockwise in quarter-turn increments until the shift becomes crisp and immediate. Consider a rider who just bought a new bike three months ago and suddenly notices the chain jumping during climbs.
This is textbook cable stretch””new cables bed in and elongate during their first few hundred miles of use. Beyond cable tension, skipping gears can stem from a dirty drivetrain, a worn chain that has stretched beyond 0.75% of its original length, a bent derailleur hanger, or improperly set limit screws. Each cause has a specific diagnostic sign and corresponding fix. This article walks through every common cause of gear skipping and clicking, from the simplest barrel adjuster tweaks to checking your derailleur hanger alignment. You will learn how to identify which component is actually causing your problem, when a fix is straightforward enough to do trailside, and when persistent issues warrant a trip to your local bike shop.
Table of Contents
- Why Do Bike Gears Skip and What Causes That Clicking Noise?
- Adjusting Cable Tension with the Barrel Adjuster
- Setting Limit Screws to Prevent Over-Shifting
- Checking and Adjusting the B-Gap for Clean Shifts
- Diagnosing and Replacing a Worn Chain
- Inspecting the Derailleur Hanger for Alignment Issues
- When Cable Replacement Becomes Necessary
- Knowing When to Visit a Professional Mechanic
- Conclusion
Why Do Bike Gears Skip and What Causes That Clicking Noise?
The mechanical reality of a bicycle drivetrain is that it depends on precise cable tension to position the derailleur exactly where each cog sits. When you click your shifter, it releases or pulls a specific length of cable, moving the derailleur a set distance. If the cable has stretched even a millimeter or two, that distance no longer matches the spacing between cogs, and the chain either lands between gears or overshoots to the wrong one. The result is that annoying skip or the metallic clicking of a chain trying to seat itself properly. A misaligned derailleur creates similar symptoms but for different reasons. If the derailleur itself sits at a slight angle””often due to a bent hanger from a minor crash or the bike falling over””it cannot track parallel to the cassette.
This means shifts in one direction might feel fine while shifts in the other feel sluggish or produce grinding noises. Riders often chase cable tension adjustments for hours when the actual problem is a five-degree bend in the hanger that a trained eye can spot in seconds. Dirt and grime compound these issues significantly. A chain caked with road grit or dried lubricant does not articulate smoothly over the cassette teeth, causing hesitation and noise even when cable tension is perfect. Chain wear is the sneakier problem””chains stretch with use, and once a chain exceeds 0.75% elongation from its original length, it no longer meshes correctly with the cassette teeth. At this point, no amount of derailleur adjustment will eliminate the skipping; the chain simply needs replacing.
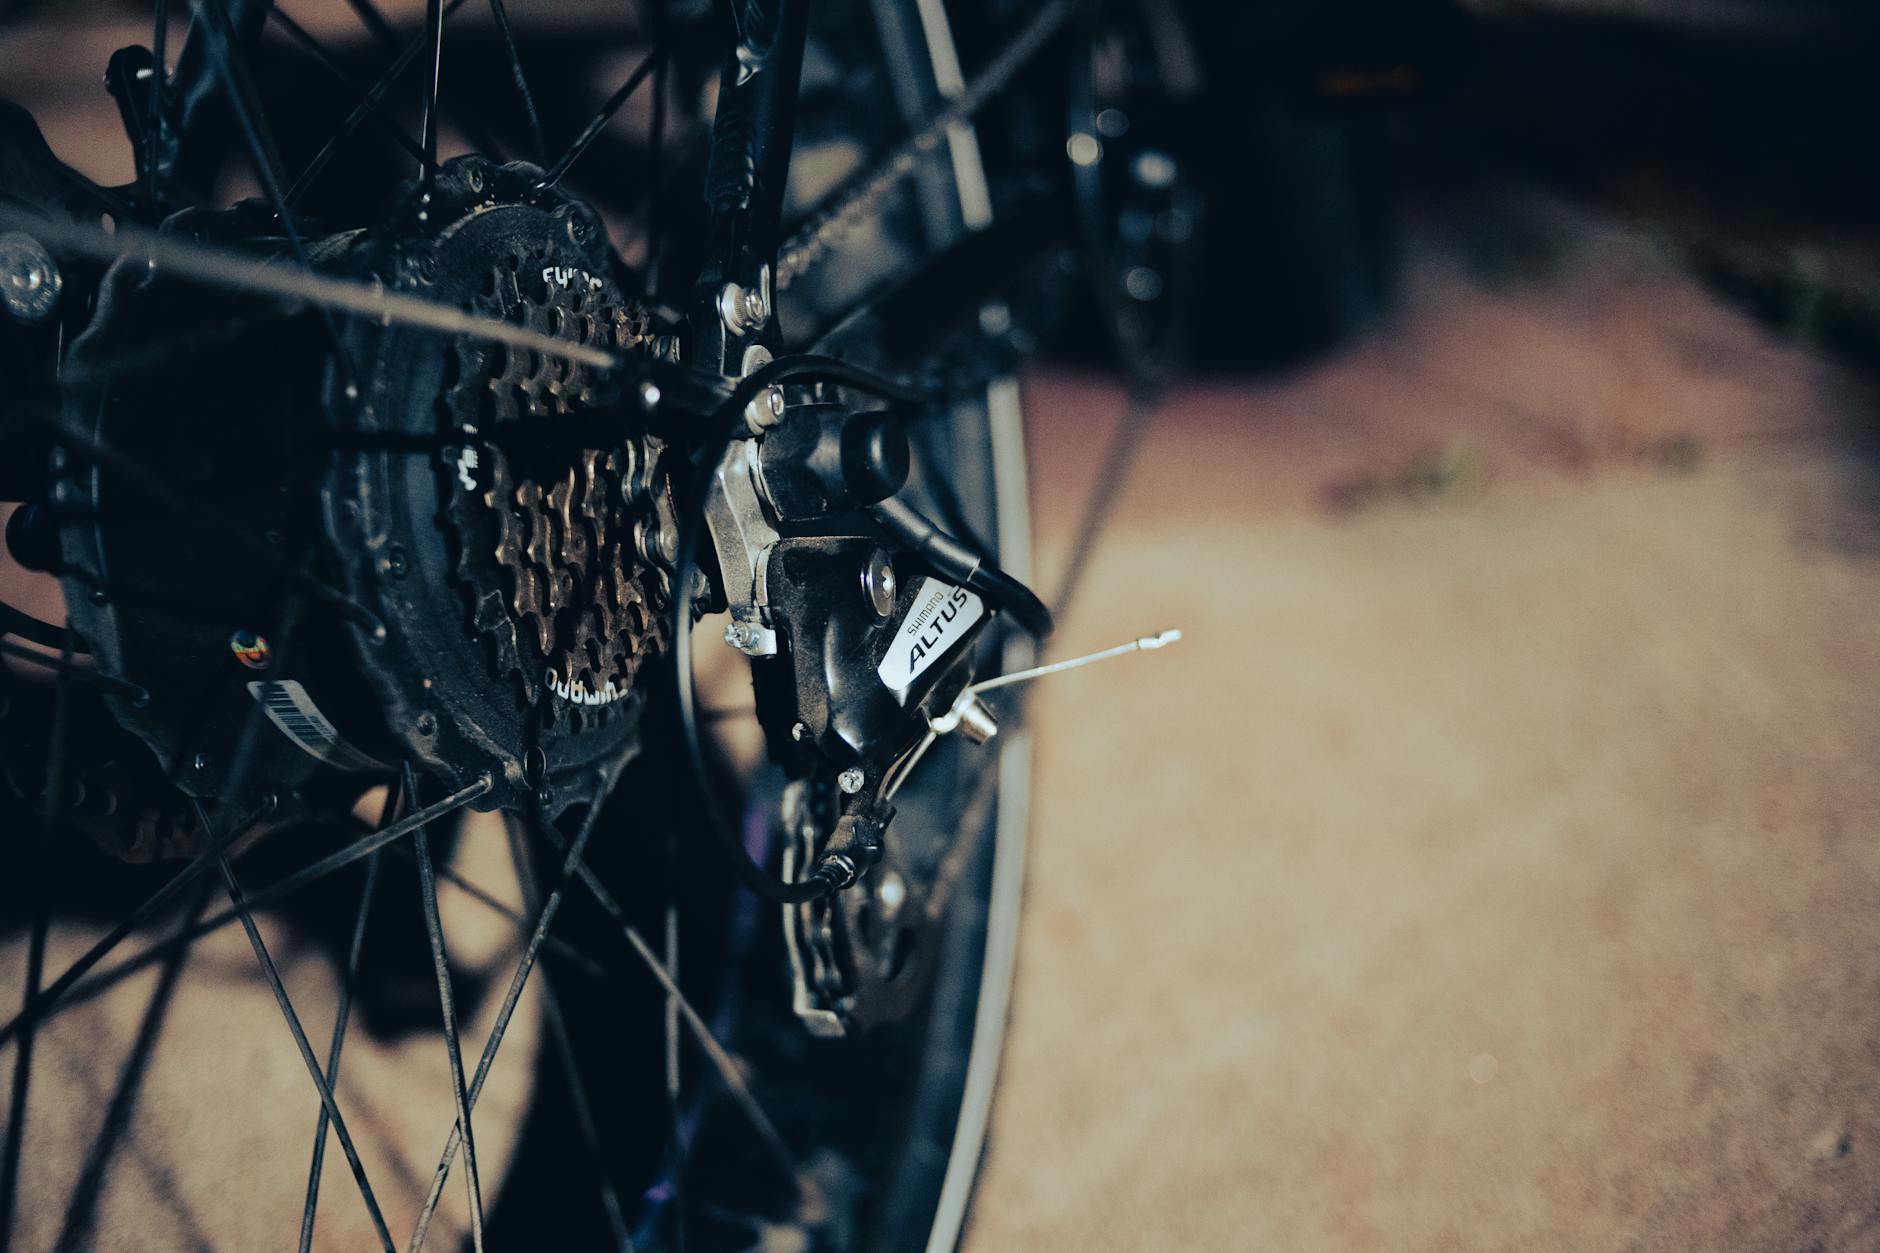
Adjusting Cable Tension with the Barrel Adjuster
The barrel adjuster is your first line of defense and solves the majority of shifting complaints. This threaded cylinder sits either where the cable enters the rear derailleur or inline along the cable housing near the handlebars. Turning it changes the effective cable tension without requiring you to loosen any bolts or reanchor the cable. To diagnose whether cable tension is your problem, shift to the smallest rear cog and a middle or large front chainring. Press your rear shifter once to command a shift to the next larger cog.
If the chain hesitates, makes noise, or refuses to move up, your cable tension is too loose. Turn the barrel adjuster counterclockwise in quarter-turn increments, testing after each adjustment until the shift happens cleanly. If the chain is jumping too far or double-shifting, the cable is too tight””turn the barrel adjuster clockwise to loosen. However, if you find yourself turning the barrel adjuster more than two full rotations from its midpoint, the cable itself likely needs reanchoring at the derailleur pinch bolt. Barrel adjusters have limited range, and trying to compensate for significant cable slip or stretch beyond that range results in the adjuster bottoming out or threading out so far it becomes unstable. At that point, loosen the cable anchor bolt, pull the cable taut by hand, retighten, and reset the barrel adjuster to its middle position before fine-tuning.
Setting Limit Screws to Prevent Over-Shifting
Limit screws are the two small Phillips or flathead screws on your rear derailleur labeled H and L. They act as physical stops that prevent the derailleur from moving too far inward or outward, which would cause the chain to jump off the cassette entirely. The H screw controls how far the derailleur can move toward the smallest cog, while the L screw limits movement toward the largest cog. If your chain is clicking at the extremes of your gear range””particularly on the smallest or largest cog””the limit screws may need adjustment. Shift to the smallest cog and observe the upper jockey wheel. It should align directly below that cog, not angled toward the spokes or away toward the dropout.
Wind the H screw in clockwise if the chain runs rough or wants to jump off toward the frame. For the large cog, shift there and adjust the L screw similarly, ensuring the chain seats fully without the derailleur trying to push past the cassette. A common mistake is adjusting limit screws to fix general shifting issues when cable tension is actually the problem. Limit screws only affect the two extreme gears. If you are experiencing skipping in the middle of your cassette, limit screws are not the culprit. Over-tightening limit screws when chasing a cable tension problem will actually make things worse by preventing the derailleur from reaching gears it should be able to access.
Checking and Adjusting the B-Gap for Clean Shifts
The B-gap, controlled by the B-tension screw on the derailleur, sets the distance between the upper jockey wheel and the cassette cogs. This gap matters because if the jockey wheel sits too close, it can contact the cogs and create noise or interfere with shifting. Too far away, and shifts become slow and imprecise because the chain has too much slack to take up. Most rear derailleurs require a B-gap of approximately 5 to 6 millimeters, measured from the top of the upper jockey wheel teeth to the bottom of the largest cog teeth when the chain is on that cog. Turning the B-tension screw clockwise increases this gap by pivoting the derailleur body away from the cassette.
Counterclockwise closes the gap. Some manufacturers specify exact measurements in their documentation, so checking your derailleur’s manual is worthwhile if you want precision. Riders with wide-range cassettes””particularly those with large climbing gears of 42 teeth or more””often need to increase the B-gap beyond standard settings to clear those oversized cogs. Conversely, if you have swapped to a cassette with a smaller large cog than your previous setup, closing the B-gap slightly can sharpen shift response. The tradeoff is always between clearance and shift speed: more gap means safer clearance but slightly lazier shifts, while less gap quickens shifts but risks contact.
Diagnosing and Replacing a Worn Chain
Chain wear is insidious because it happens gradually, and a stretched chain continues to work””just poorly. As the pins and rollers inside each link wear against each other, the chain elongates. This elongation changes the pitch between links, meaning the chain no longer drops neatly into the valleys between cassette teeth. The result is skipping under load, particularly when putting down power on climbs or accelerations. A chain checker tool is the definitive way to measure wear. These inexpensive gauges have two prongs that sit in the chain links””if the 0.5% side drops fully into the chain, you are approaching replacement time.
If the 0.75% side drops in, the chain is worn past the point where it should remain in service and is almost certainly causing your skipping issues. Once a chain reaches 0.75% stretch, continuing to ride it will rapidly wear your cassette and chainrings, turning a fifteen-dollar chain replacement into a hundred-dollar drivetrain overhaul. For regular riders putting in weekly miles, cleaning and lubricating the chain every week dramatically extends its life. Monthly cleaning suffices for occasional recreational riders. The key is removing grit before it grinds away at the chain internals. A worn chain on a new cassette will skip; a new chain on a cassette that was worn by an old stretched chain will also skip. Replacing both simultaneously, while more expensive upfront, often proves necessary when a chain has been ridden too long past its service life.

Inspecting the Derailleur Hanger for Alignment Issues
The derailleur hanger is the small, often replaceable piece of metal that connects your rear derailleur to the frame. It is intentionally designed as a sacrificial component””if the bike falls or the derailleur takes an impact, the hanger bends or breaks instead of damaging the frame or derailleur body. The problem is that even minor bends are enough to ruin shifting performance. To check hanger alignment, position yourself directly behind the bike and look at the derailleur. It should hang perfectly vertical, parallel to the cassette cogs. If it angles inward toward the spokes or outward toward the chainstay, the hanger is bent.
Some bends are visible to the naked eye; others require a derailleur hanger alignment gauge to detect. Bike shops have these tools and can straighten hangers in minutes, though severely bent hangers should simply be replaced since repeated bending weakens the metal. A bent hanger typically causes inconsistent shifting that defies logical adjustment. You might find that cable tension settings that make the lower gears shift perfectly cause the upper gears to skip, or vice versa. This is because the derailleur is tracking at an angle rather than moving in a straight line parallel to the cog faces. No amount of barrel adjuster tweaking or limit screw fiddling will fix this””the hanger must be straightened or replaced for the derailleur to function correctly.
When Cable Replacement Becomes Necessary
Cables do not last forever, even with perfect tension adjustment. The steel strands fray at anchor points, the housing cracks and admits contaminants, and the cable itself can develop kinks that cause binding and inconsistent movement. As a general maintenance guideline, replacing shift cables annually keeps your drivetrain responsive and prevents the frustration of sudden cable failure mid-ride. Visual inspection reveals obvious problems: frayed cable ends poking out from anchor bolts, cracked or split housing sections, or rust forming along visible cable runs.
Subtler signs include shifts that feel gritty or require extra lever force, delayed response between clicking the shifter and the derailleur moving, or the cable failing to return the derailleur when shifting to smaller cogs. These symptoms point to friction in the system, usually from contaminated or kinked cables. Replacing cables yourself is a moderate home-mechanic task requiring cable cutters capable of making clean cuts, new housing if yours shows wear, and patience with routing. Factory-installed cables are often premium options with low-friction coatings, while aftermarket replacement cables vary widely in quality. For riders uncomfortable with the routing and tension-setting process, a shop cable replacement is typically inexpensive and ensures everything is properly adjusted afterward.
Knowing When to Visit a Professional Mechanic
Some shifting problems genuinely warrant professional attention, and recognizing when you have exceeded home-mechanic territory saves time and prevents making problems worse. Unusual clanking or grinding noises that persist after you have checked cable tension, limit screws, and chain wear may indicate cassette damage, freehub issues, or internal derailleur problems that require specialized diagnosis. Electronic shifting systems, increasingly common on mid-range to high-end bikes, are a category of their own. While they eliminate cable stretch issues, they introduce firmware, battery, and motor considerations that benefit from shop expertise.
Attempting to troubleshoot electronic shifting without the manufacturer’s diagnostic tools often leads to frustration and occasionally to expensive mistakes. If your Di2, eTap, or AXS system is acting up, the shop visit is usually worthwhile. Constant chain skipping that survives every adjustment attempt is another sign to seek help. This symptom often indicates worn components that are not visually obvious””cassette cogs with hooked teeth, chainrings with worn profiles, or freehub bodies with damaged engagement pawls. A mechanic can put the bike in a stand, apply load while pedaling, and observe exactly where and why the skip occurs, leading to targeted part replacement rather than the guesswork that plagues home diagnosis.
Conclusion
Skipping and clicking gears follow a predictable diagnostic path: check cable tension first using the barrel adjuster, verify limit screws are set correctly at the gear range extremes, ensure the B-gap provides adequate clearance, measure chain wear with a checker tool, and inspect the derailleur hanger for bends. Most shifting problems trace back to cable stretch, which is why a few counterclockwise turns of the barrel adjuster fix the majority of complaints without further intervention.
Regular maintenance prevents most shifting issues from developing in the first place. Cleaning and lubricating your chain appropriately for your riding frequency, replacing cables annually, and checking chain wear periodically keeps your drivetrain running smoothly for thousands of miles. When problems do arise, work through the diagnostic steps methodically before assuming the worst””nine times out of ten, the fix is simpler than you expect.