A comprehensive gravel bike tire selection guide can mean the difference between a transcendent ride through backcountry roads and a frustrating slog that leaves you questioning every equipment choice you’ve made. Gravel cycling occupies a unique space in the cycling world, demanding tires that perform across an almost absurd range of conditions”from smooth pavement to chunky rock gardens, from hard-packed dirt to loose sand, often within the same ride. The tire mounted to your gravel bike is the single point of contact between you and the terrain, making it arguably the most consequential component choice for ride quality, efficiency, and capability. The challenge facing gravel cyclists is that there is no universal solution. A tire that excels on dry, fast fire roads will struggle in muddy conditions.
A wide, knobby tire that inspires confidence on technical singletrack becomes a liability on long paved approaches. Unlike road cycling, where tire selection is relatively straightforward, or mountain biking, where terrain categories are more clearly defined, gravel riding demands a nuanced understanding of tire width, tread pattern, casing construction, and rubber compounds. The proliferation of options from major manufacturers”each offering dozens of gravel-specific models”only compounds the confusion. By the end of this guide, you will understand the functional differences between tire widths ranging from 35mm to 50mm and beyond, how tread patterns affect grip, rolling resistance, and durability, and how to match tire characteristics to your specific riding conditions and preferences. You’ll learn the trade-offs involved in every tire decision and develop a framework for making informed choices rather than relying on marketing claims or random recommendations. Whether you’re building up a new gravel bike, preparing for a specific event, or simply trying to optimize your current setup, this guide provides the technical foundation necessary for confident tire selection.
Table of Contents
- How Does Tire Width Affect Gravel Bike Performance and Comfort?
- Understanding Gravel Tire Tread Patterns and Their Terrain Applications
- Rubber Compounds and Casing Construction in Gravel Tires
- Selecting Gravel Tire Width Based on Riding Style and Terrain
- Common Gravel Tire Selection Mistakes and How to Avoid Them
- Tubeless vs. Tubed Setups for Gravel Bike Tires
- How to Prepare
- How to Apply This
- Expert Tips
- Conclusion
- Frequently Asked Questions
How Does Tire Width Affect Gravel Bike Performance and Comfort?
Tire width is the most fundamental specification in gravel tire selection, with most options falling between 35mm and 50mm, though some frames accommodate tires up to 55mm or wider. The width you choose affects four primary performance characteristics: rolling resistance, traction, comfort, and handling. Contrary to outdated assumptions, wider tires do not necessarily roll slower than narrow ones. Research conducted by Bicycle Rolling Resistance and independent testing by manufacturers has consistently demonstrated that wider tires, when run at appropriate pressures, can match or exceed the efficiency of narrower tires while providing superior comfort and grip. This occurs because wider tires can be run at lower pressures without risking pinch flats, allowing them to conform to surface irregularities rather than deflecting off them”a phenomenon known as suspension loss. The relationship between width and pressure is critical to understand. A 700x40mm tire might run optimally at 35-45 psi for a 165-pound rider on mixed terrain, while a 700x32mm tire would require 55-70 psi to avoid rim strikes and maintain stability.
That higher pressure transmits more vibration to the rider, increases fatigue over long distances, and actually causes the tire to bounce over small obstacles rather than absorbing them. The energy lost to this bouncing”suspension loss”often exceeds any aerodynamic or weight penalty associated with the wider tire. For gravel riding specifically, where surfaces are inherently rougher than pavement, this effect is magnified. Frame and fork clearance ultimately limits your options. Most modern gravel frames accommodate at least 45mm tires, with many accepting 50mm or wider. However, mud clearance must be considered”a tire that physically fits in dry conditions may clog with mud, potentially damaging the frame or locking the wheel entirely. A minimum of 6mm clearance on all sides is advisable for any conditions involving mud or debris.
- **35-38mm tires** suit riders prioritizing speed on predominantly smooth gravel and paved roads, offering a road-like feel with modest off-road capability
- **40-45mm tires** represent the most versatile range for mixed-terrain riding, balancing efficiency with comfort and providing adequate traction for most gravel conditions
- **47-50mm+ tires** excel on rough, technical terrain, loose surfaces, and extended off-road adventures where comfort and capability outweigh pure speed considerations
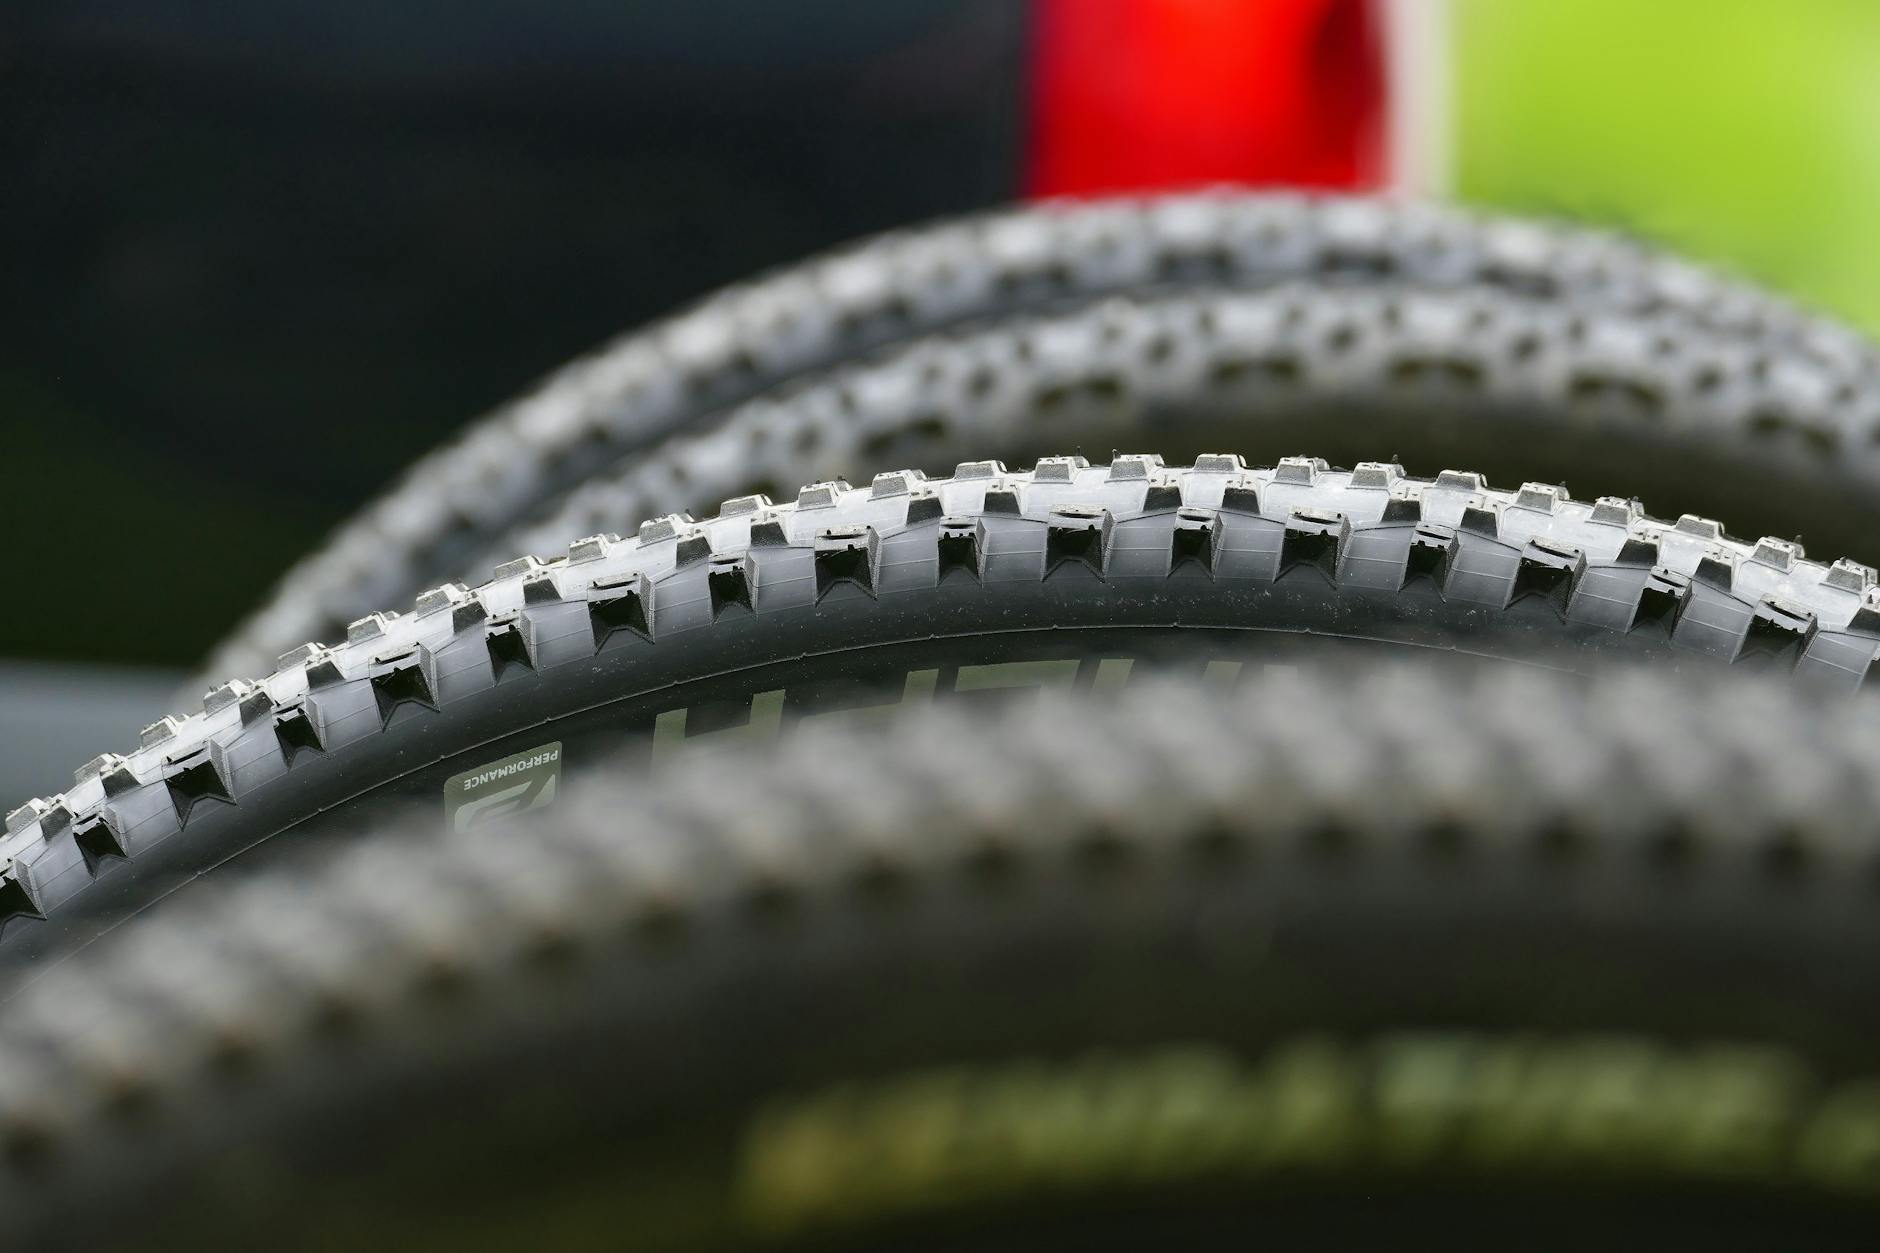
Understanding Gravel Tire Tread Patterns and Their Terrain Applications
Tread pattern determines how a tire interacts with different surfaces, affecting grip, self-cleaning ability, rolling resistance, and predictability. Gravel tire treads generally fall into four categories: slick or file-tread, small-knob, mixed or transitional, and aggressive. Each serves distinct purposes, and understanding these categories helps narrow the overwhelming number of options to a manageable shortlist. Slick and file-tread tires feature minimal texture”either completely smooth or with shallow siping that provides some wet-weather grip without significant knobs. These tires optimize rolling resistance and perform exceptionally well on hard-packed gravel, pavement, and dry conditions. The Panaracer GravelKing Slick and René Herse Barlow Pass exemplify this category.
They sacrifice loose-surface traction for speed, making them ideal for gravel racing on fast courses or riders whose routes include substantial pavement. The limitation becomes apparent on anything loose, wet, or steep”the lack of mechanical grip means relying entirely on rubber compound adhesion, which fails when surfaces shift beneath the tire. Small-knob tires represent the most popular category for general gravel riding. These feature low-profile knobs, typically 1-2mm tall, arranged in patterns that provide grip without dramatically increasing rolling resistance. The center tread is often tighter or semi-slick for efficiency when riding straight, while more aggressive side knobs engage during cornering. Examples include the Specialized Pathfinder Pro, WTB Riddler, and Maxxis Receptor. These tires handle the widest range of conditions acceptably, though they don’t excel in extremes”they’re neither as fast as slicks on pavement nor as capable as aggressive treads in mud.
- **File-tread and slick patterns** roll fastest, ideal for hardpack and pavement, but offer minimal traction on loose or wet surfaces
- **Small-knob patterns** provide the best all-around performance for typical mixed-terrain gravel riding, balancing speed and grip
- **Aggressive and mud-specific patterns** sacrifice efficiency for maximum traction in challenging conditions, featuring taller, widely-spaced knobs that shed mud and bite into soft surfaces
Rubber Compounds and Casing Construction in Gravel Tires
Beyond width and tread, rubber compound and casing construction significantly impact tire performance, durability, and ride quality. Rubber compounds are typically rated by durometer hardness, with softer compounds providing better grip but wearing faster, and harder compounds lasting longer but offering less traction. Many gravel tires use dual-compound designs, pairing a harder center compound for durability and low rolling resistance with softer shoulder compounds for cornering grip. Casing construction refers to the tire’s internal fabric structure, measured in threads per inch (TPI). Higher TPI casings (120 TPI and above) use finer threads woven more densely, creating a suppler tire that conforms better to terrain and provides a smoother ride. Lower TPI casings (60 TPI and below) use coarser threads, resulting in a stiffer, more durable, but harsher-riding tire.
Racing-oriented gravel tires typically feature high TPI casings for performance, while training or expedition tires often use lower TPI for durability. The trade-off is real: a supple 120 TPI casing may provide noticeably better ride quality and lower rolling resistance, but it’s also more susceptible to cuts and abrasion. puncture protection layers add another variable. Most gravel tires incorporate some form of breaker belt”a layer of dense material beneath the tread designed to prevent thorns, glass, and sharp rocks from reaching the inner tube or causing air loss in tubeless setups. Heavier protection adds weight and can stiffen the casing, while minimal protection saves weight but increases flat risk. The appropriate level depends on local conditions: riders in regions with thorns, goatheads, or particularly sharp gravel benefit from robust protection, while those on relatively benign surfaces may prefer lighter, more supple casings.
- **Soft rubber compounds** (around 50a-60a durometer) grip better but wear faster, suitable for racing or demanding terrain
- **Hard rubber compounds** (around 65a-70a durometer) last longer but offer less traction, appropriate for high-mileage training
- **High TPI casings** (120+) provide superior ride quality and lower rolling resistance at the cost of durability
- **Puncture protection** adds weight and stiffness but dramatically reduces flat frequency in hostile conditions
Selecting Gravel Tire Width Based on Riding Style and Terrain
Matching tire width to your specific riding context requires honest assessment of the terrain you actually ride, not aspirational adventures you might undertake. A rider in the Pacific Northwest, dealing with wet conditions and rooty forest roads, has fundamentally different needs than a rider in Kansas rolling on dry, smooth limestone. Similarly, a competitive gravel racer optimizing for speed has different priorities than a bikepacker prioritizing comfort and reliability over multi-day distances. For riders whose gravel routes include significant pavement”whether road connections between gravel sections or mixed-surface commuting”tires in the 35-40mm range often provide the best balance. The reduced rotational weight and lower aerodynamic drag of narrower tires become meaningful over long paved sections, while the width remains sufficient for moderate gravel.
This category suits riders doing events like Unbound Gravel on its faster years, or those whose local gravel is relatively smooth and well-maintained. The Specialized Pathfinder Pro in 38mm and the Pirelli Cinturato Gravel H in 40mm exemplify this approach. Technical terrain, loose surfaces, and prioritizing comfort over outright speed justify widths of 45mm and above. Wider tires can be run at meaningfully lower pressures”often 25-35 psi for a medium-weight rider”dramatically improving traction and bump absorption. For events like the Belgian Waffle Ride or any route involving extended chunky gravel, sand, or singletrack, the efficiency penalty of wider tires is offset by improved capability and reduced fatigue. Mountain bikers transitioning to gravel often prefer this end of the spectrum, finding narrower tires disconcertingly sketchy on terrain they’d consider moderate.
- **35-38mm** suits road-to-gravel crossover riding, fast gravel racing, and smooth surfaces
- **40-43mm** represents the versatile sweet spot for most mixed-terrain gravel riding
- **45-50mm** provides maximum comfort and capability for rough terrain, bikepacking, and technical routes
- **Consider your weakest conditions**: choose width based on the most challenging terrain you regularly encounter, not the easiest
Common Gravel Tire Selection Mistakes and How to Avoid Them
The most frequent mistake in gravel tire selection is running pressure too high. Riders transitioning from road cycling often default to familiar pressures”60, 70, even 80 psi”that dramatically compromise gravel performance. At these pressures, tires bounce off obstacles, traction suffers, and rider fatigue accelerates. Optimal gravel pressures are far lower than most people initially expect. A general starting point for tubeless setups: take your weight in pounds, divide by 7 for the rear tire and by 8 for the front, and adjust from there based on terrain. A 160-pound rider might start around 23 psi front and 26 psi rear on 40mm tires, fine-tuning based on feel and conditions. Another common error is selecting tires based on worst-case scenarios that rarely occur.
If 95% of your riding happens on smooth to moderate gravel but you occasionally encounter muddy conditions, optimizing for mud means sacrificing performance the vast majority of the time. A more practical approach is selecting tires for typical conditions and either adjusting technique for occasional challenging terrain or maintaining a second wheelset or tire set for specific conditions. The time spent swapping tires before a wet ride is trivial compared to dragging aggressive mud tires across hundreds of miles of dry gravel. Ignoring tire condition until failure is both dangerous and expensive. Gravel tires endure significant abrasion, and tread wear is often uneven”center knobs wear faster than shoulders on riders who spend most time upright rather than cornering hard. Inspecting tires regularly for cuts, embedded debris, and worn areas extends their life and prevents unexpected failures. For tubeless setups, sealant dries out over time and must be replenished every 2-4 months depending on climate. Dried sealant clumps inside the tire reduce effectiveness and can cause balance issues.
- **Running excessive pressure** is the most common performance-limiting mistake; experiment with lower pressures
- **Choosing tires for rare conditions** sacrifices everyday performance; optimize for typical terrain
- **Neglecting tire maintenance** leads to preventable flats and premature replacement; inspect regularly and refresh tubeless sealant
Tubeless vs. Tubed Setups for Gravel Bike Tires
The tubeless versus tubed debate has largely been settled in gravel cycling: tubeless offers significant advantages for the vast majority of riders. By eliminating the inner tube, tubeless setups remove the possibility of pinch flats”where the tube gets pinched between tire and rim during an impact”allowing lower pressures without consequence. The liquid sealant inside tubeless tires automatically seals small punctures from thorns, glass, and wire, often without the rider noticing. On gravel, where debris is common and lower pressures are beneficial, these advantages are substantial. The downsides of tubeless are front-loaded: initial setup requires compatible rims and tires, rim tape, valves, and sealant. The process can be messy and occasionally frustrating, though most modern tubeless-ready systems seat reliably with a floor pump.
Ongoing maintenance involves periodic sealant checks and replenishment. In the event of a puncture too large for sealant”a sidewall cut or major gash”field repair is more complicated than simply replacing a tube, though carrying a spare tube as backup addresses this concern. For riders doing extensive remote backcountry riding, the complexity of tubeless repair in the field is a legitimate consideration, though the reduced flat frequency generally compensates. Latex and butyl tubes remain viable for riders unwilling to deal with tubeless maintenance or those with incompatible equipment. Latex tubes offer lower rolling resistance than butyl but lose air faster and cost more. Butyl tubes are inexpensive, widely available, and reliable but add weight and rolling resistance compared to tubeless. For casual gravel riding or those with multiple bikes making tubeless maintenance burdensome, tubes remain a reasonable choice”just expect more flats at the lower pressures gravel riding demands.
How to Prepare
- **Measure your frame and fork clearance** using calipers or a ruler to determine the maximum tire width you can physically accommodate, allowing at least 6mm clearance on all sides for mud and debris”many manufacturers list maximum tire sizes, but real-world clearance varies based on rim width and tire brand
- **Document your typical riding terrain** by honestly categorizing the surfaces you encounter most frequently: smooth gravel, chunky gravel, hardpack dirt, loose over hard, mud, sand, pavement sections, and technical features”assign rough percentages to each
- **Identify your performance priorities** by ranking speed, comfort, traction, durability, and puncture resistance in order of importance for your riding style and goals
- **Research tire options** matching your width constraints and performance priorities, consulting reviews from sources like Bicycle Rolling Resistance, cycling publications, and rider forums focused on gravel”narrow to 3-5 candidates
- **Check compatibility** ensuring candidate tires are available in tubeless-ready versions if you run tubeless, and verify that your rim width falls within the tire manufacturer’s recommended range (typically printed on the sidewall or available online)
How to Apply This
- **Start with moderate pressure and reduce gradually** beginning at the higher end of the suggested range (often printed on the tire sidewall) and decreasing by 2-3 psi per ride until you find the lowest pressure that doesn’t cause rim strikes, squirm in corners, or feel vague”this process may take several rides
- **Run front and rear at different pressures** typically 2-4 psi lower in front for improved traction and comfort, since the rear carries more weight and benefits from slightly higher pressure for efficiency and to prevent tire roll
- **Match tread orientation to manufacturer intent** as most gravel tires have directional tread patterns indicated by arrows on the sidewall”proper orientation ensures knobs engage correctly during braking and acceleration
- **Reassess after break-in** because new tires often feel different after 50-100 miles once the surface rubber has worn slightly and any mold release compounds have abraded”initial impressions may not reflect long-term performance
Expert Tips
- **Carry a tire pressure gauge and mini pump on every ride** because optimal pressure changes with conditions”deflating slightly for a wet or technical section, then reinflating for a paved return route, meaningfully improves performance
- **Consider front and rear tire differentiation** using a more aggressive tire up front for steering traction and a faster-rolling tire in rear for efficiency”the front tire determines control while the rear primarily provides propulsion
- **Buy tires in pairs but replace individually** since front and rear wear at different rates”when one wears out, move the less-worn tire to the rear (where traction is less critical) and install the new tire up front
- **Test new tires on familiar routes** before events or important rides so you can accurately assess their characteristics without variables introduced by unfamiliar terrain
- **Mark tire position relative to valve stem** when removing tires for maintenance so any recurring punctures can be traced to a specific location, potentially revealing embedded debris in the tire carcass
Conclusion
Gravel bike tire selection ultimately comes down to understanding trade-offs and matching equipment to your specific context. No single tire optimizes all performance characteristics simultaneously”gains in one area necessarily involve compromises elsewhere. The rider who grasps this fundamental reality can make informed choices rather than chasing marketing claims of tires that do everything perfectly. Width affects comfort, traction, and efficiency in predictable ways; tread patterns determine surface-specific grip and rolling resistance; casing construction and rubber compounds balance performance against durability. Armed with this knowledge, the overwhelming array of gravel tire options becomes navigable.
The practical approach is experimentation within a logical framework. Start with a tire matching your typical terrain and width constraints, set pressure appropriately for your weight and conditions, and ride it enough to form genuine opinions. Pay attention to where the tire excels and where it struggles. That information, combined with understanding of how tire characteristics relate to performance, guides your next selection. Over time, you’ll develop preferences specific to your riding style and local conditions. The goal isn’t finding a perfect tire”it’s finding the right tire for how you actually ride, then extracting maximum performance through proper setup and pressure management.
Frequently Asked Questions
How long does it typically take to see results?
Results vary depending on individual circumstances, but most people begin to see meaningful progress within 4-8 weeks of consistent effort. Patience and persistence are key factors in achieving lasting outcomes.
Is this approach suitable for beginners?
Yes, this approach works well for beginners when implemented gradually. Starting with the fundamentals and building up over time leads to better long-term results than trying to do everything at once.
What are the most common mistakes to avoid?
The most common mistakes include rushing the process, skipping foundational steps, and failing to track progress. Taking a methodical approach and learning from both successes and setbacks leads to better outcomes.
How can I measure my progress effectively?
Set specific, measurable goals at the outset and track relevant metrics regularly. Keep a journal or log to document your journey, and periodically review your progress against your initial objectives.
When should I seek professional help?
Consider consulting a professional if you encounter persistent challenges, need specialized expertise, or want to accelerate your progress. Professional guidance can provide valuable insights and help you avoid costly mistakes.
What resources do you recommend for further learning?
Look for reputable sources in the field, including industry publications, expert blogs, and educational courses. Joining communities of practitioners can also provide valuable peer support and knowledge sharing.