Before your first spring ride, you need to complete six critical maintenance tasks: inflate your tires to the correct pressure, lubricate your chain, check your brakes for pad wear and cable tension, inspect your tires for cracks or embedded debris, test your shifting through all gears, and ensure all bolts are properly torqued. These tasks take approximately 30 to 45 minutes for most cyclists and can prevent the frustrating mechanical failures that commonly occur after a bike has sat unused through winter months. A friend of mine learned this the hard way last April when his rear derailleur cable snapped on mile three of his first ride because winter moisture had corroded it while the bike hung in his garage.
This article walks you through each maintenance step in detail, explains what to look for when inspecting components, and helps you determine which issues you can fix yourself versus which require a trip to your local bike shop. We cover everything from basic tire inflation to more advanced brake adjustments, along with the tools you need and the mistakes that catch most riders off guard. Whether you ride a road bike, mountain bike, or casual cruiser, these fundamentals apply across the board and will ensure your spring season starts smoothly rather than with a roadside repair.
Table of Contents
- What Bike Maintenance Should You Prioritize After Winter Storage?
- Inspecting Tires and Wheels for Hidden Winter Damage
- Chain and Drivetrain Assessment for Smooth Shifting
- Brake System Checks That Could Save Your Season
- Common Spring Maintenance Mistakes to Avoid
- Quick Bolt Check Prevents Rattles and Failures
- How to Prepare
- How to Apply This
- Expert Tips
- Conclusion
- Frequently Asked Questions
What Bike Maintenance Should You Prioritize After Winter Storage?
The priority order for spring bike maintenance depends on safety first, then functionality, then comfort. Brakes and tires sit at the top because failures in either system can cause crashes. A seized brake caliper or a tire with dry rot can wait until you are descending a hill at speed to reveal itself, and by then your options are limited. Chain and drivetrain maintenance comes next because a poorly lubricated or rusted chain causes accelerated wear on your cassette and chainrings, turning a fifteen-dollar problem into a two-hundred-dollar replacement. Most cyclists underestimate how much a bike degrades during storage. Temperature fluctuations cause metal components to expand and contract, which can loosen bolts.
Humidity promotes rust on steel parts and corrosion on aluminum. Tires lose air pressure at roughly one to two PSI per week even when not ridden, meaning a bike stored since November may have nearly flat tires by March. Cables and housing collect moisture and begin to corrode internally, creating friction that makes shifting and braking feel sluggish. A useful comparison is to think of your spring maintenance as similar to getting a car inspected after it sat in a barn for four months. You would not simply turn the key and drive onto the highway. The bike equivalent of that behavior results in the majority of early-season mechanical issues that bike shops see every spring, most of which were entirely preventable with thirty minutes of attention before that first ride.
Inspecting Tires and Wheels for Hidden Winter Damage
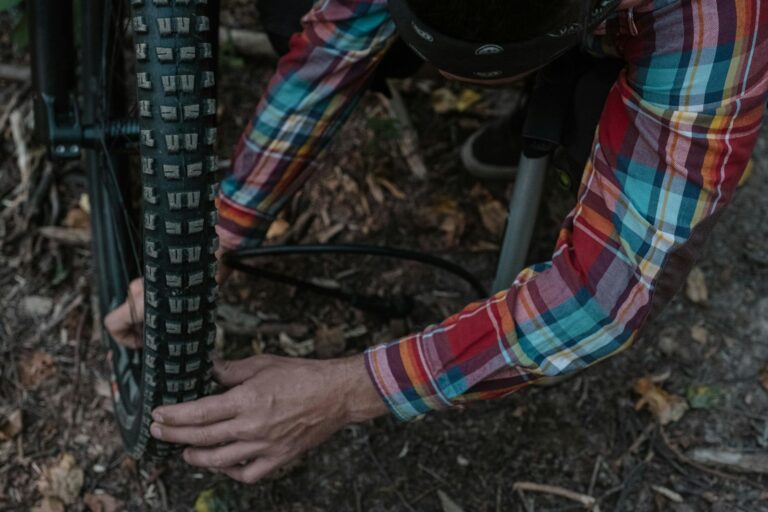
Tires suffer more from winter storage than most cyclists realize. Rubber compounds degrade over time, especially when exposed to temperature extremes, ozone from nearby appliances, or UV light from windows. Look for cracking along the sidewalls, which appears as small fissures running perpendicular to the direction of travel. These cracks indicate that the rubber has lost flexibility and is more prone to sudden failure under load. Press firmly on the tire tread and watch for any separation from the casing beneath. However, if your bike was stored in a climate-controlled space away from sunlight, tire degradation is minimal and visual inspection may reveal nothing concerning. The greater risk in that scenario is embedded debris.
Run your fingers slowly along the entire circumference of each tire, feeling for small pieces of glass, wire, or thorns that worked into the rubber during your last rides of the previous season. These objects often do not cause immediate flats but work their way deeper over subsequent rides until they puncture the tube. Removing them now takes seconds; dealing with a flat ten miles from home takes considerably longer. Wheel inspection focuses on trueness and spoke tension. Spin each wheel slowly and watch the gap between the rim and brake pads. Wobbles greater than two millimeters indicate the wheel needs truing, which most home mechanics can accomplish with a spoke wrench and patience, though severe wobbles may require professional attention. Squeeze pairs of spokes together around the wheel; they should feel uniformly tight. A loose spoke will eventually cause others to loosen, leading to wheel failure.
Chain and Drivetrain Assessment for Smooth Shifting
Your chain is the most wear-prone component on the bike and the one most affected by winter neglect. A chain that was put away dirty and dry will have stiff links and surface rust, both of which cause rough pedaling and poor shifting. The first test is visual: look at the chain under good light and check for orange discoloration indicating rust or black gunk indicating old contaminated lubricant. Either condition requires cleaning before lubrication. Chain stretch measurement tells you whether the chain needs replacement rather than just cleaning. A chain wear tool costs around ten dollars and provides an instant reading, but you can approximate the measurement with a ruler.
A new chain measures exactly twelve inches across twelve complete links. If your chain measures twelve and one-sixteenth inches or more, it has stretched enough to accelerate cassette wear and should be replaced. Continuing to ride a stretched chain will wear your cassette teeth into a shark-fin profile, requiring cassette replacement at five to ten times the cost of a chain. The limitation here is that chain wear tools vary in accuracy, and some inexpensive versions give false readings. If you measure significant stretch but the chain appears relatively new, verify with a second method before purchasing a replacement. Additionally, if your chain has stretched beyond twelve and one-eighth inches, the cassette has likely worn to match it, meaning a new chain will skip on the worn cassette teeth and you will need to replace both components simultaneously.
Brake System Checks That Could Save Your Season
Brake inspection begins with pad wear. Most brake pads have wear indicator grooves or lines molded into the braking surface. When these grooves become shallow or disappear, the pads need replacement. For rim brakes, pads should sit squarely on the rim braking surface without touching the tire above or dropping below the rim edge. A pad that contacts the tire will eventually cut through the sidewall, causing catastrophic tire failure. For disc brakes, remove the wheel and look into the caliper; pads thinner than two millimeters require replacement. Cable tension degrades over winter as cables stretch and housing compresses. Squeeze each brake lever and note where it stops relative to the handlebar.
A lever that pulls to within an inch of the bar indicates either worn pads or loose cable tension, possibly both. The barrel adjuster where the cable enters the brake lever provides up to a half-inch of adjustment; turn it counterclockwise to increase tension. Beyond that adjustment range, you need to reset cable tension at the anchor bolt. For example, last spring I helped a neighbor whose front brake lever pulled all the way to the bar. The pads looked adequate, but the cable had stretched and the barrel adjuster was already maxed out. Rather than just tightening the cable anchor and calling it fixed, we noticed the housing was kinked from a handlebar twist during storage. That kink created internal friction that masked how much cable we actually needed to pull through. Replacing the housing section solved the root cause rather than masking it with excessive cable tension that would have felt wooden and unresponsive.
Common Spring Maintenance Mistakes to Avoid
The most common spring maintenance mistake is over-lubricating the chain. Cyclists who stored their bike with a dry chain often compensate by drowning it in lubricant before the first ride. Excess lubricant attracts dirt and grit, forming an abrasive paste that accelerates chain and drivetrain wear. The correct technique is to apply one drop of lubricant to each roller, let it penetrate for five minutes, then wipe the exterior of the chain thoroughly with a clean rag. The lubrication works inside the rollers where metal contacts metal; lubricant on the outside serves no purpose and causes problems. Another frequent error is adjusting components that do not need adjustment. The temptation after reading maintenance guides is to tune everything, but this often introduces new problems.
If your derailleur shifted well when you put the bike away, and the cables show no corrosion, minor adjustments are unnecessary and risk making things worse. The exception is if you hear clicking, grinding, or experience chain skip during your test ride, which indicates something has changed during storage and warrants investigation. A third mistake involves tire pressure. Cyclists often remember their preferred pressure from last season and inflate to that number without considering temperature differences. Tire pressure increases approximately one PSI for every ten-degree Fahrenheit rise in temperature. A tire inflated to 100 PSI in a fifty-degree garage will reach 110 PSI on a ninety-degree summer day, potentially exceeding the maximum pressure rating and increasing blowout risk. Start the season with pressures five to ten PSI below your summer norm if you are inflating in a cool garage.

Quick Bolt Check Prevents Rattles and Failures
Every bolt on your bicycle is torqued to a specific specification for a reason. Too loose and components shift or rattle; too tight and you risk cracking carbon parts or stripping threads. The bolts most likely to loosen during storage are those subject to clamping force: stem bolts, seatpost clamp, and handlebar clamp. Give each a quick check with the appropriate Allen key or torque wrench before riding.
A rider in my cycling club ignored this step last year and his saddle rotated backward during a hard effort, causing him to slide off the back of the bike. The seatpost clamp bolt had loosened over winter, likely from temperature cycling in his shed. A five-second check would have prevented the crash and the collarbone fracture that followed. Carbon components especially deserve attention because the recommended torque values are often lower than intuition suggests, typically four to six Newton-meters for carbon seatposts and handlebars.
How to Prepare
- **Assemble your toolkit**: You need a floor pump with pressure gauge, Allen keys in sizes 4, 5, and 6 millimeters, a chain lubricant appropriate for your riding conditions, clean rags, and optionally a chain wear tool and torque wrench. Having everything within reach prevents the temptation to skip steps because you cannot find the right tool.
- **Clean the bike before inspection**: Dirt and grime obscure damage and wear. A bucket of soapy water and a soft brush remove most winter residue. Pay attention to the drivetrain, brake calipers, and anywhere cables enter housing. Dry the bike completely before proceeding to prevent trapping moisture under fresh lubricant.
- **Document the current state**: Take photos of your derailleur position, brake pad alignment, and cable routing before making any adjustments. If something goes wrong during maintenance, these photos provide a reference for returning to your starting point.
- **Plan adequate time**: Rushed maintenance leads to overlooked problems. Set aside at least one uninterrupted hour even though the work may take less. Starting maintenance fifteen minutes before you planned to ride guarantees you will skip important steps.
- **Arrange your workspace**: Work in a well-lit area where you can spin the wheels freely. A bike repair stand is ideal but not essential; hanging the bike from ceiling hooks or flipping it onto its handlebars and saddle works for basic maintenance.
How to Apply This
- **Inflate tires and inspect for damage**: Pump each tire to the pressure indicated on the sidewall, typically within a range. Start at the lower end of that range for your first ride, then adjust based on feel and road conditions. While inflating, rotate the tire slowly and examine every inch of rubber for cracks, cuts, bulges, or embedded debris.
- **Check brakes and make adjustments**: Squeeze each lever firmly and confirm the pads contact the rim or rotor well before the lever reaches the handlebar. Spin each wheel and verify the brakes do not rub when released. Make minor adjustments with barrel adjusters; significant issues may require cable resetting or professional attention.
- **Lubricate chain and test drivetrain**: Apply lubricant sparingly, one drop per roller, backpedal several rotations to distribute it, then wipe excess from the exterior. Shift through every gear combination while pedaling slowly and listen for clicking, skipping, or grinding that indicates adjustment needs.
- **Perform a safety bolt check and test ride**: Verify all critical bolts are snug using an Allen key, applying appropriate torque for the material. Take a short test ride around the block, checking that brakes stop you confidently, gears shift smoothly, nothing rattles, and the bike handles predictably before committing to a longer route.
Expert Tips
- Lubricate cables and housing by dripping lubricant into the housing at each end; this reduces friction that accumulates over winter and makes shifting and braking feel noticeably crisper without requiring cable replacement.
- Do not adjust your front derailleur unless you are experiencing specific problems; front derailleur setup is finicky and an unnecessary adjustment often creates ghost shifting or chain rub where none existed before.
- Consider replacing bar tape at the start of each season; winter gloves compress and degrade tape more than bare-hand riding, and fresh tape improves grip and comfort for minimal cost.
- Bounce the bike off the ground from a few inches height and listen for rattles; this simple test reveals loose bolts, unattached accessories, or foreign objects in frame tubes more effectively than visual inspection alone.
- Store lubricants and cleaning supplies away from rubber components; many solvents and even some lubricant vapors degrade rubber over time, accelerating the tire and brake pad issues you are trying to prevent.
Conclusion
Spring bike maintenance is straightforward once you understand the six core areas: tires, wheels, chain, brakes, shifting, and bolt security. Each step takes only minutes, but the combined effect is a bike that rides safely and feels like it did at the end of last season rather than one that fights you at every pedal stroke. The temptation to skip maintenance and just ride is strong when the first warm day arrives, but the cyclists sidelined with preventable mechanicals at the bike shop in April all had that same thought.
Your next step is to schedule a specific time this week for maintenance rather than waiting for perfect conditions. Gather your tools and supplies in advance so you can begin immediately when that time arrives. After completing these steps, consider keeping a simple log of component replacement dates, particularly for chain and tires, so you can anticipate wear rather than react to failures. A maintained bike rewards you with reliable performance and lower long-term costs, making the thirty-minute spring investment pay dividends across thousands of miles.
Frequently Asked Questions
How long does it typically take to see results?
Results vary depending on individual circumstances, but most people begin to see meaningful progress within 4-8 weeks of consistent effort. Patience and persistence are key factors in achieving lasting outcomes.
Is this approach suitable for beginners?
Yes, this approach works well for beginners when implemented gradually. Starting with the fundamentals and building up over time leads to better long-term results than trying to do everything at once.
What are the most common mistakes to avoid?
The most common mistakes include rushing the process, skipping foundational steps, and failing to track progress. Taking a methodical approach and learning from both successes and setbacks leads to better outcomes.
How can I measure my progress effectively?
Set specific, measurable goals at the outset and track relevant metrics regularly. Keep a journal or log to document your journey, and periodically review your progress against your initial objectives.
When should I seek professional help?
Consider consulting a professional if you encounter persistent challenges, need specialized expertise, or want to accelerate your progress. Professional guidance can provide valuable insights and help you avoid costly mistakes.
What resources do you recommend for further learning?
Look for reputable sources in the field, including industry publications, expert blogs, and educational courses. Joining communities of practitioners can also provide valuable peer support and knowledge sharing.