Replace your bike tires when you hit mileage thresholds””roughly 2,500 to 4,000 kilometers for road tires and 3,000 to 8,000 miles for mountain bike tires””or when you spot visual warning signs like worn tread, sidewall cracks, or visible casing threads. The process itself requires only basic tools: two or three tire levers, a spare tube, and a pump. Most cyclists can complete a tire change in under fifteen minutes once they understand the technique, and doing it yourself costs around $25 for a tube and tire compared to $40 to $80 at a bike shop including labor. Consider a road cyclist who commutes twenty miles daily. At roughly 5,000 miles per year, they should expect to replace rear tires twice annually and front tires once, since rear tires bear more weight and wear faster.
Ignoring these replacement intervals risks blowouts, poor handling, and significantly reduced grip in wet conditions. This guide covers the specific signs that indicate replacement time, walks through the step-by-step process of changing a tire, breaks down costs across different tire types, and explains what factors accelerate or slow tire wear so you can maximize the life of your rubber. Beyond the basics, understanding tire replacement helps you make smarter purchasing decisions. A puncture-resistant commuter tire rated for 5,000 kilometers costs more upfront but may prove cheaper per mile than a lightweight racing tire that lasts only 1,500 kilometers. The following sections will help you identify exactly when your tires need attention and give you the confidence to handle replacements yourself.
Table of Contents
- How Often Should You Replace Bike Tires Based on Riding Style?
- Visual Warning Signs That Indicate Immediate Tire Replacement
- Essential Tools and Preparation for Changing a Bike Tire
- Step-by-Step Process for Removing and Installing a Bike Tire
- Understanding Tire Costs and Value Across Different Categories
- Factors That Accelerate or Extend Tire Lifespan
- The Growing Market for Bicycle Tires and What It Means for Consumers
- Conclusion
How Often Should You Replace Bike Tires Based on Riding Style?
Tire longevity varies dramatically based on how and where you ride. Road training and touring tires typically need replacement after approximately 2,000 miles, while dedicated racing tires””built lighter and with softer rubber compounds for better grip””wear out faster at around 1,500 miles. Mountain bike tires offer the widest range, lasting anywhere from 3,000 to 8,000 miles depending on whether you ride smooth singletrack or rocky technical terrain. High-performance lightweight tires sacrifice durability for speed, often lasting only around 1,500 kilometers before the thin tread wears through.
Compare this to puncture-resistant tires designed for commuting, which can reach 5,000 kilometers thanks to thicker rubber and protective layers beneath the tread. A weekend recreational rider covering 50 miles per week might get two full seasons from a set of touring tires, while a competitive cyclist training 200 miles weekly could burn through the same tires in ten weeks. Rear tires consistently wear faster than front tires because they bear more of the rider’s weight and handle acceleration forces. Many experienced cyclists rotate their front tire to the rear at the halfway point of its expected lifespan, then install a fresh tire on the front. This practice extracts maximum value from each tire while ensuring the front wheel””more critical for steering control””always has adequate tread.
Visual Warning Signs That Indicate Immediate Tire Replacement
Mileage guidelines provide useful benchmarks, but visual inspection remains the most reliable method for determining when tires actually need replacement. The clearest danger sign is visible casing””the white nylon fibers that form the tire’s structural foundation showing through worn rubber. When you see these threads, replace the tire immediately regardless of mileage, as a blowout becomes likely. Road tires develop characteristic flat spots down the centerline as they wear, eventually squaring off toward the sidewalls. This worn profile reduces the contact patch when cornering and significantly diminishes grip.
Mountain and gravel tires show wear differently: the knobs that provide traction gradually file down until they no longer bite into loose surfaces. Once knob height drops below half the original, expect noticeably worse performance in mud, sand, and loose gravel. However, if your tires show cracking in the sidewalls despite having plenty of tread remaining, age and environmental exposure have degraded the rubber. Sunlight and outdoor storage accelerate this deterioration, making a tire unsafe even with low mileage. Bulging or misshapen areas indicate internal structural damage, often from hitting a pothole or curb, and warrant immediate replacement regardless of external appearance. Some manufacturers, including Continental, include wear indicator holes in the tread that become shallow as the tire wears””a useful feature that removes guesswork from the inspection process.
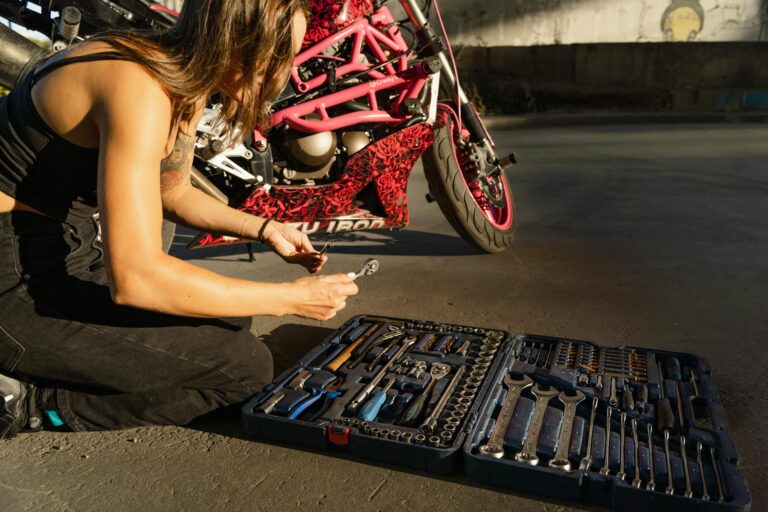
Essential Tools and Preparation for Changing a Bike Tire
Changing a bike tire requires minimal equipment, but having the right tools makes the job dramatically easier. You need two to three tire levers””the plastic hook-shaped tools that help unseat the tire bead from the rim””a spare tube or patch kit, and either a floor pump or CO2 inflator. If your bike uses axle nuts rather than quick-release skewers, bring the appropriate wrench, typically 15mm for most bikes. Tire levers deserve more attention than most cyclists give them. Cheap, brittle levers snap under pressure and can damage carbon rims.
Quality levers from brands like Pedro’s or Park Tool cost only a few dollars more and last years. For tubeless setups, add tire sealant and a valve core removal tool to your kit. Keep these items together in a small bag that lives with your bike or in your jersey pocket on rides. Before starting any tire work, shift your chain to the smallest rear cog””this makes wheel removal and reinstallation much simpler. If you have rim brakes, release the brake quick-release or unhook the cable to create clearance for the tire to pass through. For disc brakes, avoid squeezing the lever while the wheel is removed, as this can push the pistons out and require recalibration.

Step-by-Step Process for Removing and Installing a Bike Tire
Begin by deflating the tire completely if it still holds air””press the valve core or simply unscrew a Presta valve. Insert the first tire lever under the tire bead about two inches from the valve, hook it onto a spoke, then insert a second lever another two inches away. Work the second lever around the rim circumference to unseat one side of the tire completely. Remove the old tube by pulling it out starting opposite the valve, then push the valve through the rim hole last. Before installing a new tube, run your fingers carefully along the inside of the tire and the rim tape, feeling for thorns, glass, or sharp objects that caused the original flat. Missing this step ranks as the most common mistake in tire changes””many cyclists immediately puncture their fresh tube on the same debris.
Also inspect the rim tape to ensure it fully covers the spoke holes, as exposed edges can puncture tubes from the inside. Partially inflate the new tube until it just holds its shape, making installation easier and reducing pinch flat risk. Insert the valve through the rim hole first, then work the tube into the tire all the way around. Starting at the valve, push the tire bead back onto the rim using your palms. The final section often requires significant hand strength””tire levers work here too, but use extreme caution to avoid pinching the tube between lever and rim. Once seated, inflate to the recommended pressure: 80 to 120 PSI for road bikes, 30 to 50 PSI for mountain bikes.
Understanding Tire Costs and Value Across Different Categories
Bike tire prices range from $20 to over $120 depending on intended use, construction quality, and puncture protection features. Road tires occupy the $20 to $80 range for standard options, with premium models from brands like Continental GP5000 or Vittoria Corsa exceeding $100 per tire. Mountain bike tires run $30 to $100, with the variation driven largely by casing durability and rubber compound choices. Commuter and hybrid tires offer the best value for daily riders, typically costing $20 to $60 while delivering excellent puncture resistance and longevity. E-bike specific tires command premium prices””$40 to $120 or more””because they must handle the additional weight and torque of electric systems.
These tires feature reinforced sidewalls and harder rubber compounds to manage the unique stresses e-bikes create. The tradeoff between price and longevity deserves careful consideration. A $30 puncture-resistant tire lasting 5,000 kilometers costs $6 per 1,000 kilometers. A $70 racing tire lasting 1,500 kilometers costs over $46 per 1,000 kilometers””nearly eight times more per mile. Unless you race competitively and need every advantage, mid-range tires with good puncture protection deliver far better value for most riders. Professional installation adds $10 to $30 per tire at bike shops, a reasonable cost if you lack tools or confidence, but unnecessary expense once you master the technique.
Factors That Accelerate or Extend Tire Lifespan
Rider weight significantly impacts tire wear””a 200-pound cyclist will wear through identical tires faster than a 140-pound rider simply due to increased contact pressure. Riding style matters too: aggressive braking, especially skidding, rapidly degrades the rear tire. Cyclists who anticipate stops and brake gradually can extend tire life by 20 percent or more compared to those who brake hard at the last moment. Road and terrain conditions create dramatic differences in longevity. Smooth asphalt treats tires gently, while chip-seal roads act like sandpaper. Urban riding with frequent glass, debris, and pothole hazards wears tires faster than rural routes.
For mountain bikers, rocky trails chew through rubber far quicker than hardpack dirt or groomed flow trails. Storage conditions affect tires even when the bike sits unused. UV exposure from sunlight breaks down rubber compounds, causing cracking and brittleness. Tires stored in garages with sun exposure or outdoors degrade much faster than those kept in dark, climate-controlled spaces. If you store a bike for months between seasons, slightly deflate the tires and keep them away from windows. Ozone from electric motors and certain chemicals also accelerates rubber degradation””keep bikes away from furnaces and water heaters if possible.
The Growing Market for Bicycle Tires and What It Means for Consumers
The global bicycle tire market reached approximately $8.32 billion in 2024 and shows projected growth at a compound annual rate of 6.3 percent, potentially reaching $13.56 billion by 2032. This expansion reflects increased cycling participation worldwide, growing e-bike adoption, and premium tire technology development. For consumers, this growth means more product options, competitive pricing, and continued innovation in puncture resistance and rolling efficiency.
Major manufacturers now invest heavily in research for compounds that balance grip, durability, and low rolling resistance””a combination that historically required choosing two of three. Tubeless technology continues expanding from mountain bikes into road and gravel segments, offering puncture self-sealing and lower pressure capability. As the market matures, expect better tires at every price point, though the fundamental maintenance knowledge in this guide will remain relevant regardless of technological advances.
Conclusion
Tire replacement timing depends on both mileage””2,500 to 4,000 kilometers for road tires, 3,000 to 8,000 miles for mountain bike tires””and visual inspection for wear indicators, cracks, and casing visibility. The replacement process requires minimal tools and basic mechanical skill, making DIY changes practical for any cyclist willing to learn. Understanding the factors that affect tire life, from rider weight to storage conditions, helps you maximize value from each tire purchase.
Start by establishing a routine inspection habit, checking tires before each ride for obvious damage and monthly for subtle wear patterns. Keep a spare tube, tire levers, and pump accessible both at home and on rides. When replacement time comes, consider your actual riding patterns rather than marketing claims””a puncture-resistant commuter tire often delivers better real-world value than a lightweight racing tire for most cyclists. Master the change process on a calm afternoon at home before you need to perform it trailside or roadside under pressure.