Before your first spring ride, inspect your tires for three critical issues: sidewall cracking, tread wear, and proper inflation. Rubber compounds degrade over winter storage, and a tire that looked fine in November may now have dry rot along the sidewalls or flat spots from sitting in one position for months. Run your fingers along both sidewalls feeling for cracks, check that the tread wear indicators (small raised bars in the tread grooves) aren’t flush with the surface, and inflate to the pressure listed on the sidewall while watching for bulges or deformities.
A cyclist in Minnesota discovered this the hard way last April when a tire that had sat deflated in a cold garage all winter blew out within the first mile due to a cracked bead that wasn’t visible during a casual glance. Beyond the basic inspection, you’ll want to assess whether your tires have enough life left for the season ahead or if replacement makes more sense now rather than mid-summer. This article covers the specific signs of tire degradation, how storage conditions affect rubber integrity, the difference between cosmetic wear and safety-critical damage, and when to upgrade rather than simply replace with the same model. We’ll also address sealant maintenance for tubeless setups and common inflation mistakes that lead to early-season flats.
Table of Contents
- What Should You Look for When Checking Bicycle Tires After Winter Storage?
- Understanding Tire Pressure Requirements for Spring Riding Conditions
- How Winter Storage Conditions Affect Tire Longevity
- When to Replace Versus Repair Spring Cycling Tires
- Tubeless Tire Maintenance Before the First Spring Ride
- Assessing Tire Age Beyond Visual Condition
- How to Prepare
- How to Apply This
- Expert Tips
- Conclusion
- Frequently Asked Questions
What Should You Look for When Checking Bicycle Tires After Winter Storage?
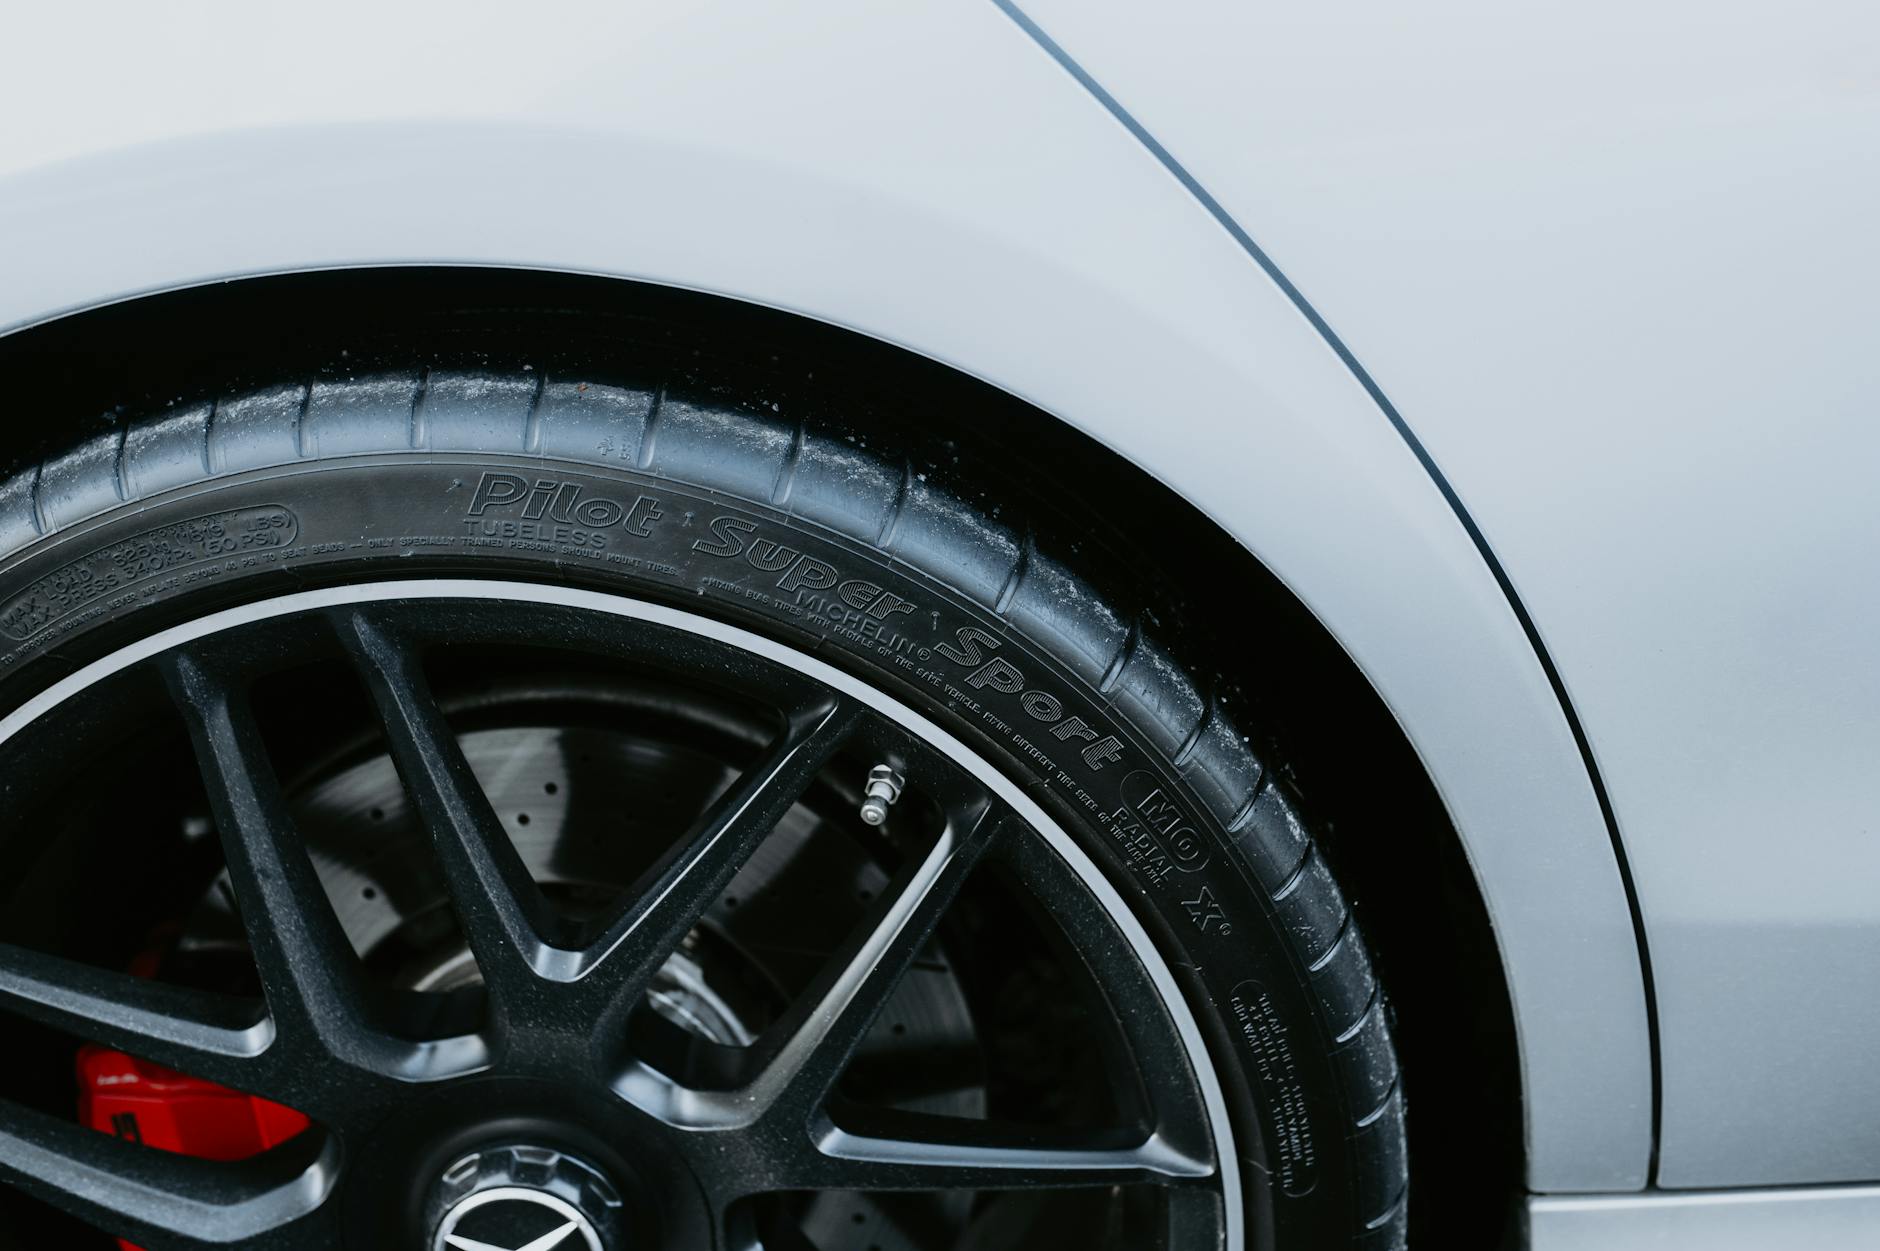
The primary concerns after winter storage are rubber degradation, structural integrity, and pressure loss. Rubber naturally oxidizes over time, and this process accelerates in cold, dry environments like unheated garages. Look for a network of small surface cracks, particularly along the sidewalls where the rubber flexes most during riding. These cracks, called checking or crazing, indicate the rubber has lost its plasticizers and become brittle. While light surface crazing on the tread may be cosmetic, any visible cracking on the sidewalls compromises the tire’s ability to contain pressure under load. Check the tire bead, the edge that hooks into the rim, for any damage or deformation. A bead that has been stressed from sitting flat or from improper storage can fail suddenly at pressure, causing a blowout rather than a gradual leak.
Compare how the bead seats around the entire circumference of both sides””it should be uniform. If one section appears higher or lower than the rest, the tire may need to be reseated or replaced. For example, a tire stored hanging on a hook by the wheel can develop a permanent flat spot at the contact point, while a tire left completely deflated may have a kinked bead. Examine the tread pattern for uneven wear, embedded debris, and cuts. Winter storage gives you time to find the small piece of glass or wire that’s been slowly working its way through the casing. Use a pick or small screwdriver to remove anything embedded in the tread. Deep cuts that expose the casing threads underneath mean the tire is compromised even if it holds air””the casing can fail under pressure, especially on rough roads.

Understanding Tire Pressure Requirements for Spring Riding Conditions
Proper inflation is more nuanced than simply pumping to the maximum pressure listed on the sidewall. That number represents the upper safe limit, not the optimal riding pressure. For spring conditions, which often include wet roads, debris from winter, and variable temperatures, most riders benefit from running 10 to 15 percent below maximum pressure. This increases the contact patch, improving grip on slick surfaces and providing better absorption of road imperfections. However, if you‘re a heavier rider or carrying panniers for commuting, you’ll need pressure closer to the maximum to prevent pinch flats and rim damage.
A 180-pound rider on 28mm tires might run 80 psi comfortably, while a 140-pound rider on the same tires could drop to 65 psi for the same performance characteristics. The calculation changes again for wider tires””a 38mm gravel tire at 80 psi would feel harsh and lose traction, where 45 to 55 psi provides optimal performance for most riders. There’s no universal correct pressure, only the pressure that works for your weight, tire width, and riding conditions. Temperature also affects tire pressure significantly during spring’s variable weather. A tire inflated to 80 psi in a 50-degree garage will measure around 85 psi after warming up on a 70-degree afternoon, and drop to 75 psi if you started riding at dawn in 40-degree weather. This swing matters less for recreational riding but can affect handling and flat resistance during longer rides that span significant temperature changes.
How Winter Storage Conditions Affect Tire Longevity
Where and how you stored your bike determines much of what you’ll find during your spring inspection. The ideal storage environment is cool, dry, and dark, with temperatures remaining relatively stable. UV exposure degrades rubber even through indirect light, and ozone from electric motors or fluorescent lighting accelerates the breakdown. A bike stored in a living space typically fares better than one in a garage with a freezer or workshop equipment. Tires left fully inflated during storage generally maintain their shape better than those allowed to go flat. The recommendation to deflate tires for storage is largely a myth from the era of cotton-casing tires””modern synthetic casings hold their shape well under pressure, and keeping them inflated prevents the tire from developing flat spots or kinks where the weight rests.
If your bike hung from hooks or sat on a stand with the wheels off the ground, this concern is eliminated entirely. A cyclist who stored their bike properly inflated on a wall hook will likely find their tires in significantly better condition than one whose bike sat on a concrete floor with flat tires for four months. Examine the rim tape while you have the tire off for inspection. Rim tape can shift, degrade, or become brittle over winter, exposing spoke holes that will puncture tubes or compromise tubeless seals. High-pressure road setups are particularly sensitive to rim tape condition. If the tape shows any lifting at the edges or visible wear over spoke holes, replace it before the first ride””it’s inexpensive insurance against frustrating flats.

When to Replace Versus Repair Spring Cycling Tires
The decision to repair or replace comes down to the severity of damage, the tire’s overall condition, and how much riding you plan to do this season. Minor cuts that don’t penetrate the casing, light tread wear, and surface cracking limited to the tread can often be monitored rather than immediately addressed. A boot””a patch of reinforcing material applied inside the tire””can extend the life of a tire with a single significant cut, getting you through a season before replacement. However, any sidewall damage warrants replacement regardless of the tire’s overall condition.
The sidewall flexes thousands of times per mile and operates under constant stress””a compromised sidewall fails unpredictably and often catastrophically. The tradeoff calculation favors replacement when multiple issues are present: a tire with moderate tread wear, some sidewall cracking, and a booted cut has accumulated enough compromises that repair no longer makes economic sense given the reliability you’re sacrificing. Compare the cost of a new tire against the inconvenience and potential danger of a failure during a ride. For performance-oriented riders, the spring inspection is an opportunity to assess whether your current tires still meet your needs or whether the riding you did last year suggests a different tire would serve better. If you found yourself wanting more grip in wet conditions, better puncture resistance for your commute, or lower rolling resistance for longer rides, now is the time to make that change rather than running through another season on tires that don’t quite work for you.
Tubeless Tire Maintenance Before the First Spring Ride
Tubeless setups require additional attention after storage because the sealant inside has a limited lifespan and may have dried out, separated, or pooled during months of inactivity. Shake the wheel and listen for liquid sloshing””if you hear nothing or only a faint sound, the sealant has likely dried into a solid mass. Remove the tire and inspect the interior. Dried sealant can be peeled out in most cases, though stubborn residue may require a plastic scraper or sealant remover. Fresh sealant should be added before the first ride regardless of what you find inside, and the tire should be spun to distribute the new sealant evenly around the interior. Most sealants require replacement every two to four months of riding, but a tire that sat unused all winter with old sealant is effectively starting at zero.
A limitation to keep in mind: sealant works by coagulating around punctures, and this process is temperature-dependent. On cold early-spring mornings, fresh sealant may take longer to seal punctures, and dried-out old sealant may not seal at all. Carry a spare tube on the first few rides of the season until you’ve verified your tubeless setup is functioning properly. Inspect the tubeless valve stem for corrosion or sealant buildup that might impede airflow. Remove the valve core and clear any obstruction with a thin wire or valve core tool. Dried sealant in the valve is a common cause of difficult inflation and inaccurate pressure readings””the restriction makes it hard to add air quickly and can cause gauges to read inconsistently.
Assessing Tire Age Beyond Visual Condition
Rubber degrades even in perfect storage conditions, and a tire that looks acceptable may have exceeded its functional lifespan. Most manufacturers recommend replacing tires after five years from the date of manufacture, regardless of wear or appearance. The tire’s date code, a four-digit number on the sidewall, indicates the week and year of production”””2521″ means the 25th week of 2021.
A tire manufactured in 2019 that has been sitting in a shop or your garage is now approaching its replacement date even if never ridden. This matters particularly for spare tires kept for emergencies or wheels built with tires that were on sale years ago. A rider last spring mounted a “new” tire from their parts bin that was actually seven years old, and it developed multiple sidewall cracks within the first hundred miles despite showing no obvious deterioration before installation. The stress of inflation and riding revealed degradation that wasn’t visible in storage.
How to Prepare
- Remove both wheels from the bike and deflate the tires completely. This allows you to manipulate the tire for thorough inspection and feel the entire surface without fighting against pressure.
- Visually inspect both sidewalls around the complete circumference, looking for cracking, cuts, bulges, or foreign objects. Use a bright light and examine the area near the bead where damage often hides.
- Check the tread for wear indicators, embedded debris, and cuts. Remove any embedded material with a pick and assess whether cuts penetrate to the casing threads.
- Inspect the bead for damage, kinks, or deformation that might prevent proper seating on the rim.
- Check the rim tape for proper adhesion and coverage of all spoke holes before reinstalling the tire.
How to Apply This
- Clean the tires and rims with a damp cloth to remove any grit or debris that accumulated during storage, paying attention to the brake track if you have rim brakes.
- Address any issues found during inspection: replace damaged rim tape, boot significant cuts if the tire is otherwise serviceable, or set aside tires that need replacement.
- Reinstall tires carefully, ensuring the bead seats evenly around the entire circumference. For tubeless setups, add fresh sealant before seating.
- Inflate to your target pressure, then let the bike sit for 24 hours and recheck pressure. Slow leaks that aren’t obvious immediately will reveal themselves overnight, and it’s better to discover them in your garage than on the road.
Expert Tips
- Check the pressure in your floor pump gauge against a separate, accurate gauge at least once per season. Pump gauges drift over time and a 10-psi error can significantly affect ride quality and flat resistance.
- Don’t immediately inflate to full pressure after winter storage. Start at 60 percent of target pressure and inspect the tire while slowly adding air. Bulges, uneven bead seating, and structural problems become visible during inflation.
- Store an index card with each bike noting the tire model, size, installation date, and the sealant refresh date for tubeless setups. This eliminates guesswork about tire age and maintenance history.
- Rotate your tires if the rear shows significantly more wear than the front. Moving the front to the rear and installing a new tire on the front extends overall tire life since the front tire wears more slowly.
- Don’t trust a tire’s appearance alone if it’s been in hot storage like a car trunk or sun-exposed shed. Heat damage can weaken the casing without visible signs, making the tire prone to sudden failure.
Conclusion
A thorough spring tire inspection addresses rubber degradation, pressure management, and structural integrity””the three factors that determine whether your tires will perform reliably through the season. The fifteen minutes spent on this inspection prevents the inconvenience of roadside repairs and the potential danger of sudden tire failure. For tubeless riders, the additional step of refreshing sealant and checking valve function ensures your puncture protection is active from the first ride.
Going forward, consider making tire inspection part of your regular maintenance routine rather than a once-yearly event. Monthly pressure checks, visual inspections every few hundred miles, and prompt attention to embedded debris keep small problems from becoming ride-ending failures. Document what you find during this spring inspection and any issues that develop during the season to inform your tire choice and maintenance schedule next year.
Frequently Asked Questions
How long does it typically take to see results?
Results vary depending on individual circumstances, but most people begin to see meaningful progress within 4-8 weeks of consistent effort. Patience and persistence are key factors in achieving lasting outcomes.
Is this approach suitable for beginners?
Yes, this approach works well for beginners when implemented gradually. Starting with the fundamentals and building up over time leads to better long-term results than trying to do everything at once.
What are the most common mistakes to avoid?
The most common mistakes include rushing the process, skipping foundational steps, and failing to track progress. Taking a methodical approach and learning from both successes and setbacks leads to better outcomes.
How can I measure my progress effectively?
Set specific, measurable goals at the outset and track relevant metrics regularly. Keep a journal or log to document your journey, and periodically review your progress against your initial objectives.
When should I seek professional help?
Consider consulting a professional if you encounter persistent challenges, need specialized expertise, or want to accelerate your progress. Professional guidance can provide valuable insights and help you avoid costly mistakes.
What resources do you recommend for further learning?
Look for reputable sources in the field, including industry publications, expert blogs, and educational courses. Joining communities of practitioners can also provide valuable peer support and knowledge sharing.


