A proper spring tune-up for your bike involves inspecting and servicing five critical systems: brakes, drivetrain, tires, cables, and bearings. After months of winter storage or wet-weather riding, these components accumulate grime, lose lubrication, and develop wear that compromises both performance and safety. The checklist starts with a thorough cleaning, moves through brake pad inspection and adjustment, chain wear measurement, tire pressure and sidewall checks, cable tension assessment, and ends with headset and bottom bracket bearing evaluation. Consider the fate of a rider who skipped their spring inspection last year: a corroded brake cable snapped during a descent in Vermont’s Green Mountains, turning what should have been a routine ride into a crash that bent the front wheel and fractured a collarbone.
This scenario plays out hundreds of times each season, yet most of these failures announce themselves weeks in advance through subtle symptoms that a proper tune-up would catch. A stretched chain, for instance, doesn’t suddenly fail””it gradually destroys your cassette and chainrings, turning a fifteen-dollar replacement into a two-hundred-dollar drivetrain overhaul. This article walks through each inspection point in detail, explains what to look for and why it matters, and helps you decide which tasks to tackle yourself versus when to hand the bike over to a professional mechanic. You’ll learn the specific measurements and wear indicators that separate a safe bike from a liability, along with the tools you’ll need and the techniques that make the job efficient.
Table of Contents
- What Should a Spring Bike Tune-Up Include?
- Inspecting and Servicing Your Bike’s Brake System
- Drivetrain Cleaning and Chain Replacement Timing
- Tire Inspection and Pressure Optimization for Spring Riding
- Cable and Housing Inspection: The Hidden Wear Points
- Bearing Assessment and Headset Adjustment
- How to Prepare
- How to Apply This
- Expert Tips
- Conclusion
- Frequently Asked Questions
What Should a Spring Bike Tune-Up Include?
A comprehensive spring tune-up addresses every system that affects safety and performance, but the priority order matters. Start with brakes because they’re your primary safety system, then move to the drivetrain because it’s typically the dirtiest and most worn, followed by tires, cables, and finally bearings. This sequence ensures you catch the most dangerous issues first while the bike is still dirty, then work toward the precision adjustments that require a clean frame. The brake inspection involves measuring pad thickness, checking rotor condition for disc brakes or rim wear for rim brakes, and testing lever feel. Hydraulic systems need a fluid level check and inspection for leaks at the caliper pistons and lever seals. Cable-actuated brakes require cable and housing inspection for fraying, kinking, or corrosion.
Many riders overlook the mounting hardware””caliper bolts should be torqued to specification, and quick-release mechanisms must engage fully. A good comparison: new brake pads typically have four to five millimeters of material, while pads worn below one millimeter need immediate replacement. The warning signs include inconsistent lever feel, squealing that persists after cleaning, and visible scoring on rotors or rims. Drivetrain inspection requires measuring chain wear with a chain checker tool, examining chainring and cassette teeth for the shark-fin profile that indicates excessive wear, and verifying derailleur alignment and limit screw settings. A chain stretched beyond 0.5 percent on a twelve-speed drivetrain or 0.75 percent on an eleven-speed system will accelerate cassette wear significantly. Shift through every gear combination while watching the chain for hesitation, skipping, or noise that indicates indexing problems or component wear.
Inspecting and Servicing Your Bike’s Brake System
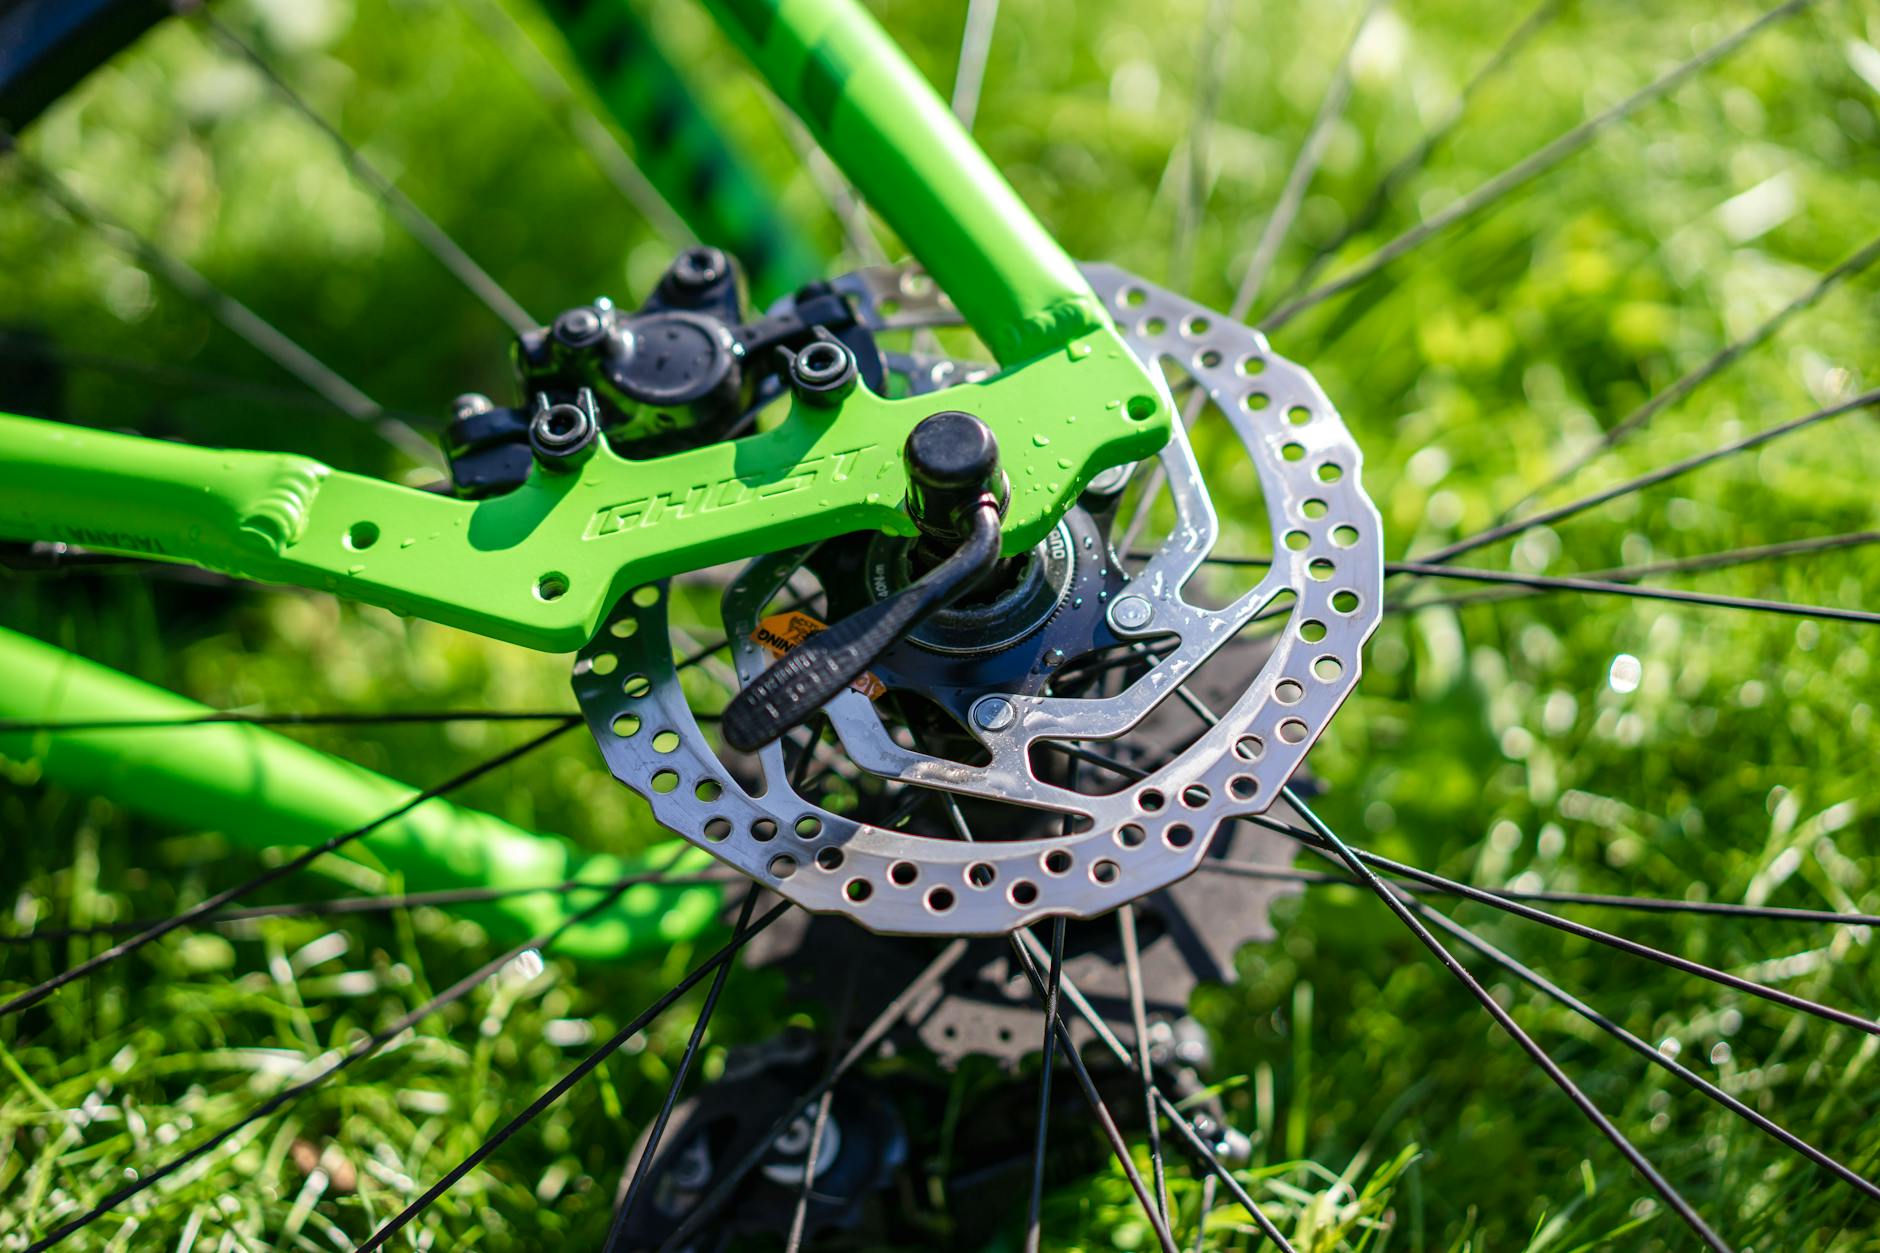
Brake inspection goes beyond squeezing the lever and hoping for the best. For disc brakes, remove each wheel and visually inspect the pads through the caliper opening””most pads have wear indicator grooves that disappear when replacement is due. Check the rotor for warping by spinning the wheel slowly and watching the gap between pad and rotor through the caliper. Any visible wobble means the rotor needs truing or replacement. Measure rotor thickness with a caliper; most rotors stamp their minimum thickness on the braking surface, typically 1.5 to 1.8 millimeters depending on manufacturer. However, if your bike has been stored in a damp environment or ridden through winter salt and slush, surface corrosion on rotors can create a false sense of security. The rotor might measure within specification but have pitting that reduces braking power and accelerates pad wear.
Light surface rust typically cleans off with a few hard stops, but deep pitting requires rotor replacement. Hydraulic brake fluid also absorbs moisture over time, reducing the boiling point and creating a spongy lever feel under prolonged braking. If your brakes felt fine in October but now require more lever travel, a bleed might be necessary even if there are no visible leaks. Rim brakes present different challenges. Inspect the brake track on the rim for concave wear””many modern rims include wear indicator dimples or grooves that disappear when the rim wall becomes dangerously thin. A worn rim can fail catastrophically under braking, particularly on long descents where heat builds up. Check that brake pads contact the rim squarely without touching the tire sidewall, and verify that the pads toe-in slightly to prevent squealing. Cable-actuated systems should allow the lever to engage braking force before reaching the halfway point of lever travel.
Drivetrain Cleaning and Chain Replacement Timing
Chain wear measurement determines whether you’re performing routine maintenance or facing a cascade of replacement parts. A chain checker tool provides instant feedback: insert the tool into the chain, and if it drops fully into place at the 0.5 percent mark, replacement is due for most modern drivetrains. Waiting until the chain stretches to 0.75 or one percent dramatically increases the likelihood that the stretched chain has worn matching grooves into your cassette and chainrings, requiring their replacement as well. A fifteen-dollar chain becomes a three-hundred-dollar drivetrain when wear goes unchecked. The cleaning process matters as much as measurement. A drivetrain caked in winter grime harbors abrasive particles that accelerate wear with every pedal stroke. Remove the chain using a quick link or chain tool, then soak it in degreaser while you scrub the cassette, chainrings, and derailleur pulleys.
Toothbrushes and dedicated cleaning tools reach between cogs where buildup hides. Rinse everything thoroughly””residual degreaser attracts new contamination and breaks down fresh lubricant. Let components dry completely before reassembly and lubrication. For example, a mechanic at a shop in Boulder, Colorado, documented the difference between two identical bikes used by commuters in similar conditions. The rider who cleaned and lubricated their chain weekly went eighteen months before needing a new chain and showed minimal cassette wear. The rider who performed only occasional maintenance replaced three chains in the same period along with two cassettes, spending roughly four times more on parts despite riding the same distance. Proper cleaning doesn’t just improve shifting””it represents significant long-term savings.
Tire Inspection and Pressure Optimization for Spring Riding
Tires demand attention beyond checking pressure because rubber degrades during storage and accumulated damage may not be obvious. Start by inflating tires to their maximum rated pressure and examining the entire circumference of each tire for cuts, embedded debris, and sidewall damage. Rotate the wheel slowly while flexing the tire sidewall outward to expose cracks in the rubber that indicate aging or dry rot. Even tires with adequate tread depth may have compromised casing integrity after sitting deflated through winter, particularly if stored in temperature extremes or direct sunlight. The tradeoff between pressure settings involves grip, comfort, rolling resistance, and puncture protection. Higher pressures reduce rolling resistance on smooth surfaces but increase harshness and can actually slow you down on rough pavement where the tire bounces rather than conforming to irregularities.
Lower pressures improve grip and comfort but increase the risk of pinch flats and sidewall damage, particularly with lightweight race tires. Tubeless setups allow lower pressures without pinch flat risk but require sealant inspection””winter storage often leaves sealant dried into ineffective clumps that need removal and replacement. Spring conditions also affect optimal pressure. Early-season rides often encounter debris washed onto roads during snowmelt and spring rains, making puncture-resistant tires or slightly higher pressures worthwhile despite the comfort tradeoff. As roads clean up and temperatures stabilize, you can optimize for performance. Most riders run pressures ten to fifteen percent lower than they think they need””experimentation with a quality floor pump that has an accurate gauge often reveals that less pressure improves both speed and comfort.
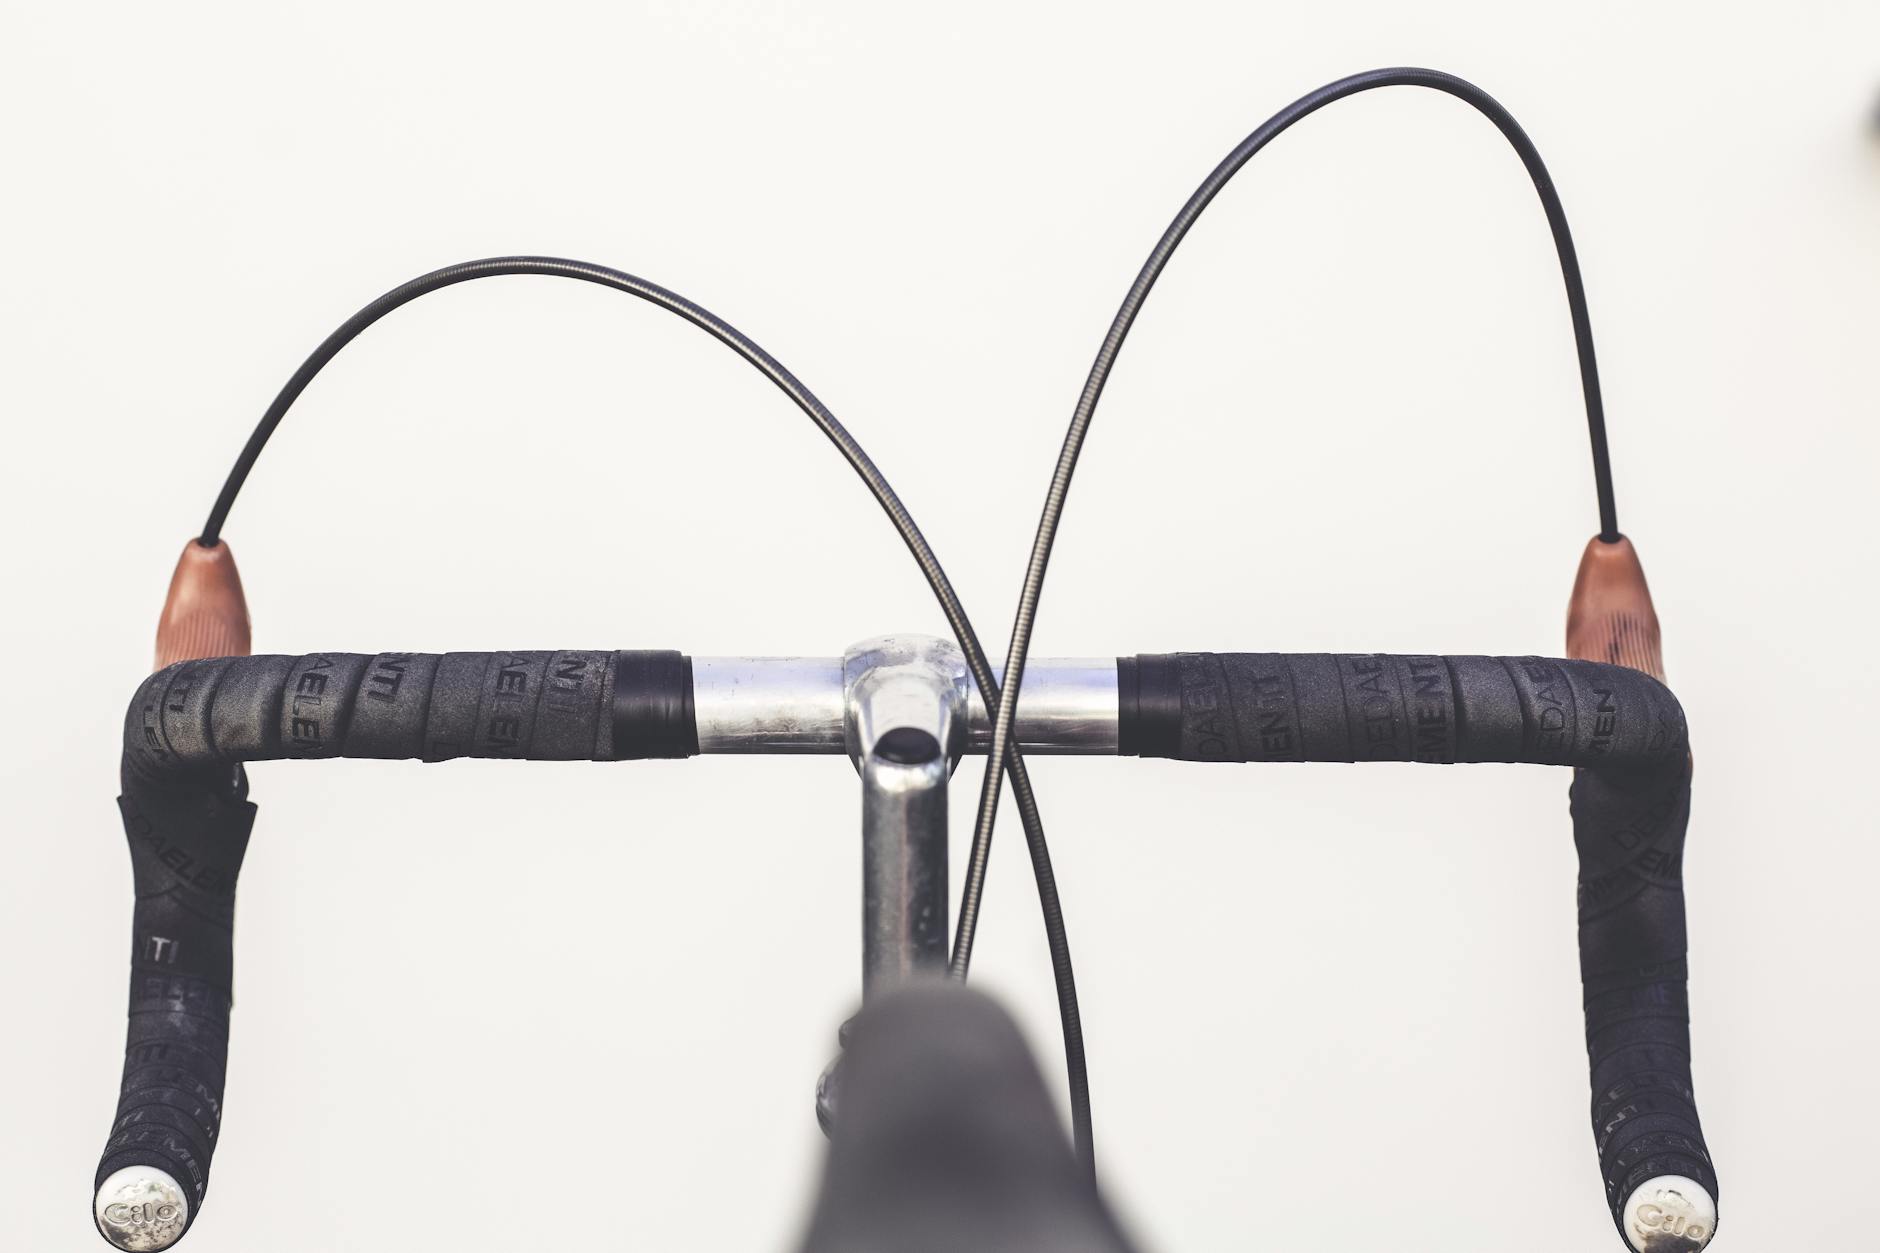
Cable and Housing Inspection: The Hidden Wear Points
Cables and housing rank among the most overlooked tune-up items because their degradation is gradual and often invisible until failure occurs. Shift and brake cables run through housing that can corrode internally, creating friction that makes shifting sluggish and braking unpredictable. The visual inspection focuses on housing ends where fraying typically begins and on any point where housing bends sharply or contacts the frame. Kinked housing restricts cable movement and can trap moisture that accelerates corrosion inside the liner. To assess cable condition, disconnect the cable from its anchor point and slide it through the housing by hand. Smooth, consistent resistance indicates healthy cables and housing.
Any catching, roughness, or inconsistent friction points to internal corrosion or damaged housing liner. Pay particular attention to the short housing segments at the handlebars, where repeated steering movement stresses the housing, and at the rear derailleur, where the tight bend radius accelerates wear. Even bikes with internal cable routing eventually exit to external housing segments near the components, and these transition points trap water and contaminants. One limitation of cable inspection applies to bikes with fully internal routing: you cannot easily assess cable condition without complete removal and rerouting, which requires routing tools and considerable patience. For these bikes, replacement on a time-based schedule””typically every two to three years for recreational riders or annually for high-mileage cyclists””prevents unexpected failures. The alternative is waiting for symptoms like slow return on brake levers or delayed downshifts, but by then the cables may be close to failure. Internal routing also complicates housing replacement, often requiring professional service or specialized magnetic routing tools.
Bearing Assessment and Headset Adjustment
Bearings in the headset, bottom bracket, and wheel hubs accumulate wear and contamination that manifests as roughness, play, or noise. The headset check involves straddling the front wheel and applying the front brake while rocking the bike forward and backward””any clunking indicates loose headset bearings that need adjustment or replacement. With the front wheel off the ground, turn the handlebars slowly through their full range and feel for notches or roughness that indicate pitted bearing races, a condition called brinelling that requires bearing replacement rather than simple adjustment. Bottom bracket assessment requires removing the chain from the chainrings and spinning the crankarms by hand. Any roughness, grinding sensation, or lateral play indicates worn bearings.
External bottom brackets allow easy removal and inspection, while press-fit designs require specific tools and may benefit from professional service. Hub bearings can be checked by grasping the rim and attempting to move the wheel side to side””play indicates adjustment needed for cup-and-cone hubs or bearing replacement for cartridge-style sealed bearings. For example, a touring cyclist preparing for a cross-country trip found slight roughness in their bottom bracket during spring inspection. The original plan was to service it after the trip, but a pre-trip consultation with a mechanic revealed that the bearings were within weeks of catastrophic failure. Replacement before departure cost sixty dollars in parts and labor; failure on the road would have meant waiting for parts in a small Montana town and potentially damaging the frame’s bearing surfaces.
How to Prepare
- Assemble your tool kit: Allen wrenches in 4, 5, and 6 millimeter sizes cover most modern bikes, plus a torque wrench for carbon components, tire levers, a chain checker, and a floor pump with pressure gauge. Add a chain tool if your chain lacks a quick link.
- Gather cleaning supplies: Degreaser, clean rags, brushes of various sizes, and a bucket for soaking the chain. Avoid using high-pressure water that can force contamination into bearings.
- Stock replacement parts: Chain lubricant matched to your conditions (wet or dry), brake pads if yours are borderline, a spare quick link, and cables and housing if yours are more than two years old.
- Prepare your workspace: A bike stand dramatically improves access to all components and saves your back. Work in a well-lit area with a clean floor where you can spot dropped hardware.
- Download specifications: Look up torque values for your specific components, particularly stem bolts, seatpost clamp, and brake caliper mounts. Over-torquing damages threads and carbon components; under-torquing creates dangerous loose parts.
How to Apply This
- Start with a complete wash and degrease cycle before any inspection. Dirt obscures wear indicators and makes accurate assessment impossible. Pay special attention to the drivetrain, brake surfaces, and pivot points.
- Work through systems in priority order: brakes first for safety, then drivetrain, tires, cables, and finally bearings. Complete all inspection and service on one system before moving to the next to maintain focus and avoid missing steps.
- Test ride before considering the job complete. A short ride around the block reveals shifting issues, brake problems, and noises that weren’t apparent on the stand. Bring tools for minor adjustments.
- Document what you find and what you replace. Keeping a maintenance log helps predict future service needs and identifies recurring problems that might indicate underlying issues like frame misalignment or component incompatibility.
Expert Tips
- Replace cables and housing proactively every two years even if they appear functional; the internal corrosion that causes failure isn’t visible until it’s too late, and fresh cables transform shifting quality.
- Do not lubricate a dirty chain””lubricant on top of grime creates an abrasive paste that accelerates wear. Always clean thoroughly first, let dry completely, then apply lubricant sparingly to each roller.
- Check derailleur hanger alignment with a dedicated tool before blaming indexing problems on cable stretch or limit screws; a bent hanger causes ghost shifting that no amount of cable adjustment can fix.
- If your hydraulic brakes feel spongy after winter storage, try squeezing the lever firmly and holding it for thirty seconds to reset piston position before assuming you need a full bleed.
- Never skip the test ride, even after a seemingly minor adjustment; problems that seem theoretical on the stand become immediately obvious when pedaling under load, and catching them at home beats discovering them miles from your car.
Conclusion
A thorough spring tune-up prevents the cascading failures that transform small maintenance items into expensive repairs and dangerous situations. The investment of a few hours each spring protects both your safety and your wallet by catching wear before it spreads from chains to cassettes, from brake pads to rotors, and from minor cable corrosion to sudden failure. Each system inspection follows a logical progression from visual assessment to measurement to hands-on testing, providing multiple opportunities to identify problems.
The checklist approach ensures consistency year after year, building familiarity with your bike’s normal condition so that developing problems stand out immediately. Riders who maintain detailed service logs often report catching issues at the earliest possible stage simply because they know what their bike looked and felt like at the last inspection. Whether you complete the entire tune-up yourself or use this checklist to communicate intelligently with your shop mechanic, understanding these inspection points makes you a better-informed cyclist who can trust their equipment when the riding matters most.
Frequently Asked Questions
How long does it typically take to see results?
Results vary depending on individual circumstances, but most people begin to see meaningful progress within 4-8 weeks of consistent effort. Patience and persistence are key factors in achieving lasting outcomes.
Is this approach suitable for beginners?
Yes, this approach works well for beginners when implemented gradually. Starting with the fundamentals and building up over time leads to better long-term results than trying to do everything at once.
What are the most common mistakes to avoid?
The most common mistakes include rushing the process, skipping foundational steps, and failing to track progress. Taking a methodical approach and learning from both successes and setbacks leads to better outcomes.
How can I measure my progress effectively?
Set specific, measurable goals at the outset and track relevant metrics regularly. Keep a journal or log to document your journey, and periodically review your progress against your initial objectives.
When should I seek professional help?
Consider consulting a professional if you encounter persistent challenges, need specialized expertise, or want to accelerate your progress. Professional guidance can provide valuable insights and help you avoid costly mistakes.
What resources do you recommend for further learning?
Look for reputable sources in the field, including industry publications, expert blogs, and educational courses. Joining communities of practitioners can also provide valuable peer support and knowledge sharing.


