Learning how to get a professional road bike fit represents one of the most valuable investments any cyclist can make, yet it remains surprisingly overlooked by riders of all levels. Whether purchasing a first road bike or optimizing an existing setup after years of riding, the relationship between body and machine determines everything from comfort and efficiency to injury prevention and long-term enjoyment of the sport. A proper bike fit transforms an off-the-rack bicycle into a personalized performance tool that works with the rider’s unique anatomy rather than against it. The consequences of riding a poorly fitted bike accumulate gradually and often go unrecognized until they manifest as chronic pain, reduced power output, or frustrating plateaus in performance.
Knee pain, lower back discomfort, neck strain, and hand numbness rank among the most common complaints from cyclists, and the vast majority of these issues trace directly back to improper bike setup. Beyond injury prevention, professional fitting unlocks efficiency gains that no amount of training can replicate”studies suggest that optimized positioning can improve power transfer by five to ten percent while simultaneously reducing perceived exertion. This guide covers the complete process of obtaining a professional road bike fit, from understanding what the fitting session entails to selecting a qualified fitter and preparing for the appointment. Readers will gain insight into the specific measurements and adjustments involved, learn to recognize when a fit is needed, and understand how to maintain optimal positioning over time. The goal is to demystify a process that many cyclists find intimidating and demonstrate why professional fitting serves as the foundation for every other aspect of cycling development.
Table of Contents
- What Is a Professional Road Bike Fit and Why Does It Matter for Cyclists?
- The Complete Road Bike Fitting Process Explained
- Key Measurements and Adjustments in Road Bike Fitting
- How to Find and Choose a Qualified Bike Fitter
- Common Road Bike Fit Problems and How Professional Fitting Solves Them
- When to Get a Professional Road Bike Fit
- How to Prepare
- How to Apply This
- Expert Tips
- Conclusion
- Frequently Asked Questions
What Is a Professional Road Bike Fit and Why Does It Matter for Cyclists?
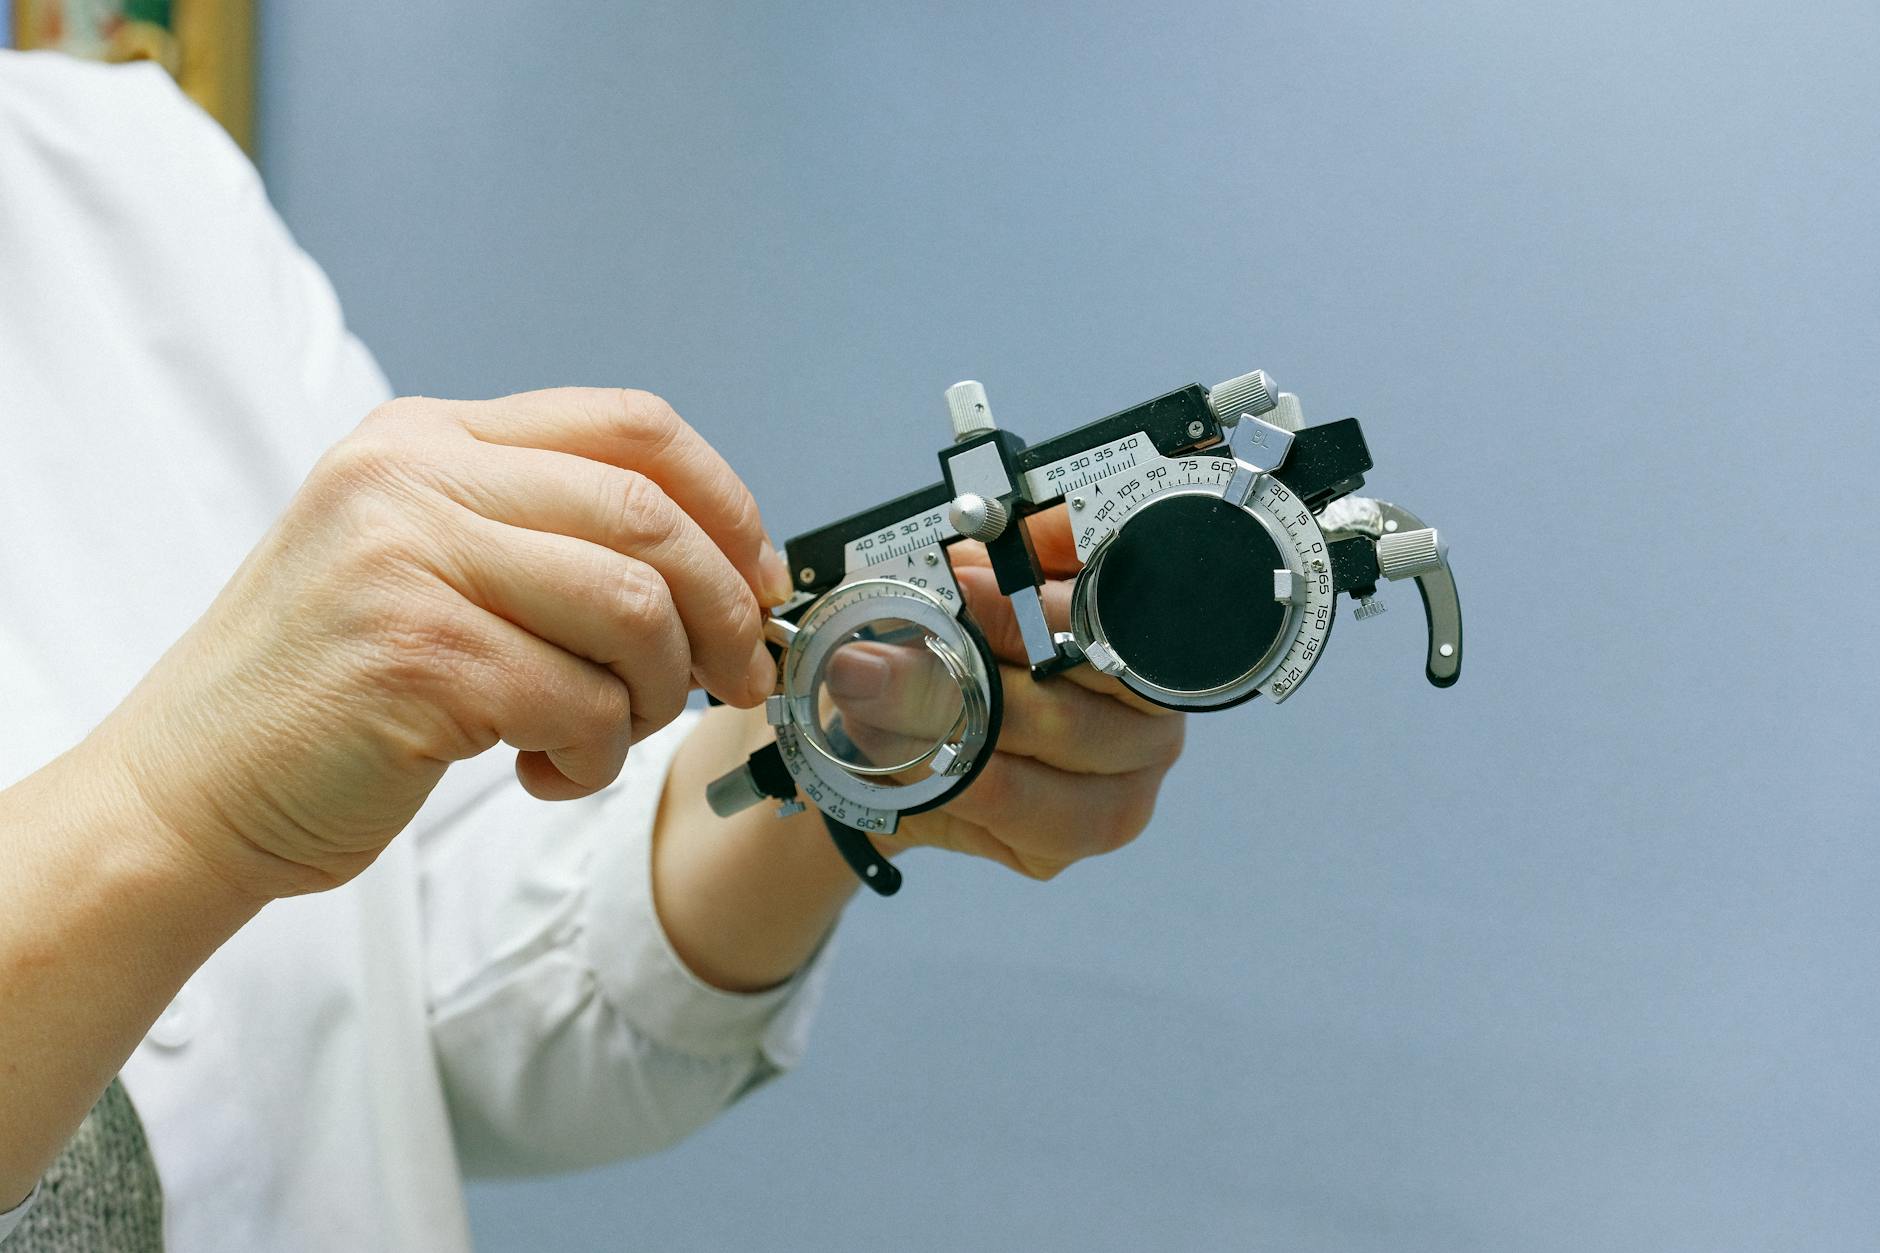
A professional road bike fit is a comprehensive assessment and adjustment process conducted by a trained specialist who analyzes a cyclist’s body dimensions, flexibility, riding style, and goals to optimize the interface between rider and bicycle. Unlike basic sizing charts that match frame size to height, professional fitting examines dozens of variables including saddle height, fore-aft position, handlebar reach and drop, cleat placement, and crank length. The process typically involves sophisticated measurement tools, video analysis, and iterative adjustments performed while the cyclist pedals on a stationary trainer or specialized fitting jig.
The importance of professional fitting extends far beyond comfort, though comfort certainly matters for anyone spending hours in the saddle. Proper positioning maximizes the biomechanical efficiency of the pedal stroke, allowing riders to generate more power with less muscular fatigue. When joints move through their optimal range of motion and muscles fire in their ideal length-tension relationship, the body can sustain higher outputs for longer durations. Elite cyclists and professional teams invest heavily in fitting services precisely because marginal gains in efficiency translate directly to competitive advantage.
- **Injury prevention** stands as perhaps the most compelling reason to pursue professional fitting, as repetitive stress injuries account for the majority of cycling-related medical issues. A knee tracking improperly over the pedal by just a few millimeters can result in thousands of misaligned repetitions per hour, eventually causing patellofemoral syndrome or iliotibial band irritation.
- **Power optimization** through proper saddle height and fore-aft positioning ensures that primary muscle groups”quadriceps, hamstrings, and glutes”engage in their most effective ranges. Research published in the Journal of Sports Sciences demonstrates that saddle height variations of just two centimeters can alter power output by more than three percent.
- **Aerodynamic efficiency** improves when a rider can maintain an aggressive position without compromising breathing or comfort. Professional fitters balance the desire for a low frontal area against the practical limitations of flexibility and core strength, finding the sustainable sweet spot for each individual.

The Complete Road Bike Fitting Process Explained
Professional bike fitting sessions follow a structured methodology that begins well before any wrenches touch the bicycle. Most qualified fitters start with a detailed interview covering riding history, current complaints or discomfort, training volume, competitive goals, and any relevant injury history. This conversation shapes the entire fitting approach”a time-trialist seeking maximum aerodynamic advantage requires different optimization priorities than a recreational rider prioritizing all-day comfort for charity events. The physical assessment phase evaluates the cyclist’s body independent of the bike, measuring leg length discrepancies, hip flexibility, shoulder width, arm reach, and core stability.
Fitters often conduct functional movement screens to identify asymmetries or limitations that will influence positioning decisions. A rider with tight hamstrings, for example, cannot safely achieve the same saddle height as someone with exceptional flexibility, regardless of what theoretical calculations suggest. These assessments reveal constraints that must be accommodated rather than ignored. The session concludes with documentation of all final positions, recommendations for any component changes needed, and follow-up protocols. Many fitters provide detailed reports that allow future bike setups to replicate the established positioning.
- **Static measurements** establish baseline dimensions including inseam length, torso length, shoulder width, and arm span. These numbers inform initial setup parameters but serve only as starting points rather than definitive answers.
- **Dynamic assessment** observes the cyclist actually pedaling, using video cameras to capture knee tracking, hip stability, ankle movement, and upper body positioning. Modern fitting systems employ motion-capture technology that quantifies joint angles throughout the pedal stroke with sub-degree precision.
- **Iterative refinement** distinguishes professional fitting from simple measurement-based sizing. Fitters make incremental adjustments, observe the results, gather rider feedback, and continue refining until achieving optimal positioning. This process often requires multiple adjustment cycles as changes in one area affect sensations elsewhere.
Key Measurements and Adjustments in Road Bike Fitting
Saddle height remains the most fundamental fitting parameter and the one most commonly set incorrectly by self-fitting cyclists. The traditional method of setting saddle height so the heel barely touches the pedal at bottom dead center provides only a rough approximation. Professional fitters measure knee angle at bottom dead center using goniometers or video analysis, targeting angles between 25 and 35 degrees depending on riding style and flexibility.
A saddle too low limits power production and stresses the knee joint; too high causes the pelvis to rock and creates excessive hamstring tension. Fore-aft saddle position determines how the rider’s weight distributes between the pedals and handlebars while also affecting knee tracking over the pedal spindle. The outdated “knee over pedal spindle” rule that positions the kneecap directly above the pedal axle has been largely abandoned by modern fitters, who recognize that optimal positioning varies significantly based on riding discipline, flexibility, and individual anatomy. Time trialists often position significantly forward of KOPS to leverage quadriceps dominance, while endurance riders may benefit from a more rearward position that engages posterior chain muscles for sustained efforts.
- **Handlebar reach** affects weight distribution, breathing capacity, and upper body comfort. Reach too long strains shoulders and neck while compromising control; reach too short cramps the hip angle and reduces power potential. Professional fitters adjust stem length and handlebar setback to achieve appropriate reach while maintaining a sustainable hip angle between 40 and 50 degrees at the top of the pedal stroke.
- **Handlebar drop** represents the vertical distance between saddle and handlebar tops, controlling how aggressively the rider positions relative to the wind. Greater drop improves aerodynamics but demands flexibility, core strength, and neck mobility that many recreational cyclists lack. Fitters balance aerodynamic benefits against comfort limitations.
- **Cleat position** on cycling shoes profoundly impacts pedaling biomechanics despite receiving less attention than frame-level adjustments. Fore-aft cleat positioning affects calf muscle engagement and Achilles tendon stress, while rotational cleat angle must accommodate the rider’s natural foot angle to prevent knee torque.
How to Find and Choose a Qualified Bike Fitter
The bike fitting industry lacks universal certification standards, which means quality varies dramatically between practitioners. Several reputable training programs produce competent fitters, including Retül, Specialized Body Geometry, Trek Precision Fit, and various sports medicine-based approaches. Certification from these programs indicates baseline competency, though experience and continued education matter equally. The best fitters combine technical training with extensive practical experience and genuine passion for the biomechanics of cycling.
When evaluating potential fitters, inquire about their methodology, tools, and typical session duration. Quality fits rarely take less than two hours, with comprehensive sessions often extending to three or four hours. Be skeptical of quick fitting services that promise results in 30 minutes”true optimization requires observation, iteration, and refinement that cannot be rushed. Ask about follow-up policies; reputable fitters include at least one follow-up session to address issues that emerge after accumulating saddle time on the new setup.
- **Reputation and reviews** from other cyclists provide valuable insight into a fitter’s effectiveness. Local cycling clubs, bike shops, and online forums often identify the respected fitters in a region. Pay attention to testimonials from riders with similar goals and body types.
- **Equipment quality** correlates with fitting precision. Motion-capture systems, pressure-mapping saddles, and adjustable fitting jigs enable more accurate assessment than basic tools alone. While skilled fitters can achieve good results with minimal equipment, advanced technology removes guesswork and improves repeatability.
- **Communication style** matters because the fitting process is collaborative. The fitter must understand the rider’s goals, concerns, and feedback while also educating the rider about positioning rationale. A fitter who dismisses rider input or fails to explain adjustments may produce technically correct positioning that the rider never trusts or maintains.
- **Specialization** helps when specific concerns drive the fitting need. Some fitters focus on addressing injury and pain, often holding physical therapy credentials. Others specialize in racing performance or triathlon positioning. Match the fitter’s expertise to the primary fitting objective.
Common Road Bike Fit Problems and How Professional Fitting Solves Them
Knee pain represents the most frequent complaint that drives cyclists to seek professional fitting, and it demonstrates how small positioning errors compound over thousands of pedal strokes. Anterior knee pain typically indicates a saddle positioned too low or too far forward, while posterior knee pain often results from a saddle too high or too far back. Lateral knee pain frequently traces to cleat rotation misalignment that forces the knee to track outside its natural plane. A professional fitter identifies the pain pattern, examines the relevant positioning parameters, and makes targeted corrections that address root causes rather than symptoms.
Lower back pain affects a substantial percentage of road cyclists and stems from multiple potential causes that require systematic investigation. Excessive reach forces the lower back to round forward, placing sustained stress on lumbar structures. Inadequate core strength allows the pelvis to rock with each pedal stroke, creating repetitive flexion-extension cycles. Saddle positioning that shifts too much weight backward increases lumbar lordosis and compresses facet joints. Professional fitters consider all these factors when addressing back complaints, sometimes recommending off-bike interventions like core strengthening alongside positional adjustments.
- **Hand numbness and pain** typically result from excessive weight on the handlebars, often caused by a reach too long or a saddle nose tilted downward that slides the rider forward. Fitters redistribute weight through positioning changes and sometimes recommend handlebar shapes or glove padding to reduce pressure on the ulnar and median nerves.
- **Neck and shoulder tension** indicates an aggressive position that exceeds the rider’s flexibility or a handlebar width that forces the shoulders into a cramped or overextended position. Solutions may include raising the handlebars, shortening the stem, or selecting handlebars with appropriate width and reach dimensions.
- **Foot numbness or hot spots** trace to cleat positioning, shoe fit, or pedal interface issues. Professional fitters assess foot mechanics, recommend appropriate insoles or wedges for cyclists with forefoot tilt, and position cleats to support natural foot function.

When to Get a Professional Road Bike Fit
Several circumstances strongly indicate the need for professional fitting services. Purchasing a new bicycle warrants fitting before or immediately after the transaction”ideally, the fitting data informs frame size selection and component specification. Many cyclists make expensive mistakes by purchasing bikes that cannot be properly fitted to their bodies, requiring component replacements or, in extreme cases, complete frame changes. Getting fitted before buying prevents these costly errors.
Experiencing persistent discomfort or pain while riding signals positioning problems that self-adjustment rarely resolves effectively. While minor saddle height tweaks might temporarily improve symptoms, underlying issues often involve multiple interacting variables that require professional assessment to untangle. Changes in flexibility, fitness, or riding goals also justify re-fitting, as the body’s needs evolve over time. A position established five years ago may no longer suit a rider whose hamstring flexibility has declined or whose competitive aspirations have shifted from racing to endurance touring. After injuries or extended time off the bike, re-fitting ensures the returning rider isn’t fighting against positioning that no longer matches their current physical condition.
How to Prepare
- **Document current discomfort or complaints** by keeping a brief log for several rides before the appointment. Note when symptoms appear, their location, intensity, and any positions or terrain that seem to trigger them. This information helps the fitter prioritize adjustments and identify patterns.
- **Gather riding history and goals** to share with the fitter, including typical weekly mileage, event participation, riding terrain, and aspirations for future cycling. A fitter optimizes differently for someone training for competitive road racing versus someone seeking comfortable weekend centuries.
- **Bring the actual bike to be fitted** along with all equipment used during typical rides”cycling shoes, shorts, pedals, and any accessories that remain on the bike. Wear the clothing and shoes that will be used in actual riding, as different shorts or shoes can alter positioning needs.
- **Arrive physically prepared** by avoiding intense training the day before the fit. Fatigued muscles behave differently than fresh ones, potentially leading to positioning that doesn’t suit normal riding conditions. Arrive well-hydrated and having eaten normally.
- **Compile relevant medical history** including past injuries, surgeries, chronic conditions, and any current treatment from physical therapists or physicians. Flexibility limitations, leg length discrepancies, or spinal issues all affect fitting decisions and should be disclosed upfront.
How to Apply This
- **Transfer fit specifications exactly** when the fitting is complete, using the documented measurements to set up the bike. If the fitting was performed on a fit jig rather than the actual bike, take care to replicate all dimensions precisely. Small measuring errors can negate the fitting benefits.
- **Allow adaptation time** after implementing new positioning, as the body needs to adjust even to objectively better positions. Start with shorter rides and gradually increase duration over two to three weeks. Some temporary discomfort in new muscle engagement patterns is normal; persistent or worsening pain is not.
- **Schedule the follow-up appointment** that most professional fitters include in their service. After accumulating meaningful saddle time”typically 200 to 500 kilometers”return for refinement based on real-world feedback. Positions that felt ideal on the trainer may need minor tweaks after road riding.
- **Maintain the established position** by periodically checking key measurements and resisting the temptation to make casual adjustments. Mark saddle and handlebar positions with tape or paint pen to detect slippage. When components must be replaced, use the documented specifications to maintain fit integrity.
Expert Tips
- **Request the complete fit data** in written form before leaving the appointment. This documentation proves invaluable for future bike purchases, travel bike rentals, or working with a different fitter if relocating. The record should include saddle height, setback, and tilt; handlebar reach and drop; crank length; and cleat position.
- **Be honest about flexibility limitations** rather than straining to demonstrate mobility you cannot maintain. Fitters can only optimize for the body that shows up at the appointment. Positions established while forcing end-range flexibility will prove unsustainable and potentially injurious during actual riding.
- **Consider the interplay between fit and equipment** when discussing options with the fitter. Sometimes achieving optimal positioning requires component changes beyond simple adjustments”a different stem length, saddle shape, or crank size. Quality fitters explain these needs without pressuring equipment sales.
- **Address leg length discrepancies proactively** if aware of any difference between limbs. Discrepancies exceeding a few millimeters often require shims under cleats or adjusted crank lengths to balance the pedal stroke. Ignoring asymmetries forces compensation patterns that cause injury over time.
- **Revisit the fit after significant changes** including substantial weight loss or gain, injury recovery, flexibility improvements from dedicated stretching, or shifts in riding focus. The body changes, and fit should evolve accordingly. Annual check-ups maintain optimal positioning even without obvious problems.
Conclusion
Investing in a professional road bike fit delivers returns that compound with every ride, protecting against injury while unlocking performance potential that no amount of training can replicate on a poorly fitted machine. The process examines the complete interface between cyclist and bicycle, optimizing saddle position, handlebar setup, and cleat placement based on individual anatomy, flexibility, and goals. While the upfront cost”typically ranging from $150 to $400 for comprehensive services”may seem significant, it pales against the expense of treating preventable injuries or the frustration of struggling against equipment that works against the body.
The path forward involves researching qualified fitters in the area, preparing thoroughly for the appointment, and committing to the adaptation period that allows the body to adjust to optimized positioning. Most cyclists who experience professional fitting wonder why they waited so long, discovering newfound comfort and efficiency that transforms their relationship with the sport. The bicycle becomes an extension of the body rather than a source of compromise, and riding evolves from something endured into something genuinely enjoyed for years to come.
Frequently Asked Questions
How long does it typically take to see results?
Results vary depending on individual circumstances, but most people begin to see meaningful progress within 4-8 weeks of consistent effort. Patience and persistence are key factors in achieving lasting outcomes.
Is this approach suitable for beginners?
Yes, this approach works well for beginners when implemented gradually. Starting with the fundamentals and building up over time leads to better long-term results than trying to do everything at once.
What are the most common mistakes to avoid?
The most common mistakes include rushing the process, skipping foundational steps, and failing to track progress. Taking a methodical approach and learning from both successes and setbacks leads to better outcomes.
How can I measure my progress effectively?
Set specific, measurable goals at the outset and track relevant metrics regularly. Keep a journal or log to document your journey, and periodically review your progress against your initial objectives.
When should I seek professional help?
Consider consulting a professional if you encounter persistent challenges, need specialized expertise, or want to accelerate your progress. Professional guidance can provide valuable insights and help you avoid costly mistakes.
What resources do you recommend for further learning?
Look for reputable sources in the field, including industry publications, expert blogs, and educational courses. Joining communities of practitioners can also provide valuable peer support and knowledge sharing.


