Learning how to clean and lubricate your bike chain properly is one of the most fundamental maintenance skills every cyclist should master, yet it remains one of the most commonly neglected aspects of bicycle care. A well-maintained chain operates quietly, shifts smoothly, and transfers power efficiently from your legs to the rear wheel. Conversely, a dirty or dry chain creates friction, accelerates wear on expensive drivetrain components, and can leave you stranded with a broken chain mid-ride. The difference between a chain that lasts 2,000 miles and one that survives 5,000 miles often comes down to nothing more than regular cleaning and proper lubrication. The problems caused by poor chain maintenance extend far beyond the chain itself.
Grit and grime embedded in chain links act like sandpaper against chainrings and cassette cogs, wearing down teeth at an accelerated rate. A stretched chain caused by internal wear no longer meshes properly with these components, creating skipping under load and potentially dangerous situations when climbing or sprinting. Replacing a cassette and chainrings can cost anywhere from $100 to $500 or more depending on the groupset, making the few minutes required for regular chain care an excellent investment of time. By the end of this guide, you will understand the complete process of inspecting, cleaning, and lubricating your bicycle chain using both quick maintenance methods and deep cleaning techniques. The information covers different lubricant types suitable for various riding conditions, proper application methods that maximize protection while minimizing dirt attraction, and the warning signs that indicate your chain needs attention. Whether you ride a commuter bike through city streets, a road bike on long weekend rides, or a mountain bike through muddy trails, these techniques apply universally with minor adjustments for your specific conditions.
Table of Contents
- Why Does Your Bike Chain Need Regular Cleaning and Lubrication?
- Understanding Different Bike Chain Lubricant Types and When to Use Them
- Tools and Supplies Needed for Proper Chain Maintenance
- Step-by-Step Guide to Clean Your Bike Chain Effectively
- Common Chain Lubrication Mistakes and How to Avoid Them
- Maintenance Frequency and Seasonal Chain Care Considerations
- How to Prepare
- How to Apply This
- Expert Tips
- Conclusion
- Frequently Asked Questions
Why Does Your Bike Chain Need Regular Cleaning and Lubrication?
The bicycle chain operates in a uniquely hostile environment compared to other mechanical systems. Unlike an automobile engine where oil circulates in a sealed system, your bike chain is completely exposed to road spray, dust, mud, and atmospheric moisture. Every rotation picks up microscopic particles that work their way between the inner and outer link plates, around the rollers, and into the pin bushings where they cause abrasive wear. This contamination mixes with existing lubricant to form a grinding paste that accelerates component degradation with every pedal stroke.
Chain lubrication serves multiple critical functions beyond simply reducing friction. The lubricant creates a protective barrier against moisture that would otherwise cause rust formation on the steel components. It allows the chain to articulate smoothly as it wraps around chainrings and cassette cogs, reducing energy losses that translate directly into watts you must produce. Proper lubrication also dampens noise, with a well-maintained chain producing a nearly silent operation compared to the characteristic grinding or squeaking of a neglected drivetrain. Studies conducted by friction testing laboratories have measured efficiency differences of 3-5 watts between optimally lubricated chains and those running dry or with contaminated lubricant.
- **Wear prevention**: Clean lubricant reduces metal-to-metal contact between pins, bushings, and rollers, preventing the elongation commonly called chain stretch
- **Corrosion protection**: Oil and wax barriers prevent oxidation that weakens chain components and causes surface pitting
- **Efficiency optimization**: Laboratory testing shows properly lubricated chains can be 98-99% efficient versus 95-96% for poorly maintained chains
Understanding Different Bike Chain Lubricant Types and When to Use Them
The cycling industry offers three primary categories of chain lubricant, each formulated for specific conditions and riding styles. Wet lubricants use heavier oil bases that cling tenaciously to chain surfaces and resist being washed away by rain or stream crossings. These products excel in wet, muddy conditions common during fall and winter riding or on mountain bike trails after rain. The trade-off is that wet lubes attract and hold more dirt particles, requiring more frequent cleaning to prevent the buildup of abrasive sludge.
Dry lubricants typically use lighter carrier fluids that evaporate after application, leaving behind a waxy or Teflon-based coating on the chain surfaces. These products attract far less dirt than wet lubes, keeping drivetrains cleaner in dusty summer conditions and on paved roads. The downside is reduced durability; dry lubes wash off easily in rain and may need reapplication every 100-150 miles compared to 200-300 miles for wet formulations. Ceramic-infused lubricants represent a premium subcategory that incorporates microscopic ceramic particles to fill surface imperfections and reduce friction further, though independent testing suggests the performance benefits over quality conventional lubricants are modest.
- **Wet lubricants**: Best for rain, mud, and winter conditions; requires frequent cleaning; examples include Finish Line Wet and Rock N Roll Gold
- **Dry lubricants**: Ideal for summer, dry trails, and road riding; cleaner running but less durable; examples include Finish Line Dry and Squirt
- **Wax-based lubricants**: Offer the cleanest operation with minimal dirt attraction; require more involved application process; examples include Silca Super Secret and Molten Speed Wax
Tools and Supplies Needed for Proper Chain Maintenance
Assembling the right tools before starting chain maintenance makes the process faster and more effective. At minimum, you need a quality chain lubricant appropriate for your conditions, clean rags or microfiber cloths, and a brush with stiff bristles for scrubbing. An old toothbrush works adequately for casual maintenance, though purpose-built brushes with stiffer bristles remove grime more efficiently. Many cyclists find that keeping dedicated chain cleaning supplies separate from household items prevents greasy contamination of other areas.
For thorough deep cleaning, additional tools significantly improve results. Chain cleaning devices that clamp around the chain and contain rotating brushes plus a solvent reservoir can remove contamination from between plates and around rollers without removing the chain from the bicycle. Degreaser formulated for bicycle use dissolves old lubricant and embedded grime without leaving residue that interferes with new lubricant adhesion. A chain wear indicator tool, available for under $15, takes the guesswork out of determining when your chain has stretched beyond acceptable limits and needs replacement. Latex or nitrile gloves protect your hands from chemicals and make cleanup considerably easier.
- **Essential supplies**: Chain lubricant, clean rags, stiff-bristled brush, degreaser
- **Recommended additions**: Chain cleaning device, chain wear checker, disposable gloves, work stand
Step-by-Step Guide to Clean Your Bike Chain Effectively
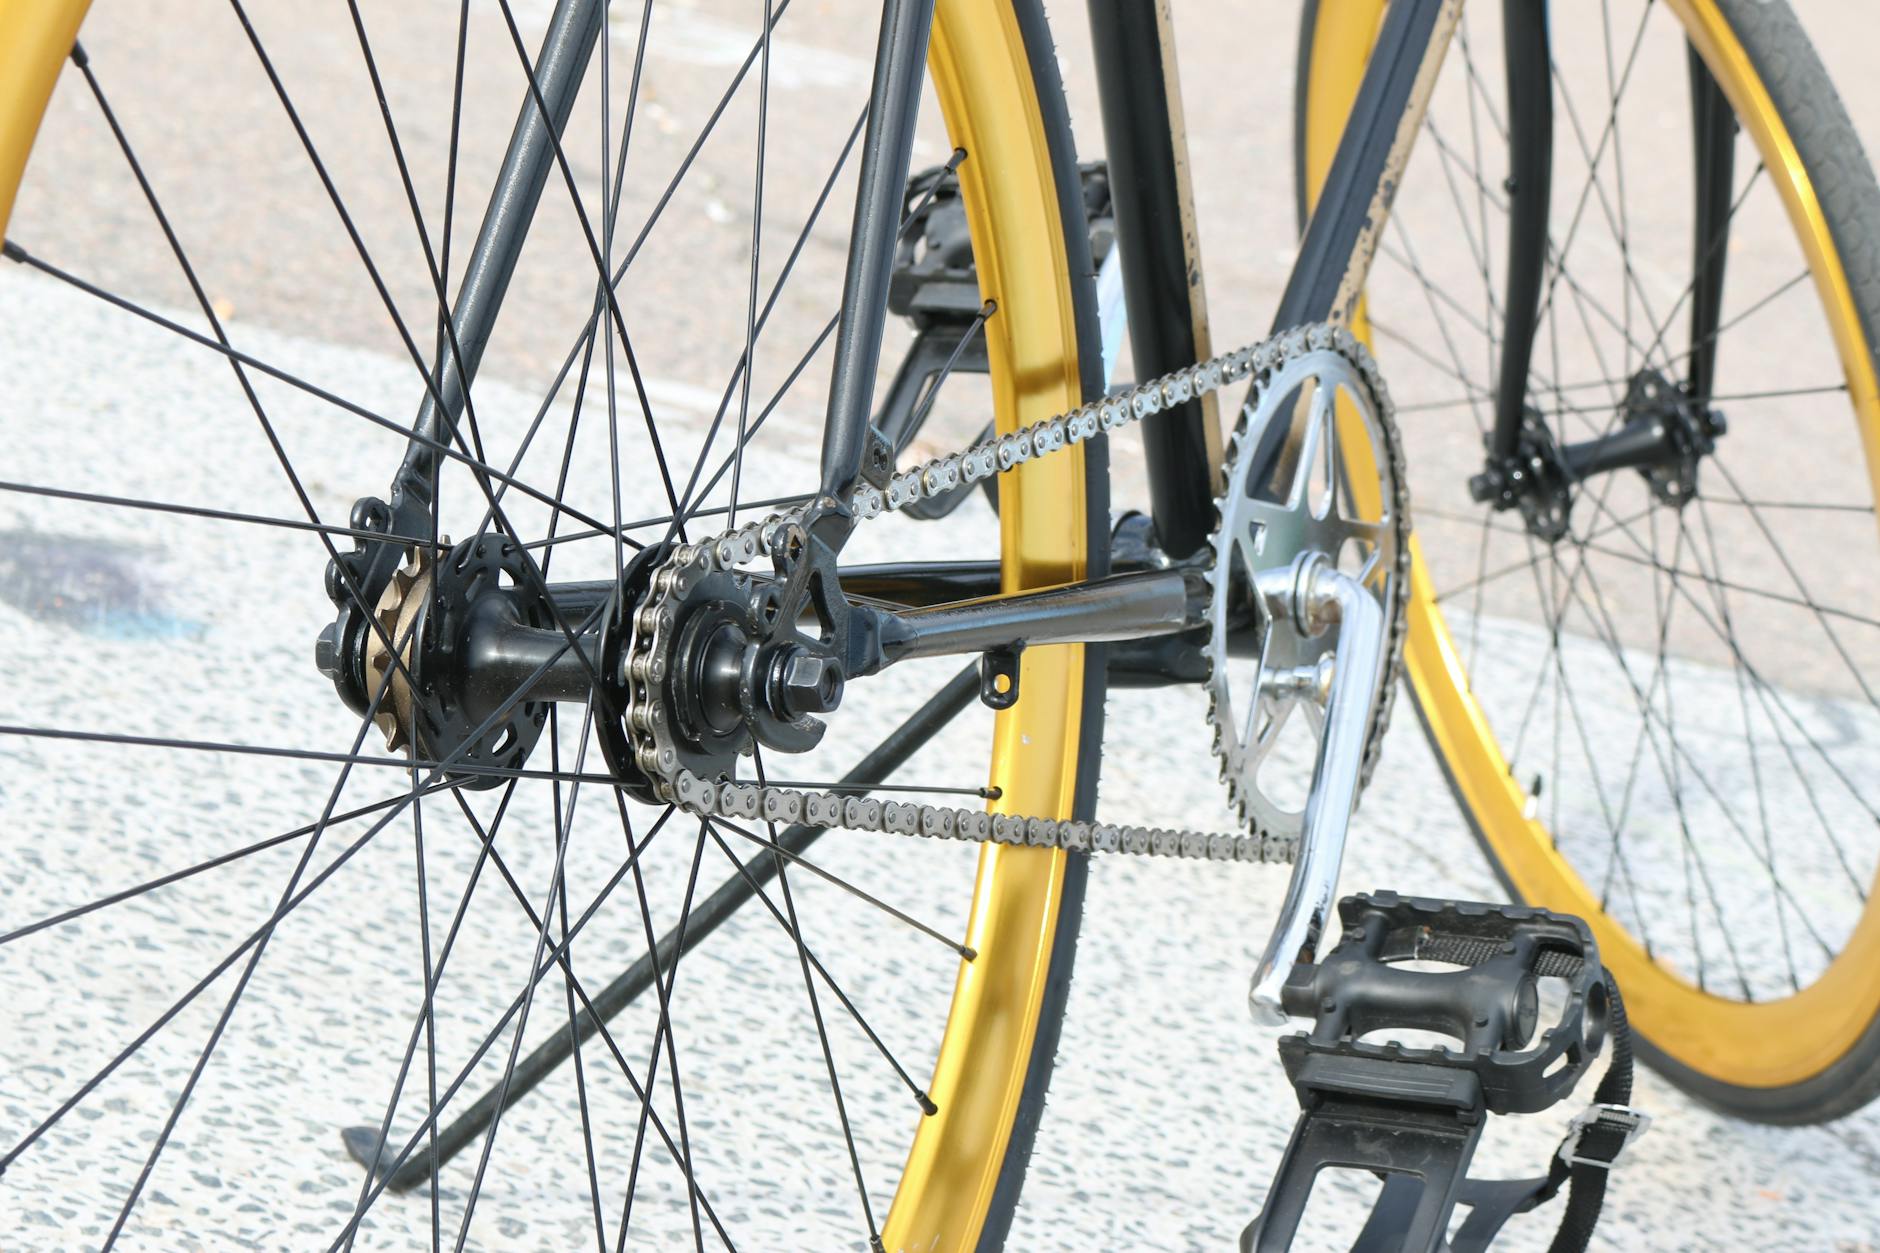
The cleaning process begins with an assessment of current chain condition. Spin the cranks backward slowly while watching the chain move through the rear derailleur. Look for stiff links that do not articulate smoothly, heavy grime buildup, or rust spots indicating moisture damage. Check chain wear using a chain checker tool; most tools indicate when the chain has elongated by 0.5% (time to replace soon) or 0.75% (replace immediately to protect cassette and chainrings). This initial inspection determines whether a quick wipe-down suffices or a complete degreasing is necessary.
For routine maintenance after dry rides, applying degreaser to a rag and running the chain through it while backpedaling removes surface contamination effectively. Rotate the rag to expose clean sections as each area becomes soiled. Follow with a dry rag to remove degreaser residue before applying fresh lubricant. This method takes approximately five minutes and should be performed every 100-200 miles or whenever the chain appears visibly dirty or sounds rough. The chain should feel smooth and show the underlying silver metal color rather than being coated in black grime.
- **Visual inspection**: Check for stiff links, excessive buildup, rust, and measure wear with a chain checker
- **Surface cleaning**: Apply degreaser to rag and run chain through while backpedaling; rotate to clean rag sections
- **Deep cleaning**: For heavily contaminated chains, use a chain cleaning device filled with degreaser and run through 20-30 full revolutions
- **Rinsing and drying**: Wipe thoroughly with clean dry rags; allow to dry completely before lubricating
Common Chain Lubrication Mistakes and How to Avoid Them
Over-lubrication ranks as the single most common mistake cyclists make when maintaining their chains. Excess lubricant does not provide additional protection; instead, it attracts more dirt and flings off onto frame tubes, rims, and brake surfaces during riding. The goal is to lubricate the internal moving parts of the chain—specifically the areas between pins and rollers—not to coat the exterior surfaces. After applying lubricant and allowing penetration time, always wipe off the excess from chain exteriors with a clean rag.
Using inappropriate lubricants creates problems that may not become apparent immediately. Household products like WD-40 (which is a penetrating solvent, not a lubricant), motor oil, or cooking oils either lack the staying power needed for cycling applications or attract excessive dirt. Motor oil in particular is far too heavy for bicycle chain use and collects debris rapidly. Some cyclists make the mistake of applying new lubricant over dirty chains, which simply traps contaminants against metal surfaces rather than addressing the underlying problem. Always clean before lubricating, even if time constraints only allow a quick wipe-down.
- **Over-application**: Using too much lubricant attracts dirt and creates mess without improving protection
- **Wrong products**: WD-40, motor oil, and cooking oils are not suitable chain lubricants
- **Lubricating dirty chains**: Applying fresh lubricant over grime traps contaminants against wear surfaces
- **Neglecting penetration time**: Lubricant needs several minutes to work into internal chain components before wiping off excess
Maintenance Frequency and Seasonal Chain Care Considerations
How often you need to clean and lubricate your bike chain depends on riding conditions, mileage, and lubricant type more than any fixed schedule. Road cyclists riding in dry conditions might go 200-300 miles between applications with a quality wet lubricant, while mountain bikers on dusty trails may need to clean and re-lubricate after every ride. Commuters who ride in all weather conditions typically benefit from establishing a weekly maintenance routine regardless of exact mileage covered. Seasonal changes demand adjustments to your maintenance approach.
Winter riding with road salt, rain, and slush requires more aggressive cleaning and heavier wet lubricants that resist being washed away. Summer conditions allow lighter dry lubricants that keep drivetrains cleaner but need more frequent reapplication. Transitioning between seasons provides an excellent opportunity for thorough deep cleaning before switching lubricant types. Many experienced cyclists perform a complete drivetrain cleaning including cassette and chainrings two to four times per year, with simpler chain-only maintenance between these deep cleans.
How to Prepare
- **Shift to middle chainring and middle cassette cog** to reduce chain tension and provide easier access to all chain sections; this position also keeps the chain away from the largest cogs where cleaning tools may not reach easily
- **Position the bicycle in a work stand or flip it upside down** resting on handlebars and saddle; a work stand provides the most convenient access, but inverting the bike works adequately for basic maintenance
- **Gather all necessary supplies within arm’s reach** including lubricant, degreaser, rags, brush, chain cleaning device if using one, and disposable gloves; having everything ready prevents interruptions mid-process
- **Lay down newspaper, cardboard, or an old towel** beneath the drivetrain to catch drips and overspray, protecting your floor or work area from degreaser and old lubricant
- **Inspect the chain visually and with a wear checker tool** to assess current condition and determine whether deep cleaning is needed; chains worn beyond 0.75% should be replaced rather than cleaned
How to Apply This
- **Apply one drop of lubricant to each roller** while slowly backpedaling, targeting the top of the chain where it runs between the cassette and rear derailleur; continue until you have completed the entire chain (approximately 110-116 links on most bikes)
- **Allow the lubricant to penetrate for 5-10 minutes** so it can work into the spaces between pins, bushings, and rollers; many lubricants become more effective after brief penetration time
- **Shift through all gears several times** to distribute lubricant across the full range of chainring and cassette cog contact surfaces; this also helps work the lubricant into internal chain components
- **Wipe off all excess lubricant from chain exteriors** using a clean dry rag while backpedaling; the chain should appear almost dry on the outside while remaining lubricated internally
Expert Tips
- **Mark your chain with a twist tie or spot of paint** at the master link or a specific point so you know when you have completed a full revolution during cleaning and lubricating; this prevents missing sections or double-applying lubricant
- **Store your lubricant bottle with the nozzle pointing up** and give it a good shake before each use, as some formulations can separate over time; clogged nozzles can be cleared with a thin wire or by briefly running under warm water
- **Clean and lubricate your chain the day before a ride rather than immediately before** to allow excess lubricant to work out and be wiped away; lubricating right before riding often results in lubricant spray on clothing and frame
- **Keep a small bottle of lubricant and a rag in your car or bike bag** for mid-ride emergencies; a squeaking chain can often be rescued with a few drops of lubricant applied during rest stops
- **Replace your chain proactively at the 0.5% wear mark** rather than waiting until 0.75%; the modest cost of an extra chain per year is far less than the cassette and chainring wear caused by running an elongated chain
Conclusion
Maintaining a clean, properly lubricated bike chain transforms your riding experience while protecting your investment in quality cycling components. The techniques covered in this guide—from understanding different lubricant types for various conditions to mastering proper application methods—require minimal time investment but deliver substantial returns in drivetrain longevity, shifting performance, and pedaling efficiency. A chain that receives regular attention can easily last twice as long as a neglected one, and the cassettes and chainrings it drives will similarly enjoy extended service life.
Building chain maintenance into your regular cycling routine becomes second nature after a few repetitions. Many cyclists find that a quick post-ride wipe-down followed by monthly deep cleaning strikes an effective balance between component protection and time expenditure. As you become more attuned to your drivetrain’s condition, you will naturally notice when the chain needs attention through changes in sound, shifting crispness, or visual appearance. This proactive approach to bicycle maintenance extends beyond the chain to inform how you care for all components, ultimately making cycling more reliable and enjoyable while reducing long-term maintenance costs.
Frequently Asked Questions
How long does it typically take to see results?
Results vary depending on individual circumstances, but most people begin to see meaningful progress within 4-8 weeks of consistent effort. Patience and persistence are key factors in achieving lasting outcomes.
Is this approach suitable for beginners?
Yes, this approach works well for beginners when implemented gradually. Starting with the fundamentals and building up over time leads to better long-term results than trying to do everything at once.
What are the most common mistakes to avoid?
The most common mistakes include rushing the process, skipping foundational steps, and failing to track progress. Taking a methodical approach and learning from both successes and setbacks leads to better outcomes.
How can I measure my progress effectively?
Set specific, measurable goals at the outset and track relevant metrics regularly. Keep a journal or log to document your journey, and periodically review your progress against your initial objectives.
When should I seek professional help?
Consider consulting a professional if you encounter persistent challenges, need specialized expertise, or want to accelerate your progress. Professional guidance can provide valuable insights and help you avoid costly mistakes.
What resources do you recommend for further learning?
Look for reputable sources in the field, including industry publications, expert blogs, and educational courses. Joining communities of practitioners can also provide valuable peer support and knowledge sharing.


