Understanding essential bike maintenance tips is the foundation of a safe, enjoyable, and cost-effective cycling experience. Whether you commute daily through city streets, tackle weekend trail rides, or train seriously for competitive events, the mechanical condition of your bicycle directly impacts your safety, performance, and the longevity of your investment. A well-maintained bike responds predictably, shifts smoothly, stops reliably, and rolls efficiently—qualities that become critically important when navigating traffic, descending steep grades, or simply trying to make it home before dark. Many cyclists, particularly those new to the sport, view bike maintenance as an intimidating technical domain best left to professional mechanics. While complex repairs certainly warrant expert attention, the reality is that 80 to 90 percent of routine maintenance tasks require only basic tools, minimal technical knowledge, and a willingness to get your hands slightly greasy.
Neglecting these fundamental tasks leads to accelerated component wear, unexpected mechanical failures, and repair bills that far exceed what preventive maintenance would have cost. A chain left uncleaned and unlubricated, for example, can wear out drivetrain components worth hundreds of dollars in a single season. This comprehensive guide covers everything from pre-ride safety checks to seasonal overhauls, providing the knowledge needed to keep your bicycle running smoothly year-round. You will learn how to identify problems before they strand you miles from home, which maintenance tasks to perform weekly versus monthly, what tools belong in every home workshop, and when a repair genuinely requires professional intervention. By the end, you will have the confidence to handle routine maintenance independently while understanding the limits of DIY repair.
Table of Contents
- What Bike Maintenance Should Every Cyclist Perform Regularly?
- Essential Tools for Home Bicycle Maintenance
- Drivetrain Care and Chain Maintenance for Cyclists
- Brake System Maintenance Tips for Safe Cycling
- Common Bike Maintenance Mistakes and How to Avoid Them
- Seasonal Bicycle Maintenance and Storage Considerations
- How to Prepare
- How to Apply This
- Expert Tips
- Conclusion
- Frequently Asked Questions
What Bike Maintenance Should Every Cyclist Perform Regularly?
Regular bike maintenance falls into three temporal categories: pre-ride checks that take less than a minute, weekly tasks requiring perhaps fifteen minutes, and monthly procedures that might demand an hour of focused attention. The pre-ride check—often called the ABC Quick Check—examines Air (tire pressure and condition), Brakes (lever engagement and pad wear), Chain (lubrication and stretch), and Quick releases or thru-axles (proper engagement). This thirty-second inspection catches the issues most likely to cause immediate problems during a ride. Weekly maintenance centers on cleaning and lubrication. A thorough wipe-down of the frame removes corrosive road grime, while chain cleaning and lubrication prevents the grinding wear that destroys drivetrains.
This is also the time to check tire wear and embedded debris, inspect brake pads for material thickness, and ensure all bolts remain appropriately torqued. Cyclists who ride in wet or dusty conditions should perform these tasks more frequently, as environmental contamination accelerates wear dramatically. Monthly maintenance expands to include cable tension adjustment, brake and derailleur alignment, wheel truing checks, and headset and bottom bracket inspections for play or roughness. Every three to six months, depending on mileage, the bike benefits from a deep clean that includes removing wheels, cleaning the cassette and chainrings individually, inspecting spoke tension, and checking frame and fork for cracks or damage. This periodic deep maintenance catches developing issues before they become ride-ending failures.
- **Pre-ride ABC Quick Check**: Air pressure, brakes, chain, quick releases—takes 30 seconds
- **Weekly cleaning and lubrication**: Chain, frame wipe-down, tire inspection—takes 15 minutes
- **Monthly system inspection**: Cables, brakes, derailleurs, wheel true, headset—takes 45-60 minutes

Essential Tools for Home Bicycle Maintenance
building a home maintenance toolkit need not require significant investment. A basic kit sufficient for 90 percent of routine maintenance tasks costs between fifty and one hundred dollars and fits in a small toolbox. The foundation includes a set of hex wrenches (Allen keys) in sizes from 2mm to 8mm, a Phillips and flathead screwdriver, tire levers, a patch kit, a floor pump with pressure gauge, and chain lubricant. These tools address the most common maintenance needs: adjusting seat height, tightening stem bolts, fixing flats, and keeping the drivetrain lubricated. Intermediate tools expand your capabilities considerably. A chain wear indicator (checker) reveals when replacement is needed before expensive cassette damage occurs. A torque wrench prevents the overtightening that cracks carbon components and strips aluminum threads.
Cable cutters produce clean cuts that feed smoothly through housing. A chain breaker allows chain removal for deep cleaning or replacement. A spoke wrench enables minor wheel truing. Together, these tools—adding perhaps another fifty to seventy-five dollars—enable handling most repairs that would otherwise require a shop visit. Advanced tools enter the territory of specialized equipment that makes sense primarily for dedicated home mechanics or those maintaining multiple bikes. This category includes bearing presses, bottom bracket tools, headset presses, wheel truing stands, cassette lockring tools, and chain whips. While these tools enable complete self-sufficiency, the investment often exceeds two hundred dollars and requires storage space. Most recreational cyclists find that owning basic and intermediate tools while occasionally visiting a shop for specialized tasks represents the optimal balance.
- **Basic toolkit ($50-100)**: Hex wrenches, screwdrivers, tire levers, pump, patch kit, chain lube
- **Intermediate tools ($50-75)**: Chain checker, torque wrench, cable cutters, chain breaker, spoke wrench
- **Advanced equipment ($200+)**: Bearing presses, truing stand, specialized component tools
Drivetrain Care and Chain Maintenance for Cyclists
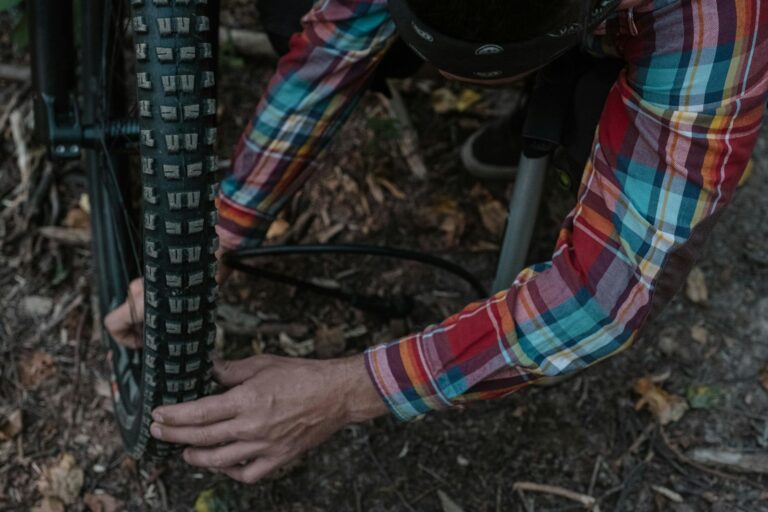
The drivetrain—comprising the chain, cassette, chainrings, and derailleurs—represents both the heart of your bicycle’s propulsion system and its most maintenance-intensive component group. A clean, well-lubricated chain transfers power efficiently, shifts smoothly, and wears slowly. A neglected chain grinds itself and mating components into expensive oblivion. Studies by chain manufacturers suggest that proper lubrication can extend chain life by 300 to 400 percent compared to running dry, while also dramatically reducing cassette and chainring wear. Chain cleaning frequency depends entirely on riding conditions. Road cyclists in dry climates might clean and lubricate every 200 to 300 miles, while mountain bikers in muddy conditions may need attention after every ride.
The cleaning process involves wiping the chain with a rag to remove surface contamination, optionally using a chain cleaning device with degreaser for thorough cleaning, allowing complete drying, and then applying lubricant to each roller while slowly rotating the cranks backward. After lubricant application, let it penetrate for a few minutes, then wipe excess from the chain’s exterior—excess lubricant attracts dirt and accelerates wear. Chain wear measurement determines replacement timing. As chains wear, they elongate (stretch), and this elongation causes accelerated wear on cassette cogs and chainring teeth. A chain wear tool measures this elongation: replacement at 0.5 percent wear allows cassette reuse, while waiting until 0.75 percent or 1 percent wear typically means the cassette needs simultaneous replacement. Given that chains cost fifteen to forty dollars while cassettes range from thirty to over two hundred dollars, timely chain replacement represents excellent preventive economics.
- **Cleaning frequency**: Every 200-300 miles for road; after every ride in muddy conditions
- **Replacement timing**: At 0.5% wear to preserve cassette; waiting longer requires cassette replacement

Brake System Maintenance Tips for Safe Cycling
Brake systems demand attention because their failure creates immediate safety hazards. Modern bicycles use either rim brakes (caliper, cantilever, or V-brake designs that grip the wheel rim) or disc brakes (mechanical or hydraulic systems using a rotor mounted to the hub). Each system has specific maintenance requirements, but both share fundamental inspection points: pad wear, cable or hydraulic line condition, and proper alignment. Rim brake maintenance begins with pad inspection. Most pads include wear indicator grooves that disappear as material depletes—replace pads before these grooves vanish completely. Pad alignment matters critically: the pad must contact the rim squarely, not the tire, and many riders prefer slight toe-in where the pad’s leading edge contacts first to prevent squealing.
Cable tension determines lever feel and stopping power; cables stretch over time and require periodic adjustment at the barrel adjuster or anchor bolt. Rim brakes also demand clean braking surfaces—contamination from road grime or lubricant overspray reduces stopping power dramatically. Disc brake maintenance differs significantly. Brake pads in disc systems wear down to a metal backing plate; replacement is needed when pad material reaches 1-1.5mm thickness. Rotors also wear and should be replaced when thickness drops below manufacturer minimums, typically 1.5mm to 1.8mm. Hydraulic disc brakes require periodic bleeding to remove air bubbles from the system—a procedure most home mechanics can learn but that requires specific tools and fluid. Contaminated disc brake pads (from oil, lubricant overspray, or even finger oils) often cannot be cleaned and must be replaced, making careful lubricant application near disc brakes essential.
- **Rim brake pads**: Replace when wear indicator grooves disappear; check alignment to rim
- **Disc brake pads**: Replace at 1-1.5mm remaining material; avoid contamination
- **Hydraulic systems**: Bleed annually or when lever feels spongy
Common Bike Maintenance Mistakes and How to Avoid Them
Even well-intentioned maintenance efforts can damage bicycles when performed incorrectly. Over-torquing bolts ranks among the most common and consequential errors. Carbon fiber components are particularly vulnerable—exceeding torque specifications can cause invisible damage that leads to sudden catastrophic failure. Using a torque wrench for stem bolts, seatpost clamps, and handlebar clamps is not optional on carbon bikes. Even on aluminum and steel bikes, over-torqued bolts strip threads and crack components. Conversely, under-torqued bolts work loose during rides, potentially causing handlebars to slip or seats to rotate unexpectedly. Lubrication errors create surprisingly serious problems. Using wrong lubricants tops the list: WD-40 and similar penetrating oils are not chain lubricants and actually displace proper lubricants while attracting dirt.
Over-lubricating leaves excess that attracts grime and accelerates wear. Lubricant overspray onto brake surfaces—whether rim or disc—contaminates braking function and often requires pad replacement. The proper technique applies lubricant sparingly to chain rollers only, allows penetration time, and wipes all excess from external surfaces. Neglecting to check torque specifications causes problems across experience levels. Different manufacturers specify different torque values for seemingly identical applications. A 5Nm specification for one stem does not mean all stems use 5Nm. Before tightening any bolt, verify the specification—often printed on the component itself, available in product documentation, or findable on manufacturer websites. When specifications cannot be found, general guidelines exist (4-6Nm for small bolts, 8-10Nm for saddle rails, 5-7Nm for stem bolts), but these remain approximations that may not suit specific components.
- **Over-torquing**: Causes cracks, stripped threads, and sudden failures; use a torque wrench
- **Wrong lubricants**: WD-40 is not chain lube; use cycling-specific products
- **Specification ignorance**: Always verify torque specs for each specific component

Seasonal Bicycle Maintenance and Storage Considerations
Seasonal changes and storage periods create specific maintenance demands. Before winter storage, perform a thorough cleaning to remove corrosive residues, lubricate the chain and all pivot points, inflate tires to maximum pressure (to prevent flat-spotting), and if possible, hang the bike or place it in a stand rather than resting it on tires. For hydraulic brake systems, avoid storing bikes upside down for extended periods, as air bubbles can migrate into the caliper. Cover the bike to prevent dust accumulation, and store in a climate-controlled space if possible—extreme cold degrades rubber components and freezes hydraulic fluid in some cases.
Spring revival requires systematic inspection after storage dormancy. Check tire pressure and sidewall condition, squeeze brake levers to ensure firm engagement, shift through all gears to verify cable integrity, and spin wheels to check for bearing roughness or wheel true deviation. Bounce the bike lightly to listen for unusual sounds indicating loose components. Test ride in a safe area before venturing into traffic, checking braking power and shifting precision. Winter storage often reveals issues that were developing before the storage period began, making this inspection particularly important.
- **Winter storage**: Clean thoroughly, lubricate, maximize tire pressure, store hanging or in stand
- **Spring inspection**: Full ABC check, test ride in safe area, address any issues before regular riding
How to Prepare
- **Establish a clean, well-lit workspace** with room to move around the bicycle and access all components. A bike repair stand elevates the bike for comfortable working height and allows wheels to spin freely, though hanging the bike from ceiling hooks or leaning it against a wall works for basic tasks. Lay down a drop cloth or cardboard to catch lubricant drips and protect your floor.
- **Gather all required tools and supplies** before starting work. Nothing disrupts maintenance flow like stopping mid-task to search for a forgotten tool. Consult your planned maintenance checklist and verify each required tool is present and functional. Keep rags, degreaser, lubricant, and cleaning supplies within arm’s reach.
- **Review procedures for unfamiliar tasks** using manufacturer documentation, reputable online resources, or instructional videos. Understanding each step before beginning prevents mistakes and builds confidence. Take note of torque specifications, compatibility requirements, and any special techniques the task demands.
- **Clean the bicycle before detailed work** because maintenance performed on a dirty bike introduces contamination into bearings and mechanisms. A simple wipe-down with a damp rag removes most surface grime; more thorough cleaning uses dedicated bike wash or diluted dish soap, avoiding high-pressure water that forces contaminants into bearings.
- **Document the starting configuration** for any adjustment work. Photograph derailleur positions, measure saddle height, note cable tension before changes. This documentation enables restoration if adjustments go wrong and creates a baseline for future reference.
How to Apply This
- **Implement the pre-ride ABC Quick Check consistently** before every ride until it becomes automatic habit. This thirty-second investment catches the problems most likely to cause mid-ride failures or safety hazards. Check air pressure with a squeeze test (or gauge for precision), squeeze both brake levers to verify solid engagement, visually inspect the chain for lubrication, and confirm quick releases or thru-axles are properly secured.
- **Schedule weekly maintenance sessions** on your calendar with the same priority as workouts or appointments. Consistency matters more than duration—a reliable fifteen-minute weekly session maintains your bicycle better than sporadic hour-long efforts. Use this time for chain cleaning and lubrication, frame wipe-down, tire inspection, and brake pad wear assessment.
- **Track maintenance activities and component mileage** using a simple spreadsheet, notebook, or cycling app. Record chain installations, brake pad replacements, tire changes, and any adjustments or repairs. This history reveals wear patterns, helps predict replacement timing, and provides valuable information if problems develop or the bike is sold.
- **Build skills progressively** by tackling slightly more challenging tasks as confidence grows. Master flat repair before attempting wheel truing. Understand cable tension adjustment before tackling derailleur alignment. Each successful maintenance task builds mechanical intuition and reveals how bicycle systems interconnect.
Expert Tips
- **Clean your chain with a rag after every ride** while applying lubricant only every few rides depending on conditions. This approach removes surface contamination continuously while avoiding over-lubrication that attracts dirt. The chain should look clean and feel slightly oily, never gunky or dripping.
- **Invest in a quality floor pump with an accurate pressure gauge** rather than relying on mini-pumps or gas station compressors. Correct tire pressure—which varies by tire width, rider weight, and terrain—dramatically affects comfort, grip, rolling resistance, and flat prevention. Check and adjust pressure before every ride.
- **Learn to true wheels and adjust derailleurs through deliberate practice** using resources like Park Tool’s instructional videos or Sheldon Brown’s classic guides. These skills eliminate the two most common shop visits for routine maintenance issues and provide deep understanding of how your bicycle functions.
- **Store your bike indoors whenever possible** because temperature swings, UV exposure, and moisture accelerate component degradation significantly. Even a covered garage provides better protection than outdoor storage. If outdoor storage is unavoidable, use a fitted bike cover and check the bike more frequently.
- **Replace cables and housing annually for bikes ridden regularly** even if they appear functional. Cable stretch and housing compression cause subtle performance degradation that riders often attribute to component wear. Fresh cables transform shifting and braking feel dramatically, and the replacement cost remains modest compared to component replacement.
Conclusion
Mastering essential bike maintenance tips transforms the relationship between cyclist and machine from mysterious dependency into confident partnership. The knowledge to perform pre-ride safety checks, maintain drivetrain cleanliness, ensure brake reliability, and recognize developing problems before they strand you miles from home represents genuine empowerment. These skills accumulate quickly with practice, and each successful maintenance task builds toward comprehensive mechanical self-sufficiency.
Beyond the immediate practical benefits, regular maintenance creates intimate familiarity with your bicycle’s specific characteristics and condition. You learn how your chain sounds when properly lubricated versus contaminated, how your brakes feel when pads are fresh versus worn, how your shifting responds when cables are tensioned correctly versus stretched. This awareness extends into your riding, providing early warning of developing issues and confidence that your equipment will perform when needed. The time invested in maintenance returns dividends in safety, performance, reliability, and the simple satisfaction of riding a bicycle that works exactly as it should.
Frequently Asked Questions
How long does it typically take to see results?
Results vary depending on individual circumstances, but most people begin to see meaningful progress within 4-8 weeks of consistent effort. Patience and persistence are key factors in achieving lasting outcomes.
Is this approach suitable for beginners?
Yes, this approach works well for beginners when implemented gradually. Starting with the fundamentals and building up over time leads to better long-term results than trying to do everything at once.
What are the most common mistakes to avoid?
The most common mistakes include rushing the process, skipping foundational steps, and failing to track progress. Taking a methodical approach and learning from both successes and setbacks leads to better outcomes.
How can I measure my progress effectively?
Set specific, measurable goals at the outset and track relevant metrics regularly. Keep a journal or log to document your journey, and periodically review your progress against your initial objectives.
When should I seek professional help?
Consider consulting a professional if you encounter persistent challenges, need specialized expertise, or want to accelerate your progress. Professional guidance can provide valuable insights and help you avoid costly mistakes.
What resources do you recommend for further learning?
Look for reputable sources in the field, including industry publications, expert blogs, and educational courses. Joining communities of practitioners can also provide valuable peer support and knowledge sharing.